
3.2 Installing the Required Mekorma Files
3.3 Grant Security Access to Alternate Windows from Dynamics GP
3.4 Enabling the Checkbook Customization
3.4.1 Integrating the Customization with a Checkbook
This document describes Pre-Requisites and the configuration steps required to connect Mekorma with PaperSave ReCapture.
This customization allows users to create a payment number string that will print using a bar code font for PaperSave Forms Recapture. This string field is available as a new field in the Mekorma Configurator called the Check Data::Bar Code Payment Number.
This field is in the Check Data category and can be added to the check stub using the same process as other MICR fields. After adding the field to the check layout, you can change the font so that it will print as a bar code.
|
Note: This document is prepared by taking in consideration that you are using Dynamics GP 2018 or 2018 R2 and PaperSave on Cloud. |
PaperSave Recapture Installation
The PaperSave ReCapture plugin is deployed onto your PaperSave Application Server. Follow the steps available here, if not previously installed. PaperSave Support will provide the download link for PaperSave ReCapture.
Mekorma Installation
Mekorma MICR must be installed and configured before using the customization.
Software Download Package
Please click here to download the Software Package. Download the .zip file. Right click on the zip file>> Choose Properties>> Click on Unblock >> Click on OK. Then, unzip the file by right clicking the file and selecting Extract All and the Extract button. Instructions in the coming topics will reference the files in this new folder.

Software Package will include the following files. Check with PaperSave Support if you have any questions.
· 5954V186.cnk file
· MekormaCustom5954.xml file
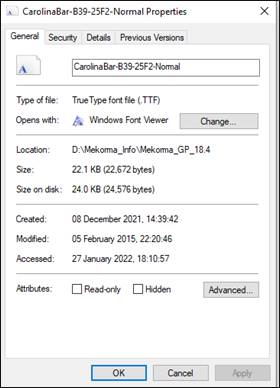
· CarolinaBar-B39-25F2-Normal.TTF
· MekormaPaperSave.dll
· MekormaPaperSave_Register.bat
· Configuration Guide to connect Mekorma with PaperSave ReCapture
|
Note: You can also download the software package for your Dynamics GP version from the following table:
|
The following steps must be followed one time at each Client Workstation using Mekorma MICR.
Ø Log-out of Dynamics GP on the workstation.
Ø Log-into the server/workstation using an account that is in the local Administrator’s group on the machine.
Ø Make sure Dynamics GP is not running.
Ø Navigate to your Dynamics GP installation data directory (Example: C:\Program Files\Microsoft Dynamics\GP 2018Data) and edit the Dex.ini file using Notepad. Add the following highlighted lines at the end of the file:
PaperSaveDocumentType=XXX
(Replace XXX with the Document Type ID value from the SQL Query in the previous step. Example for Payments Documentation: PaperSaveDocumentType=164)
PaperSaveEFTDocumentType=XXX
(Replace XXX with the Document Type ID used for EFT Remittances. This can be the same as the Payments Documentation or you may have another Document Type ID.)
PaperSaveRootURL=https://ServerName:Port/
(Replace Server Name: Port with the Server Name and Port No. where PaperSave Application is installed. For Example, http://HPSDEV49.soldev.com:4787/)
Enter PaperSaveUseDll=TRUE into the Dex.ini file.
|
NOTE: Please type these values. Do not Copy & Paste. Copying and Pasting the values have been known to cause issues. |
Ø Save the Dex.ini file and exit Notepad.
Mekorma MICR must be installed and configured before using this customization.
1. Install and Register DLL
· Copy the MekormaPapersave.dll and MekormaPapersave_Register.bat files to the root folder of Dynamics GP 2018. Example: C:\Program Files\Microsoft Dynamics\GP2018.
· Launch the Command window and run as Administrator.
· Change the directory to the root folder of Dynamics GP 2018. Example: C:\Program Files\Microsoft Dynamics\GP2018.
· Run the batch file by typing ‘MekormaPaperSave_Register’ and press Enter key.
· Close the Command.
|
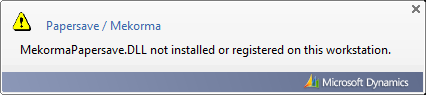
Note: If the registration command fails after installing the chunk and logging into Great Plains (GP), the message below will appear several times. |
2. Installing the Chunk File and related files
· Copy the MekormaCustom5954.xml file to the Mekorma MICR\Configurator\Fields folder of your Dynamics GP 2018 directory. Example: C:\Program Files\Microsoft Dynamics\GP2018\Mekorma MICR\Configurator\Fields
· Copy the 5954V186.cnk file to your Dynamics GP 2018 directory. Example: C:\Program Files\Microsoft Dynamics\GP2018
· After copying the file, launch Microsoft Dynamics GP. You see a dialog box like the following:
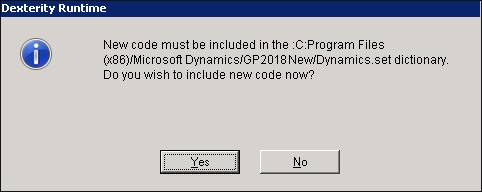
3. Click Yes to include the new code.
Follow the below steps to grant access to the alternate windows:
|
Note: To provide security access, you must login to Dynamics GP as a System administrator of the application. |
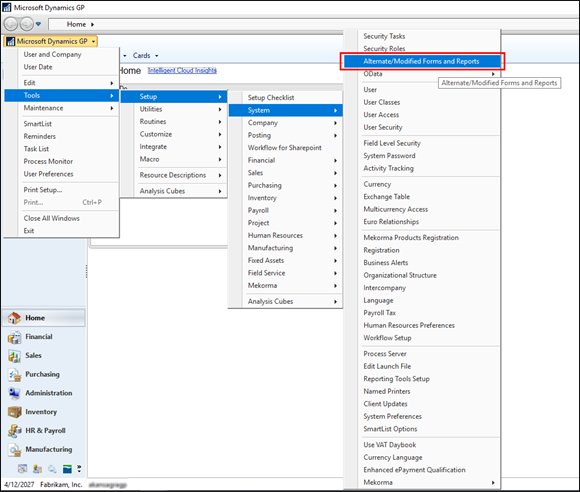
1. Log in to Dynamics GP and click on the drop-down menu as shown below.

2. Navigate to Tools > Setup > System and click on the Alternate/Modified Forms and Reports option in the menu as shown in the below screen.
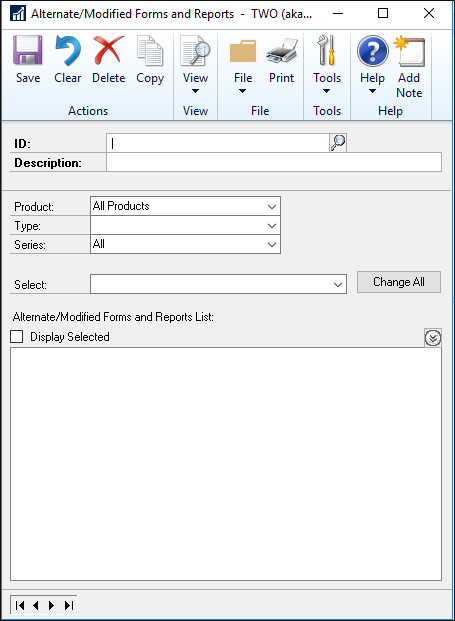
3. Now, it will open the Alternate/Modified Forms and Reports window as shown below.
4. Click on the search icon to lookup the Alternate/Modified Forms and Reports ID and enter the following values in the respective fields as shown in the below screen:
Product: Mekorma MICR
Type: Windows
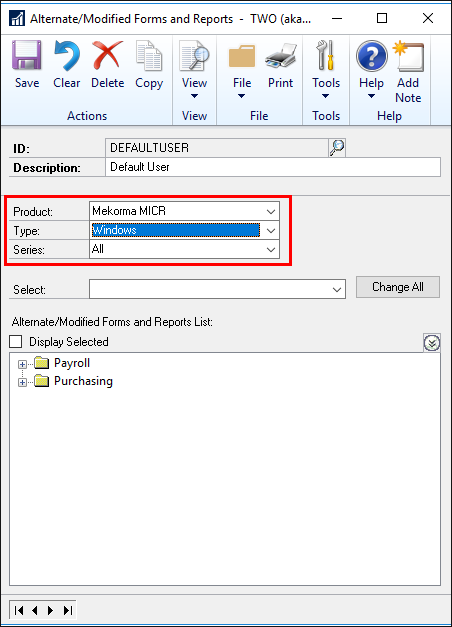
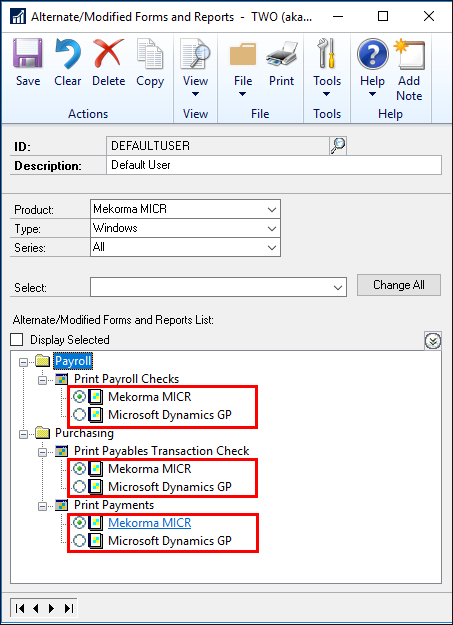
5. From within the Alternate/Modified Forms and Reports List section, expand the folders using the '+' symbol and validate that the Mekorma MICR is selected.
|
Warning: If the default Microsoft Dynamics GP is selected, the checks will print without any barcode. |
6. Click on the “Save” option in the top toolbar to save your changes for the selected ID.
7. Now, repeat the process from steps 4 to 6 to grant access to your desired IDs in Dynamics GP.
This section provides information on the following topics:
· Integrating the Customization with a Checkbook
· Using the New Fields
· Technical Support
|
NOTE: This step only must be executed once per Checkbook ID for each Dynamics GP Instance (Once in Production, and in Development, if applies). |
Because the Mekorma MICR Connector for PaperSave customization uses additional resources during check printing, you should only enable it for those checkbooks, which will use the functionality.
To integrate the customization with a checkbook:
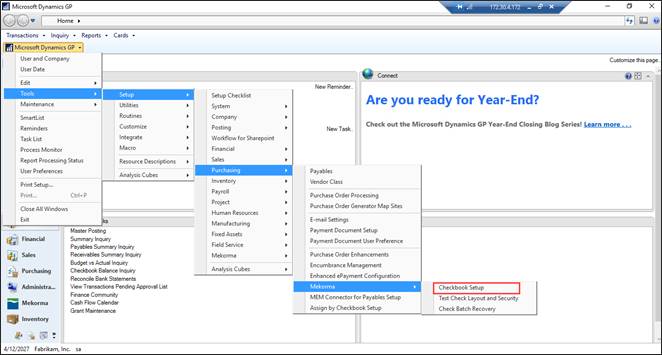
1. Open Dynamics GP and select Tools>> Setup>> Purchasing>> Mekorma>>Checkbook Setup as shown below.
2. Now, a Mekorma Checkbook Setup dialog box appears as shown below.
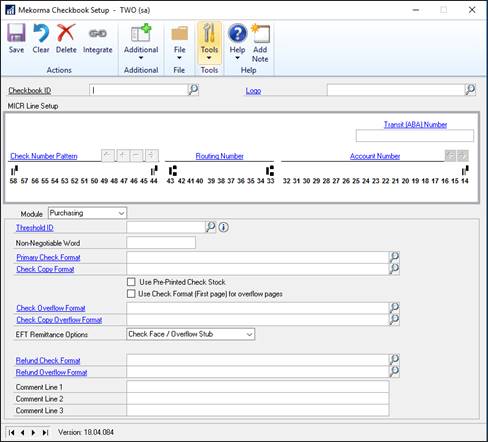
3. Enter or select the Checkbook ID for which you wish to enable the customization.

4. If this Checkbook will use GP ‘s Process Payable Remittance to print the EFT Remittance Form, you can enable Mekorma integration with the PaperSave barcode by performing Step 4. Otherwise, proceed with Step 5.
· Select the drop-down option on the EFT Remittance Options line as shown below:
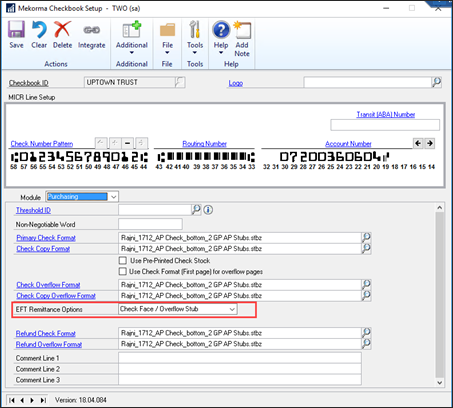
Ø Now, select Check Face / Overflow Stub option from the drop-down list.

Note: By default, Check Face / Overflow Stub option is selected.
5. Select Integrate from the top toolbar as shown below.
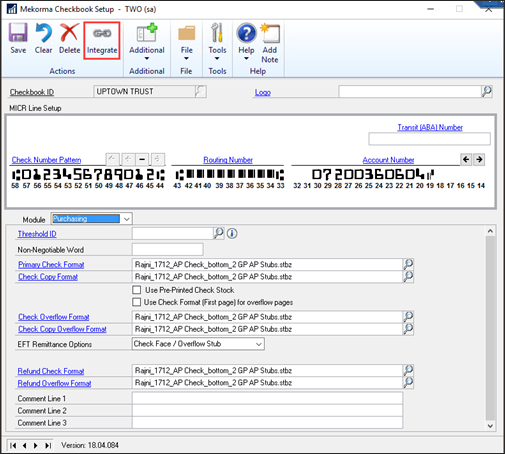
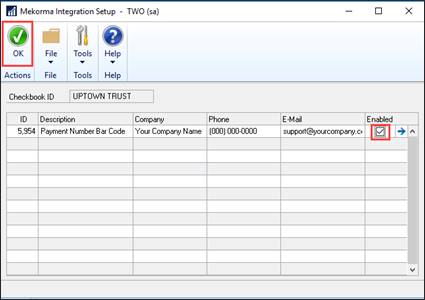
6. You see the Mekorma Integration Setup dialog box appears as shown below.
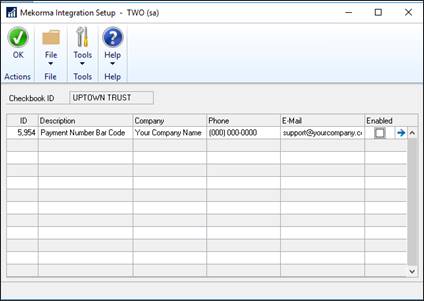
7. Check the Enabled checkbox to the right of Payment Number Bar Code and click the OK button to launch the Integration Options screen.
8. On the Integration Options dialog box, check the End Payables Document option as shown below:
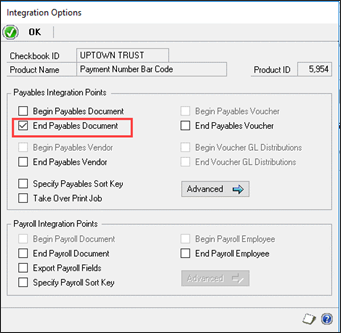
9. Click on OK to close the screen and on OK again to close the Mekorma Integration Setup screen.
10. Click on Save on the Mekorma Checkbook Setup dialog box to finish enabling the integration for the selected checkbook.
11. Repeat these steps for each checkbook that will be using the customization.
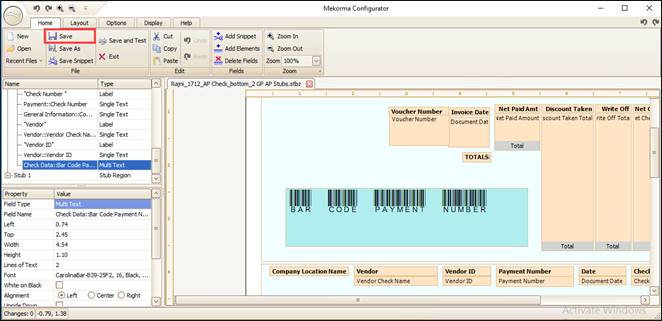
After integrating the customization with a checkbook, the Check Data::Bar Code Payment Number field is available in the Check Data category of the Mekorma Configurator for placement on the stub layout.
1. Open Dynamics GP and select Tools>> Setup>> Purchasing>> Mekorma>>Checkbook Setup as shown below.
2. Now, a Mekorma Checkbook Setup dialog box appears as shown below.
3. Now, select the Checkbook ID and click on Primary Check Format hyperlink.
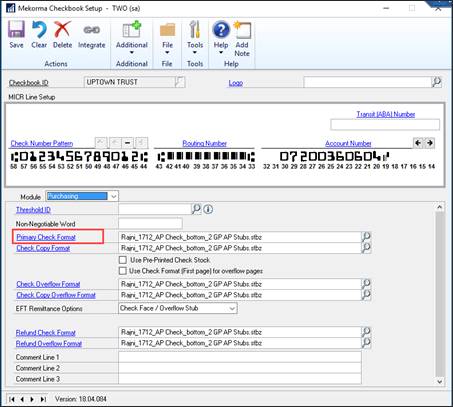
4. Now, Mekorma Configurator Wizard appears as shown below.
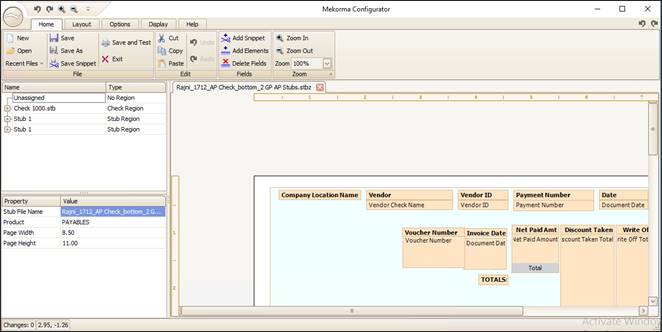
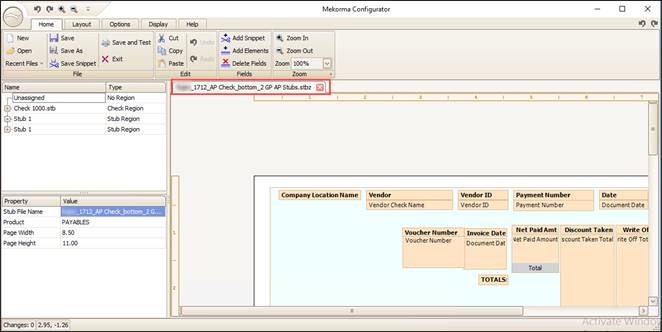
5. Now, select check format (. stbz file) on which you want to add Recapture barcode.
6. Now, click on Add Elements button.
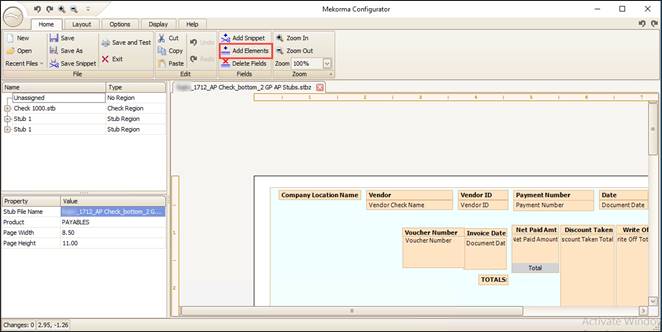
7. Now, expand Check Data and select Bar Code Payment Number.

8. Drag and drop the Bar Code Payment Number to the Check Stub region and position it to give as much real estate as possible (width).
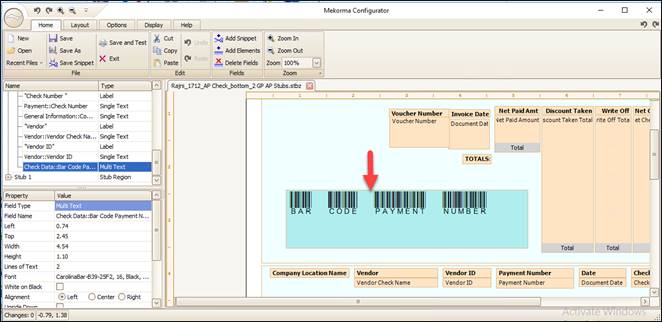
9. Now, set the Font to CarolinaBar-B39-25F2 and Font Size as 12 on the Bar Code Payment Number.
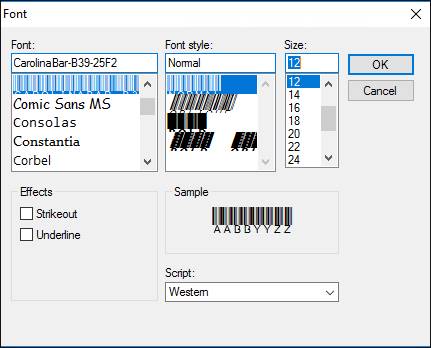
10. Change the font to use the Carolina Barcode 3 of 9, Normal, 12 size.
|
Tip: If the B39-25F2 font is not in the list of fonts, download from http://downloads.papersave.com/Support/Tools/CarolinaBar-B39-25F2-Normal.TTF |
Ø Save to the desktop, right click on the file and select Properties>> Unblock>> Apply>> OK.
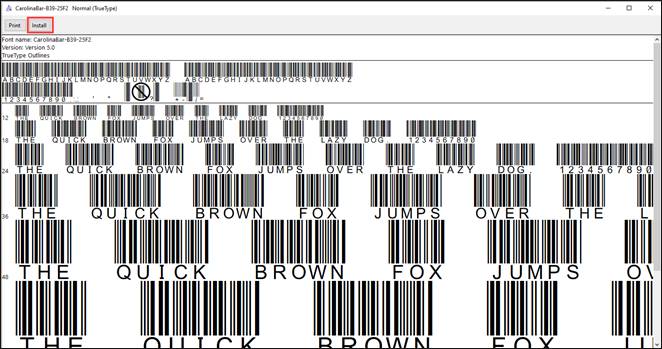
11. Navigate to Start>> All Programs>> Control Panel>> Fonts and drag the unblocked font file into this Fonts window.
|
Tip: Make sure the barcode field is fully visible; widen the field width to allow room to grow. The field cannot be truncated or obstructed in any way. |
12. Select Home Tab>> Save from Mekorma Configurator wizard and then, save and select the modified check (. stbz) file and then save the Checkbook ID in Mekorma Checkbook Setup dialog box.
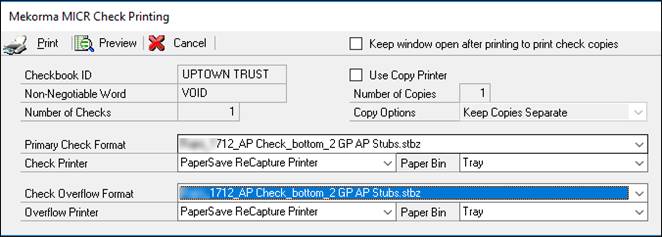
13. Print check from Microsoft GP.
|
Note: the ‘Test Layout’ in the Mekorma Checkbook Setup dialog will not print the PaperSave barcode. You must print an actual check to validate the barcode. |
· Confirm the Checkbook ID and Primary Check Format is the same selection as configured in the previous steps.
For 7x, Follow the below steps to add the generated file to PaperSave
i. Scan the check from the Acquire Area>>A ScanLater/Recapture stack>>Next.
ii. Add the check file using drag and drop or select file to upload method.
iii. After selecting the batch click on OK.
iv. Once the check(barcode) file is validated, it will open the Page manipulation view.
v. Now, you can also attach more pages to the check file and then click on Submit from the toolbar of the item list to submit the document to the respected Dynamics GP record.
vi. You can validate the submitted file from the Browse Area.
For 6x, you can scan the check using the PaperSave ScanLater preset button on your scanner.
i. Allow a minute or two, and then verify the Payment Document is related to the GP Payment Transaction.
· Inquire on the Payment Transaction, select Additional >> Show Documents from the toolbar to view the Payment Documentation
· If the document is not there, logon to the PaperSave BatchScanning Server
· Check to see if the PaperSave BatchScanning Service has stopped and needs to be restarted, by selecting Start >> Run >>services.msc.
· Check the Event Viewer for any Error messages, by selecting Start>> Run>> eventvwr.
· Confirm the values of the barcode are correct by reviewing the item above
ii. Allow a minute or two, and then verify the Payment Document is related to the GP Payment Transaction.
iii. Inquire on the Payment Transaction, select Additional >>Show Documents from the toolbar to view the Payment Documentation.
iv. If the document is not there, logon to the PaperSave BatchScanning Server
· Check to see if the PaperSave BatchScanning Service has stopped and needs to be restarted, by selecting Start >>Run >>services.msc.
· Check the Event Viewer for any Error messages, by selecting Start > Run > eventvwr.
|
Tip: Each New Checkbook must be set up following the Enabling the Customization section of this document, even when using the same Check layout from another instance (company). |
Configuring Additional Checkbook IDs
Each Checkbook ID must be setup one time per GP Instance (Company).
Follow the steps in the Integrating the Customization with a Checkbook section of this document. Confirm that the Check Face used for the Checkbook ID already has the PaperSave Barcode in the check stub. If not, follow the steps in the Using the New Field section of this document.
Configuring Client Workstations (New/Additional/Upgrade GP)
If you want to configure Mekorma with PaperSaveCloudTM on some other Client Workstation of Dynamics GP, then you need to follow the same steps described in the above sections.
|
Note: Please take a note that one of the Pre-requisite topic defined here should not be repeated for the same Tenant of a different Client Workstation. |
Make sure the client machine has the Carolina Barcode font installed:
· Navigate to Start>> All Programs>> Control Panel>> Fonts
· Locate the CarolinaBar-B39-25F2 Font
· If you do not see the font, click here to download the font: http://downloads.papersave.com/Support/Tools/CarolinaBar-B39-25F2-Normal.TTF
· Save to the desktop, right click the file, and select Properties>> Unblock>> Apply>> OK.
· Left-click on the font file and drag the unblocked font file into the Fonts window, then release.
· Double-click on the font to view the Font.
· If the Install button appears in a black font, click the button to Install
Updating GP Version?
There are specific files for each version of Dynamics GP.
If you want to upgrade to a newer version of GP, contact support on https://support.pairsoft.com/ and provide the version to which you want to upgrade and request the latest files and User Guide.
For Mekorma support assistance, you can visit our website at www.mekorma.com and click on the Support page to submit an online support request, or you can call our Technical Support department at 888-MEKORMA (635-6762), Extension 3. Mekorma provides free technical support as part of the Mekorma annual enhancement plan.
For PaperSave support assistance, contact support on https://support.pairsoft.com/. Include as much information as possible, including screen shots and any error messages. This will be used to create a New Case. You can also call PaperSave Support at 877-727-3799.