|
Multiple Document Display - Home Tab |
  
|
| Show/Hide Hidden Text |
|
Multiple Document Display - Home Tab |
|
| Show/Hide Hidden Text |
Let us understand all the options under each group of Home tab one by one.
 |
| Click on image to magnify/shrink |
Document Operations: (This group will not be available in the ribbon if the selected document is Microsoft Office Document)
1. Find: This option is used to search a Keyword in a searchable PDF document. Clicking on Find button will open the Find text-box as displayed below. You can enter the desired keyword that you want to search in the document and hit Enter key. Search result will be highlighted in the document. To navigate to next search result, again hit Enter key or else use "Next" & "Previous" arrow icons available within the Find text-box. You can hit Escape key or click on Cross icon to close the Find Text-box.
Note: |
||||||
|
![]()
2. Zoom In: This option will magnify the selected document for better readability.
3. Zoom Out: This option will shrink the display size of the selected document.
4. Rotate Left: This option will rotate the document to the left by 90 degrees.
5. Rotate Right: This option will rotate the document to the right by 90 degrees.
6. Mirror: This option will create a mirror image of the document being displayed.
7. Dynamic Zoom: This option will zoom in/out just by left-clicking the mouse and moving the mouse upward/downward to perform the zoom in/out action on the selected area of the document respectively.
8. Marquee Zoom: This option is used to highlight a certain area of the document being displayed and that highlighted area will be zoomed in for better readability.
9. Actual Size: This option will display the document in its actual display size.
10. Fit Visible: This option will adjust the display of the selected document to fit the screen size.
11. Fit Width: This option will adjust the display of the selected document to fit the width of the screen size.
12. Fit Height: This option will adjust the display of the selected document to fit the height of the screen size.
13. Custom Zoom: This option will zoom in/out of the selected document by selecting the appropriate zoom level from the drop-down list.
Note: |
The "Document Operations" group appears only when the current open document is a PDF or Image file i.e TIFF or JPG or BMP or GIF. |
Document Reproduction:
1. Print: This option will print the currently loaded document.
2. Save: This option will save the current document on the local machine.
4. Delete: This option will allow you to delete the document.
5. Print All: This option will print all the documents loaded in the window.
6. Save All: This option will save all the documents loaded in the window.
7. Email: This option will send the current document displayed on the screen through an email as an attachment.
7.1. Email Link: This option will allow you to email the URL of the current window to the desired user.
Version Control Group:
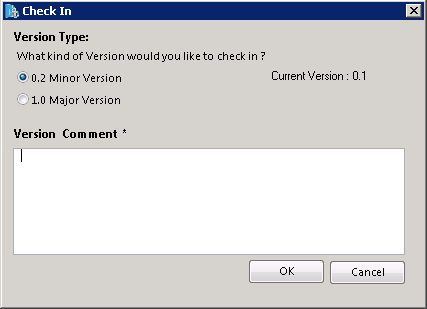
1. Check In: This option is used to save the changes made to the selected document. You can check-in only those documents that are checked-out or are checked-in for the first time after being added. Clicking Check In button will open below displayed window. You need to select version type with which you would like to check-in the selected document. Versioning the documents as minor or major would facilitate you to track the type of changes made to the document. Moreover, you can add the Version Comments in the available text-box for your reference. Then click OK to check-in the document.
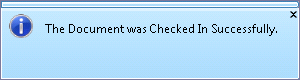
You should see below successful notification once the document is checked in successfully.
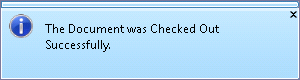
2. Check Out: This option will check-out the selected document, which will enable you to make changes to the document. You need to check-out the document to make any changes. Clicking Check Out button will show you below displayed successful notification.
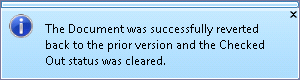
3. Undo Checkout: This option will undo all the changes made to the document after the latest check-out was made to the document and revert back to the prior version of the document. Clicking Undo Checkout button will show you below displayed successful notification.
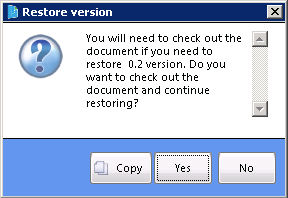
4. Show History: This option will display the history of check-in operations made to the selected document. You should see check in details like Version of the document, Name of the User who made the check in and Last modification time. You also have the ability to view the document by clicking View. You can click Restore, if you wish to revert back to the selected version of the document. System will take your confirmation before restoring the document.
Note: |
You need to make sure that the document which needs to be restored is checked out before you click Restore. Or else you will see below displayed message asking you to Check out the document. Click Yes to continue.
|
 |
| Click on image to magnify/shrink |
Templates:
1. Add Current Profile As Template: This option is used to add the Document Type profile fields along with its values as a template. You can create a number of templates. There are two types of templates:
| • | Global Template is a template visible to all users and |
| • | Local Template is visible for those who create the template. |
2. Apply Template: This option is used to apply Global/Local Templates that are created for that Document profile. When you click on the Apply Template button, a list of the templates created will appear and you can choose from it as per your requirement. If you create more than five templates of the Global Template and Local Template, the More option will appear such. When you click More the Global Template and Local Template lists will appear.
4. Save Changes: This option will save the changes made to the current document.
5. Close: This option will close the window.