|
Print Scan Later Coversheets From Query |
  
|
| Show/Hide Hidden Text |
|
Print Scan Later Coversheets From Query |
|
| Show/Hide Hidden Text |
To print Scan Later Coversheet from query you need to follow below given steps:
1. Open Host Application Web Application. Click Administration Module and select SmartList Favourites option as displayed below. Then double click on the record.
 |
| Click on image to magnify/shrink |
2. SmartList window will open as displayed below. Then click Additional button in the ribbon and select PS-Print Scan Later Coversheets option.
 |
| Click on image to magnify/shrink |
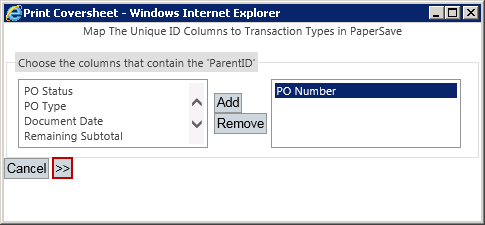
3. Print Coversheet window will open. Choose the columns that contain the ParentID from left column and click Add to add them in the right column. Then click Next icon.
Note: |
If only single Parent ID exists for a particular Transaction Type, then you will not be asked to map the Parent ID to Transaction Type in PaperSave. And instead of below prompt, you will be directly asked to print the Coversheets. |
4. Generate Coversheet window will open as displayed below. Select the Transaction Type from the left panel of the screen. Description of Coversheet options is mentioned below:
Option 1: This will create a single coversheet for each of the document types selected in the Document Type pane for each record in the Query result.
Option 2: This will create a Coversheet with all possible Profile Values for the selected Document Type.
Option 3: When this option is selected then all the profile fields will be displayed in the blank area. Select the required fields that you want to be displayed on the coversheet. This option will print separate coversheets with all the selected profile field values for the selected document type(s) in the Document Type pane for each record in the Query result.
You can fill the profile field values and click Print to print the coversheet. Click Cancel to cancel the current action.
 |
| Click on image to magnify/shrink |
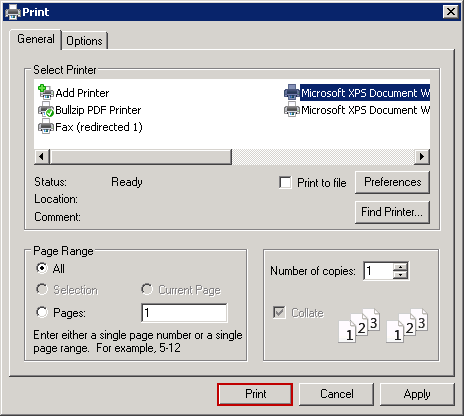
5. Print form will open. Select the printer and click Print.
6. You should see the ScanLater CoverSheet will be printed.
 |
| Click on image to magnify/shrink |
Options Tab
1. Save Mappings: Clicking on this option will save the Parent ID - TransactionType ID mapping, so next time you won't have to map the fields again.
Note: |
Once the mappings are saved, Save Mappings caption will change to Reset Mappings. You can click Reset Mappings to reset the saved mappings. |
 |
| Click on image to magnify/shrink |
This is how you can print coversheets from Query.