|
POP Mail Server |
  
|
|
POP Mail Server |
|
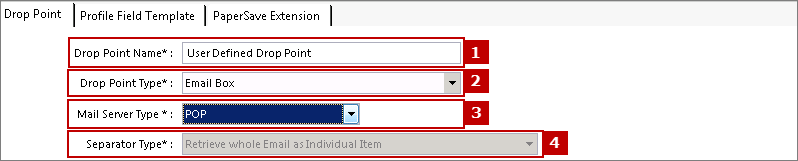
Adding Email Box Drop Point type for POP Type Mail Server:
To add a new Drop Point click on Add button available in the ribbon. As you click on Add button, right panel of the screen will be enabled allowing you to enter the drop point details. Description of all the fields is mentioned below.
1. DropPoint Name: Enter the name of the drop point in the available textbox.
2. DropPoint Type: Select the Drop Point type as Email Box from the drop-down list.
3. Mail Server Type: Select POP as Mail Server Type.
4. Separator Type: For POP type Mail Server, only below mentioned separator type is available:
| □ | Retrieve Whole Email as Individual Item: This separator type will process the whole email with its attachment(s) as individual item. For e.g., if an email consists of 1 or multiple attachment(s) then the email and its attachment(s) will be processed as an individual item. |
5. Mail Server Name: Enter the name of your mail server.
6. User Name: Enter the User Name of your Email account.
7. Password: Enter the Password of your Email account.
Note: |
The password to access the mailbox will be stored in plain text within the PaperSave database. |
8. SSL Mode: Select the appropriate SSL Mode for your mail server. Select one from below mentioned 3 types of SSL Mode:
| • | None |
| • | Implicit |
| • | Explicit |
9. Port: Enter the Port Number for the selected SSL Mode.
Note: |
||||
Please make sure that you do not change the below mentioned default Port settings:
|
10. Get email Folder List: Click Get email folder list button to get the list of folders from your mail server.

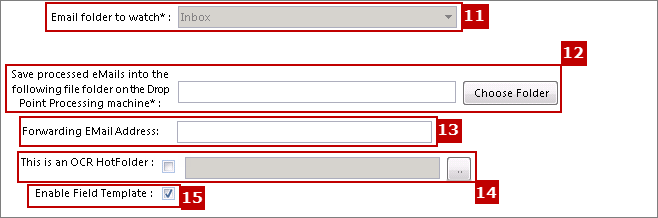
11. Email Folder to watch: POP type Mail Server will only process items available in Inbox folder.
12. Choose Folder: Once the emails from Inbox folder are processed those will be deleted from the Inbox and there is no way to get those emails back. So PaperSave forces you to take backup of processed emails and save those emails into file folder on your drop point processing machine. Click Chooser Folder button and select the desired folder to save the processed emails.
Note: |
||||||
|
13. Forwarding Email Address: Forwarding Email Address field allows you to enter the Email ID to which you would like to forward the processed emails.
Note: |
Incase of PaperSaveCloudTM, there is no way to create physical folders and save the processed emails as a backup in your local drive. We highly recommend you to provide the forwarding email address in the above field, so that the processed emails can be forwarded to this email address as a backup. |
14. Enable Profile Field Template: If this option is selected then Profile Field Template set from here would be automatically filled in while the items are processed by DropPoint Processing Service. You can import/export Profile Field template values only if this option is selected.
Fields marked with * denotes mandatory fields. Description of shortcuts to perform few Drop Point operations using keyboard are available in the bottom of the screen. Click here to know more.