|
StepActivity |
  
|
| Show/Hide Hidden Text |
|
StepActivity |
|
| Show/Hide Hidden Text |
Step Activity denotes a step in the Workflow.
Step Activity allows to host Event Driven Activities and Event Driven Activities allows to host any events such as Approved, Reject and Custom.
To use StepActivity you need to follow below mentioned steps:
1. Firstly, drag and drop the StepActivity from ToolBox section into the Workflow design area as displayed in below screen.
 |
| Click on image to magnify/shrink |
2. You will be able to view the StepActivity as displayed in below screen. When you select the StepActivity you will be able to view Properties section in the right panel of the screen.
 |
| Click on image to magnify/shrink |
3. Description of all the properties is mentioned below:
| □ | Activity: |
| • | Name: You can enter the name of the activity as per your requirement. |
| • | Description: You can select the description from the drop down list. |
| • | Enabled: You need to set the value as "True" to enable this activity. |
| □ | Notification: |
| • | NotificationStyle: You can select one of the style of notification from the drop down list as mentioned below: |
| • | Per Item |
| • | In Group |
| • | Both |
| • | Workflow User Preference |
Note: |
You will be allowed to change value for Notification Style even without Un-Publishing a Workflow. |
| • | NotifyStepOwner: By default NotifyStepOwner will be set as False. You can set this property to True if you want to send email notification to the owner of the step. |
| □ | Step Ownership: This property allows you to set the list of possible owners for the current step activity. You can view below mentioned 3 options under Step Ownership Property: |
| • | OwnershipStyle |
| • | PossibleOwners |
| • | PossibleOwnersFilteredByTag |
Note: |
You will be allowed to change values for Ownership Style, Possible Owners and Possible Owners Filtered By Tag even without Un-Publishing a Workflow. |
Description of all the above mentioned options is mentioned below:
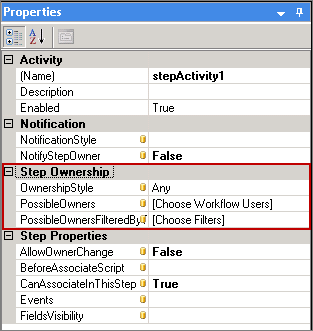
| • | OwnershipStyle: This option will allow you to select the Ownership Style from the drop-down list. You can select any of the below given options from the drop-down list. By default Any option will be selected under Ownership Style drop-down list. |
| • | Any: If this option is selected then any Workflow User can act as owner of the current step. |
| • | Possible Owners Filtered by Tag: If this option is selected then owner of the step can only be from the possible owners evaluated using FilterByTag option. |
| • | Specific List of Possible Owners: If this option is selected then owner of the step can only be from the specific list of users set under Possible Owners option. |
| • | PossibleOwners: This option will allow you to set the possible Workflow Users for the selected step. You need to click on Ellipses icon to get directed to Lookup Workflow Users screen as displayed below. Here you can select the possible Workflow Users from the list and click on OK button. |
Note: |
The Workflow Users set under Possible Owners property could be the owner of the current step if you select Specific List of Possible Owners option under Ownership Style property. |
 |
| Click on image to magnify/shrink |
| • | PossibleOwnersFilteredByTag: This option will allow you to filter Workflow User using Workflow User Formula Builder. You need to click on Ellipses icon to get directed to Workflow User Formula Builder screen as displayed below. You can add required filters and group them as per your requirement. Then click on Save & Close button to save the formula and exit the window. |
Note: |
The Workflow Users evaluated based on the filters set could be the owner of the current step if you select Possible Owners Filtered by Tag option under Ownership Style property. |
 |
| Click on image to magnify/shrink |
| □ | Step Properties: |
Below displayed screen shows the Step Properties available for the selected step. Description of all the step properties is mentioned below:
| • | AllowOwnerChange: By default AllowOwnerChange is set as False. You can set the value as "True" to allow changing the step owner manually (applicable only for the Current Owner of the Workflow Item). |
Note: |
||||
|
| • | BeforeAssociateScript: You can click on Ellipses icon to get directed to below displayed screen. Here you can write the script which will be executed before the associated event get executed. |
 |
| Click on image to magnify/shrink |
| • | CanAssociateInThisStep: If CanAssociateInThisStep property is set to True then you will be able to associate the respective Workflow Item to a record in Host Application using Workflow Entry Viewer. |
| • | Events: You need to click on "Ellipses" icon to get directed to the below displayed screen. Here you can set the values for Target Step and Target Owner for the events that are added for that particular StepActivity. Click here to know more about Target Owner. Incase of Custom Event you will be allowed to set Target Step and Target Owner if and only if the event consists of Change Step Activity. Moreover you will be allowed to set rank for all the custom events. To save the desired changes click on OK button to save the changes and exit the screen. |
Note: |
You will be allowed to change values for Target Step, Target Owner and Rank even without Un-Publishing a Workflow. |
 |
| Click on image to magnify/shrink |
| • | FieldsVisibility: You need to click on "Ellipses" icon to get directed to the below displayed screen. This property allows you to define the fields that should be visible for a particular step. Ultimately, one has an ability to hide the irrelevant fields for a particular step by un-checking the field name from the list. It means that when a Workflow Item is in that particular step user will be able to view only those fields which are marked as Visible under Document Profile Panel. However, under Workflow Item Panel you should view all the fields that exists for the selected Workflow, no matter the field is marked as hidden/visible for that step. Click on OK button to save the details and exit the screen. |
Note: |
You should see both Profile Fields and Workflow Fields (if exists) in the Fields Visibility window. |
 |
| Click on image to magnify/shrink |