

3150 SW 38th Avenue,
4th
Floor, Miami, Florida 33146. USA
![]() 877
727 3799
877
727 3799
Contents
2 PAPERSAVE SETUP & CONFIGURATION STEPS
3 user permissions required in dynamics 365 business central
3.1 grant permissions to the user who runs the assisted setup for PaperSave
4 User Login steps for PaperSave
PaperSave supported Modules and Record Types
add documents from purchase invoice list
show documents from purchase invoice list
show interrelated documents from purchase invoice list
add documents from purchase invoice card
show documents from purchase invoice card
show interrelated documents from purchase invoice card
add documents from posted purchase invoice list
show documents from posted purchase Invoice list
show interrelated documents from posted purchase Invoice list
add documents from posted purchase invoice card
show documents from posted purchase invoice card
show interrelated documents from posted purchase invoice card
add documents from purchase quote list
show documents from purchase quote list
show interrelated documents from purchase quote list
add documents from purchase quote card
show documents from purchase quote card
show interrelated documents from purchase quote card
add documents from purchase order list
show documents from purchase order list
show interrelated documents from purchase order list
add documents from purchase order card
show documents from purchase order card
show interrelated documents from purchase order card
add documents from vendor list
show documents from vendor list
show interrelated documents from vendor list
add documents from vendor card
show documents from vendor card
show interrelated documents from vendor card
add documents from sales item list
show documents from sales item list
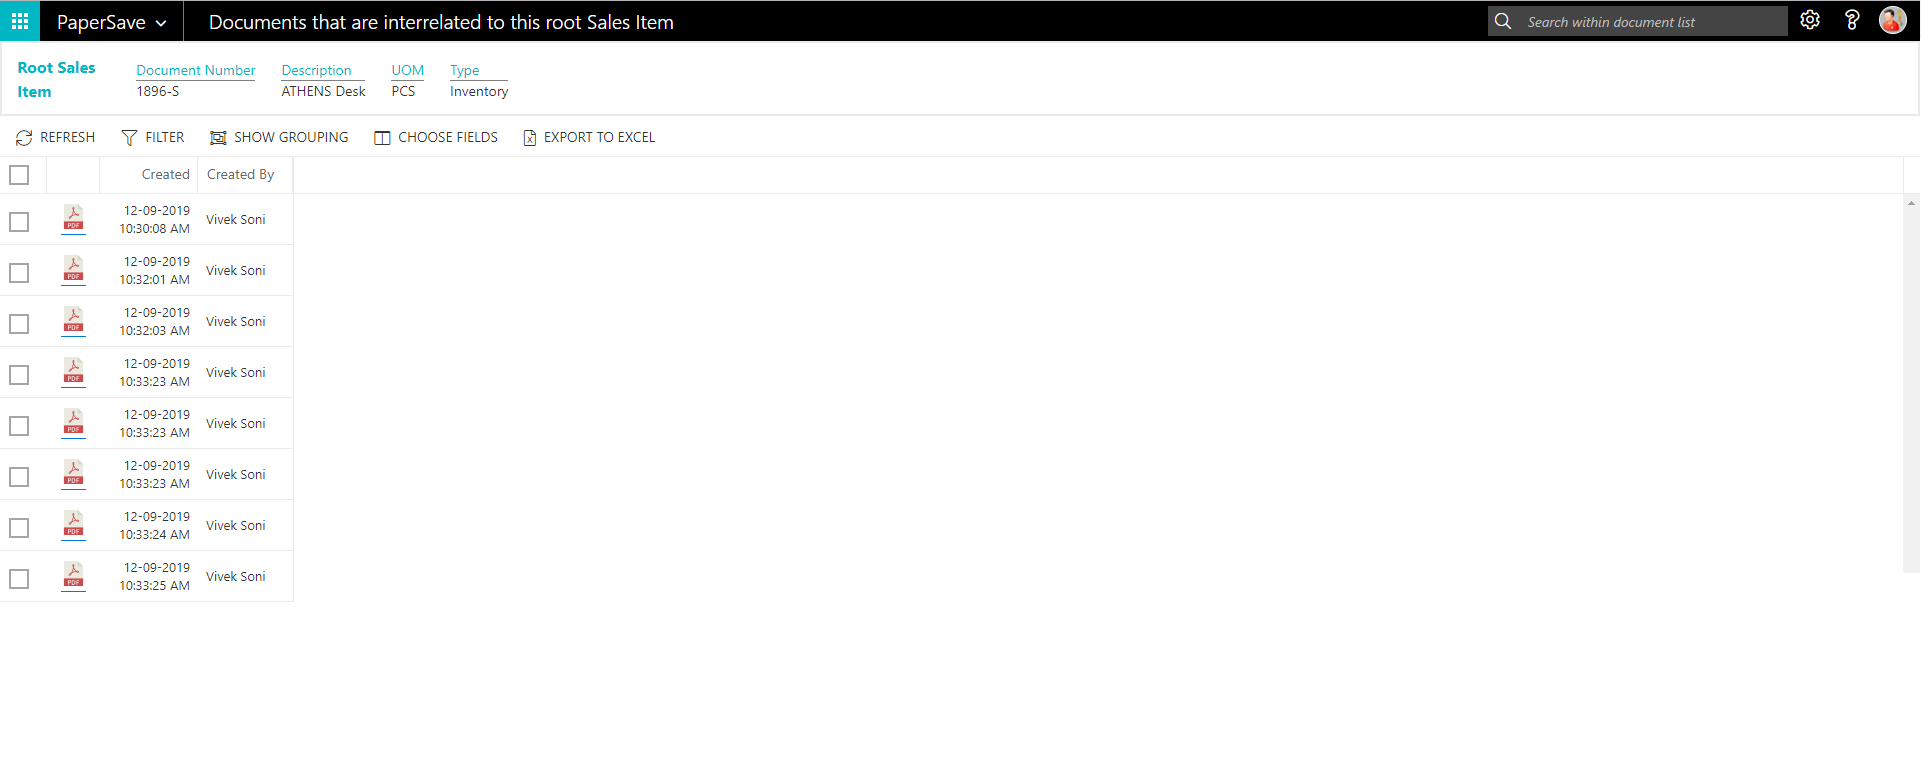
show interrelated documents from sales item list
add documents from sales item card
show documents from sales item card
show interrelated documents from sales item card
add documents from sales invoice list
show documents from sales invoice list
show interrelated documents from sales invoice list
add documents from sales invoice card
show documents from sales invoice card
show interrelated documents from sales invoice card
add documents in sales order list
show documents in sales order list
show interrelated documents in sales order list
add documents in sales order card
show documents in sales order card
show interrelated documents in sales order card
add documents from sales quote list
show documents from sales quote list
show interrelated documents from sales quote list
add documents from sales quote card
show documents from sales quote card
show interrelated documents from sales quote card
add documents from customer list
show documents from customer list
show interrelated documents from customer list
add documents from customer card
show documents from customer card
show interrelated documents from customer card
add documents from general journal batch
show documents from general journal batch
show interrelated documents from general journal batch
add documents from general ledger entries list
show documents from general ledger entries list
show interrelated documents from general ledger entries list
6.13 Associate Document from side by side entry viewer
7 DYNAMICS 365 BUSINESS CENTRAL WEB SERVICES FOR PAPERSAVE
7.1 HOW TO ACCESS THESE WEB SERVICES WITHIN DYNAMICS 365 BUSINESS CENTRAL
1 INTRODUCTION
This document primarily describes the steps to PaperSave setup for Dynamics 365 Business Central. Furthermore, it includes the User Scenarios to test the different PaperSave functionalities viz. Add Document, Show Documents and Show Interrelated Documents for various Record types like Purchase Invoice, Vendor, Sales Invoice, General Journal, Customer, etc.
2 PAPERSAVE SETUP & CONFIGURATION STEPS
NOTE: Please refer to this section to learn about permissions required for the user who will run the assisted setup for PaperSave. The user must have the required rights before running the assisted setup for PaperSave.
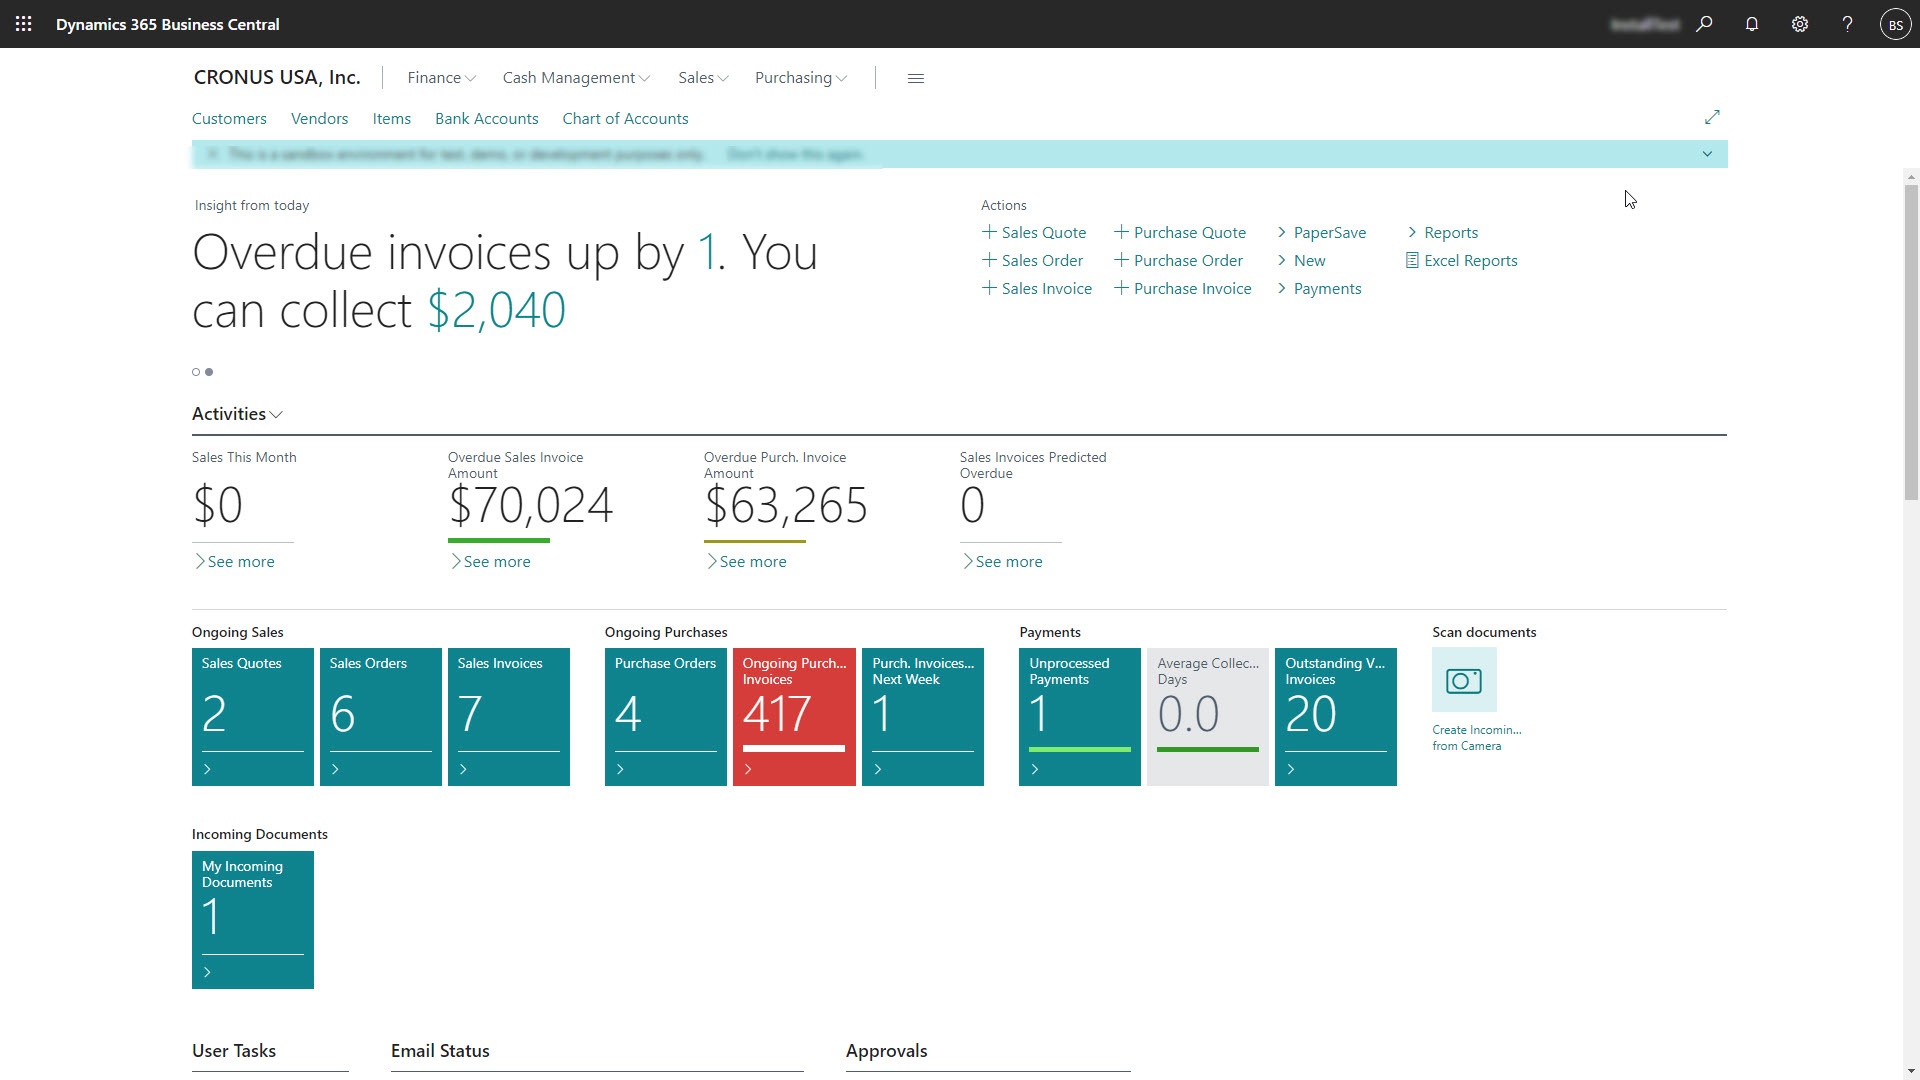
The following steps will guide you through adding a new Microsoft Entra application to use PaperSave options and through assisted setup for PaperSave. Below is the Dynamics 365 Business Central Home page.
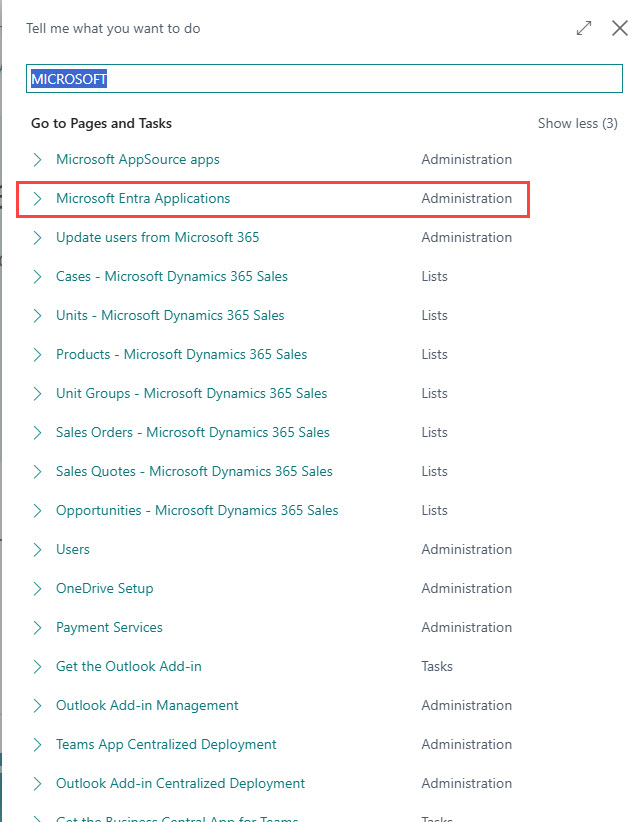
1. On the Dynamics 365 Business Central Home Page, click on search icon and enter “Microsoft Entra” in the search box.
2. Now, click on Microsoft Entra Applications” from “Go to Pages and Tasks” as shown below.
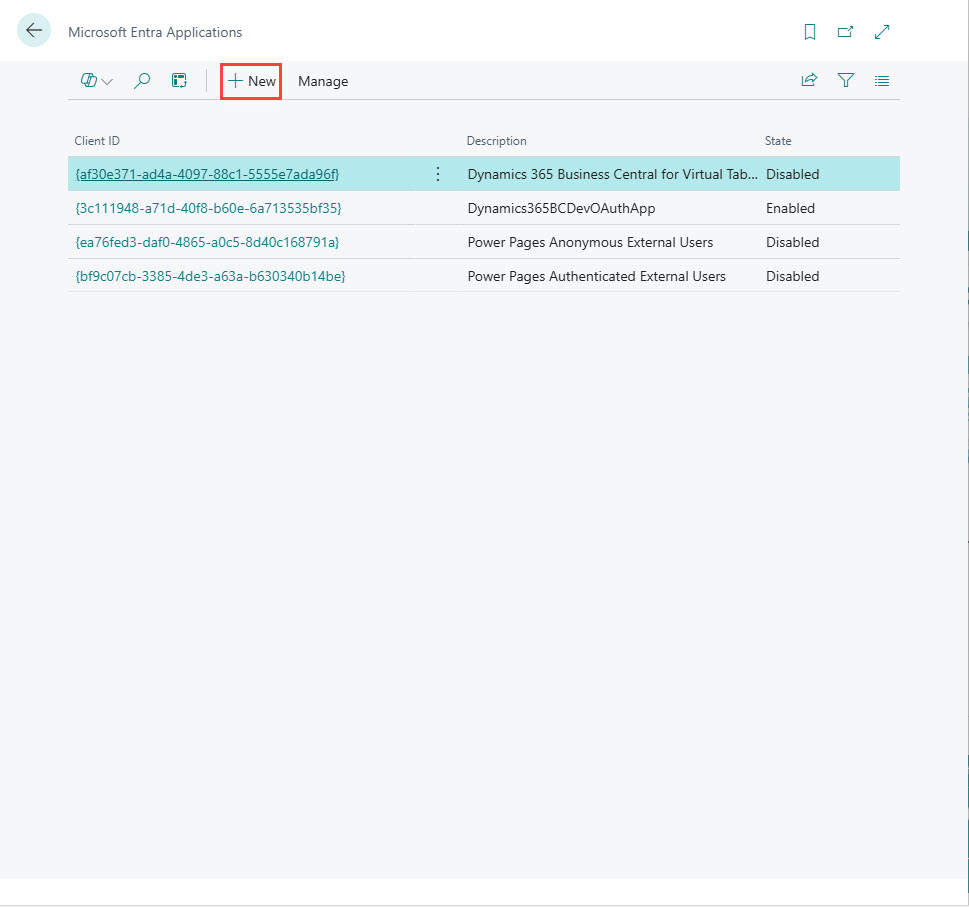
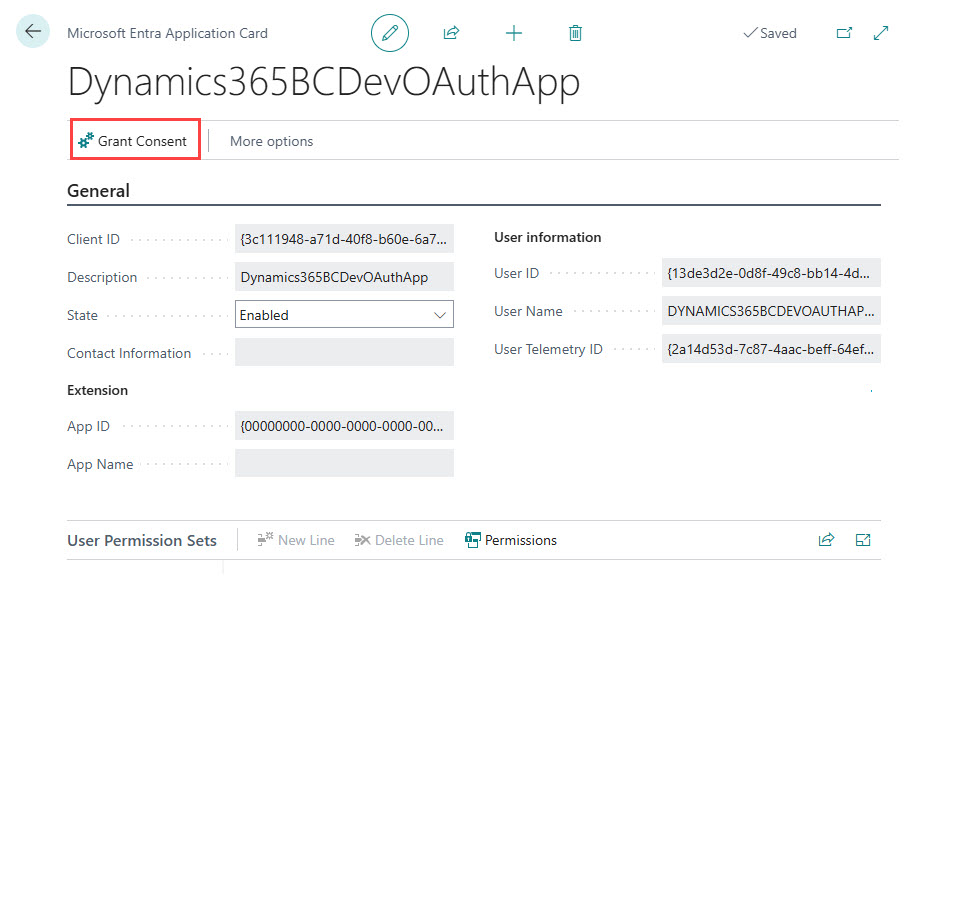
3. Now, a Microsoft Entra Application page gets launch. Click on +New option as shown below.
4. When a Microsoft Entra application card opens, enter the provided Client ID and Description. It auto saves the entered details and selects the required User Groups automatically as shown below.
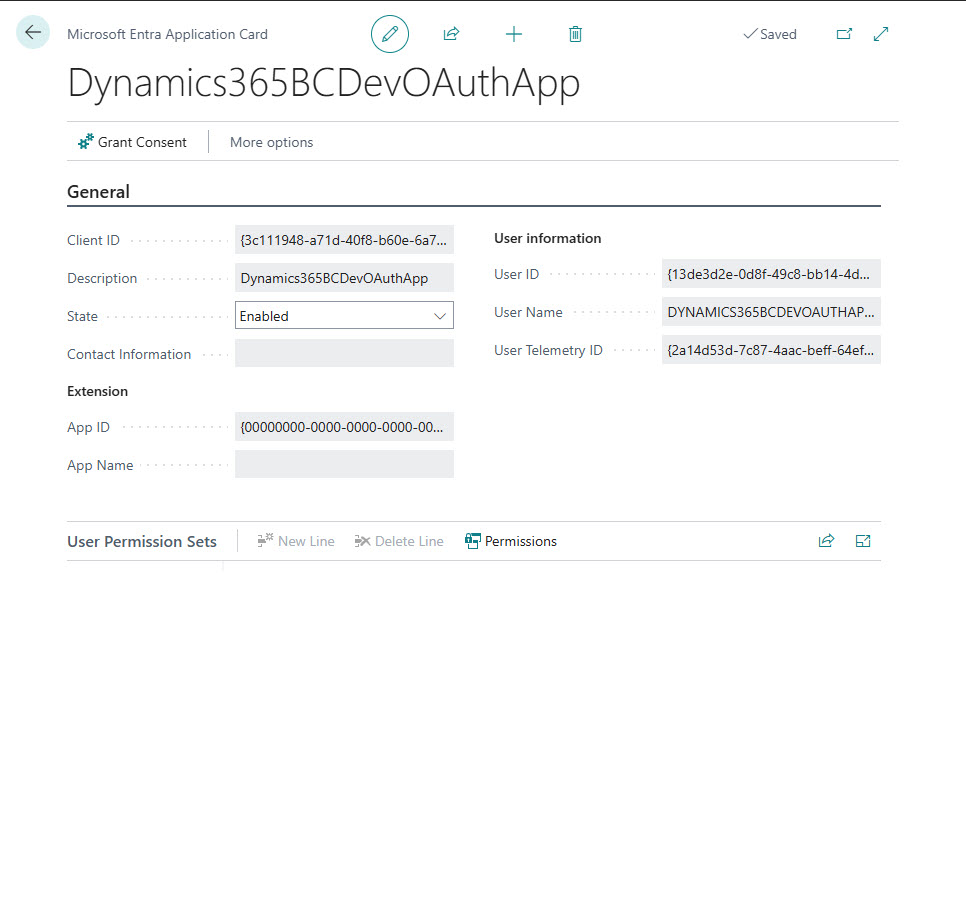
NOTE: In case the User Groups are not selected, then you need to add the following User Groups to the user.
1) D365 EXTENSION MGT
2) D365 FULL ACCESS
3) D365 INTERNAL ADMIN
4) D365 SALES
Additionally, when more than one company exists in an environment, then we strongly recommend you to leave the “Company Name” column field blank in the “User Groups” section to add the above-listed User Groups in all the available companies.
5. Now, perform the Grant Consent using the admin account.
6. Once you grant consent to the application, let’s complete the assisted setup for PaperSave.
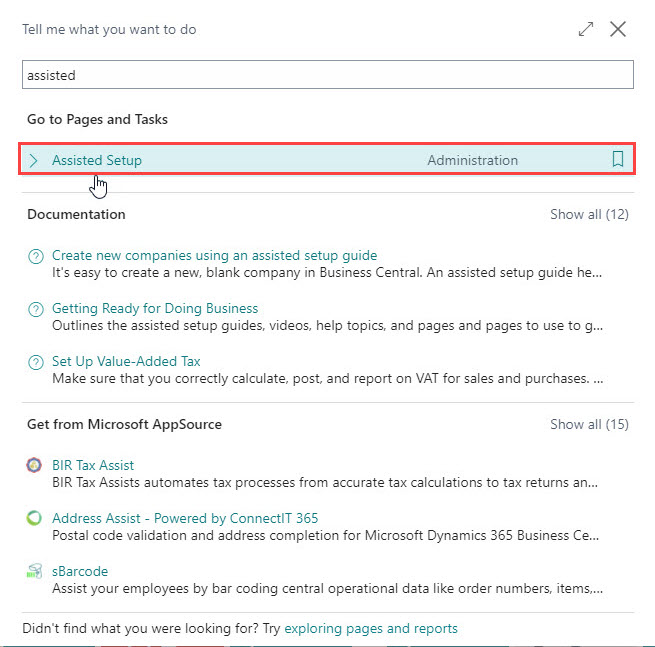
7. Click on search icon and enter “Assisted” in the search box of Dynamics 365 Business Central home.
8. Click on Assisted Setup from “Go to Pages and Tasks” as shown below.
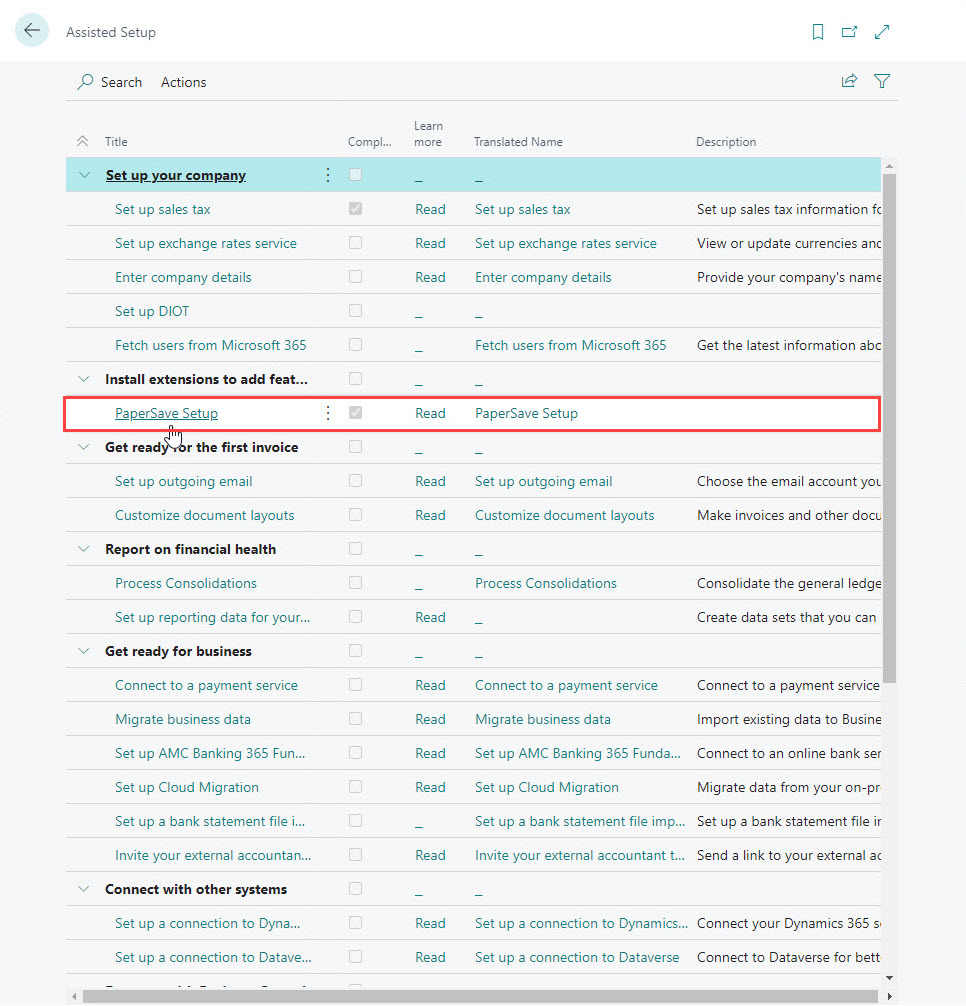
9. Click on the PaperSave Setup Link.
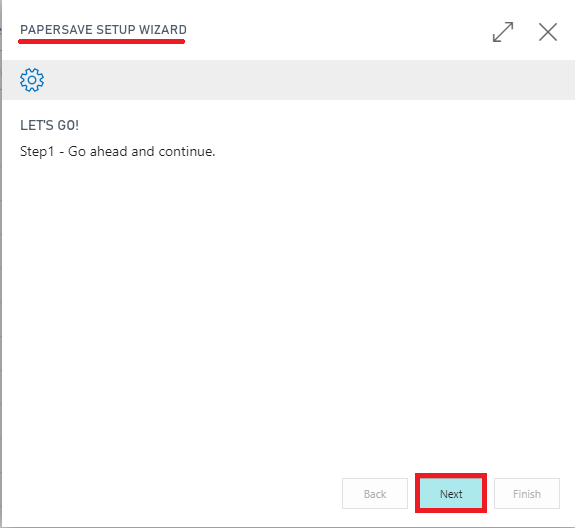
10. This launches PaperSave Setup Wizard. Click on Next.
11. Specify the relevant PaperSave Cloud URL, API secret, PaperSave App Client ID, and PaperSave App Client Secret. Then, click on Next.
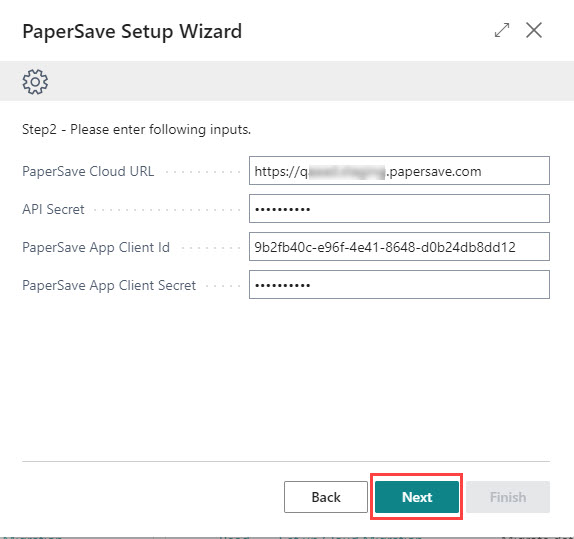
12. Click on Finish to complete the PaperSave setup.
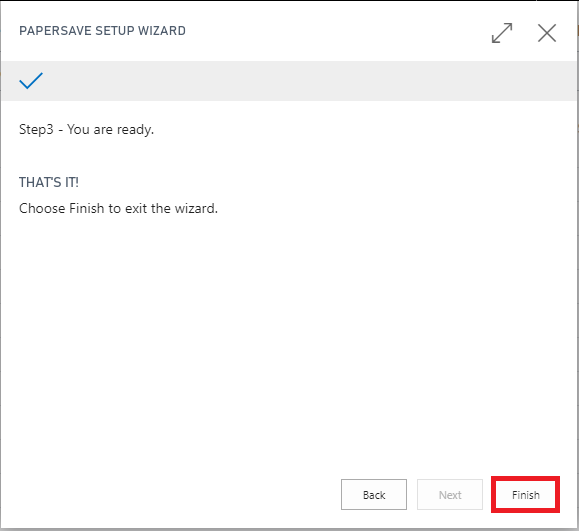
Now, you have successfully completed the assisted setup for PaperSave for Dynamics 365 Business Central.
NOTE: If there are multiple companies in the same production environment, the user must run the assisted setup for each company by switching between them. Please refer to this section to learn how to switch the company.
NOTE: The new users added or imported in Dynamics 365 Business Central after running the Assisted setup would require the permissions to access the PaperSave functionalities. Please refer to this section for more details.
NOTE:
PaperSave will reset the Access/Refresh token for all the users if the tenant is changed in PaperSave Cloud URL (by the user who runs the assisted setup). Thus, all the users will be required to perform the login steps again before they can use PaperSave functionalities in Dynamics 365 Business Central. Refer this section for more details on one-time user login steps.
2.1 Enable/Disable PaperSave
You can enable or disable the PaperSave functionalities using the PaperSave tab from Actions on the Dynamics 365 Business Central Home:
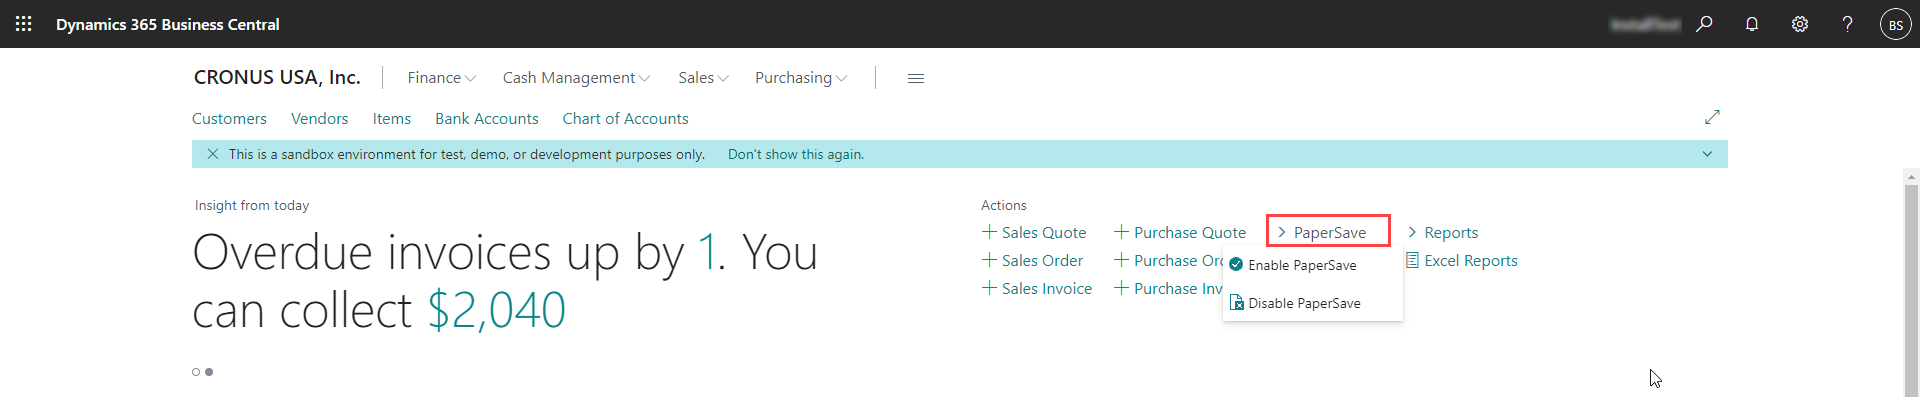
NOTE: Enable/Disable PaperSave option is available on Dynamics 365 Business Central Home for all the user roles.
3 user permissions required in dynamics 365 business central
3.1 grant permissions to the user who runs the assisted setup for PaperSave
Follow the below steps to grant required user permissions to the user who will run the assisted setup for PaperSave for Dynamics 365:
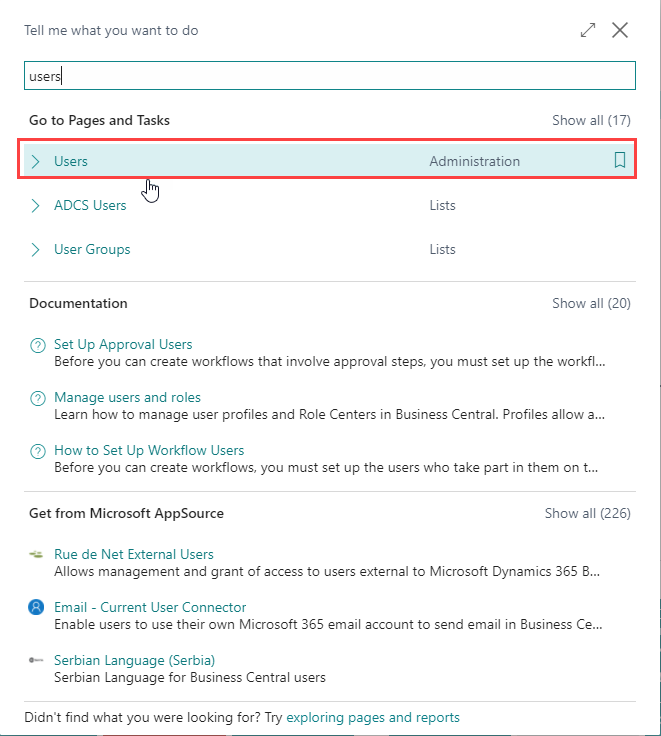
1. Enter “Users” in the search box of Dynamics 365 Business Central home.
2. Click on Users from “Go to Pages and Tasks”.
3. It shall load the list of all the users in the Dynamics 365 Business Central.
4. Click on the User Name to open the user card.
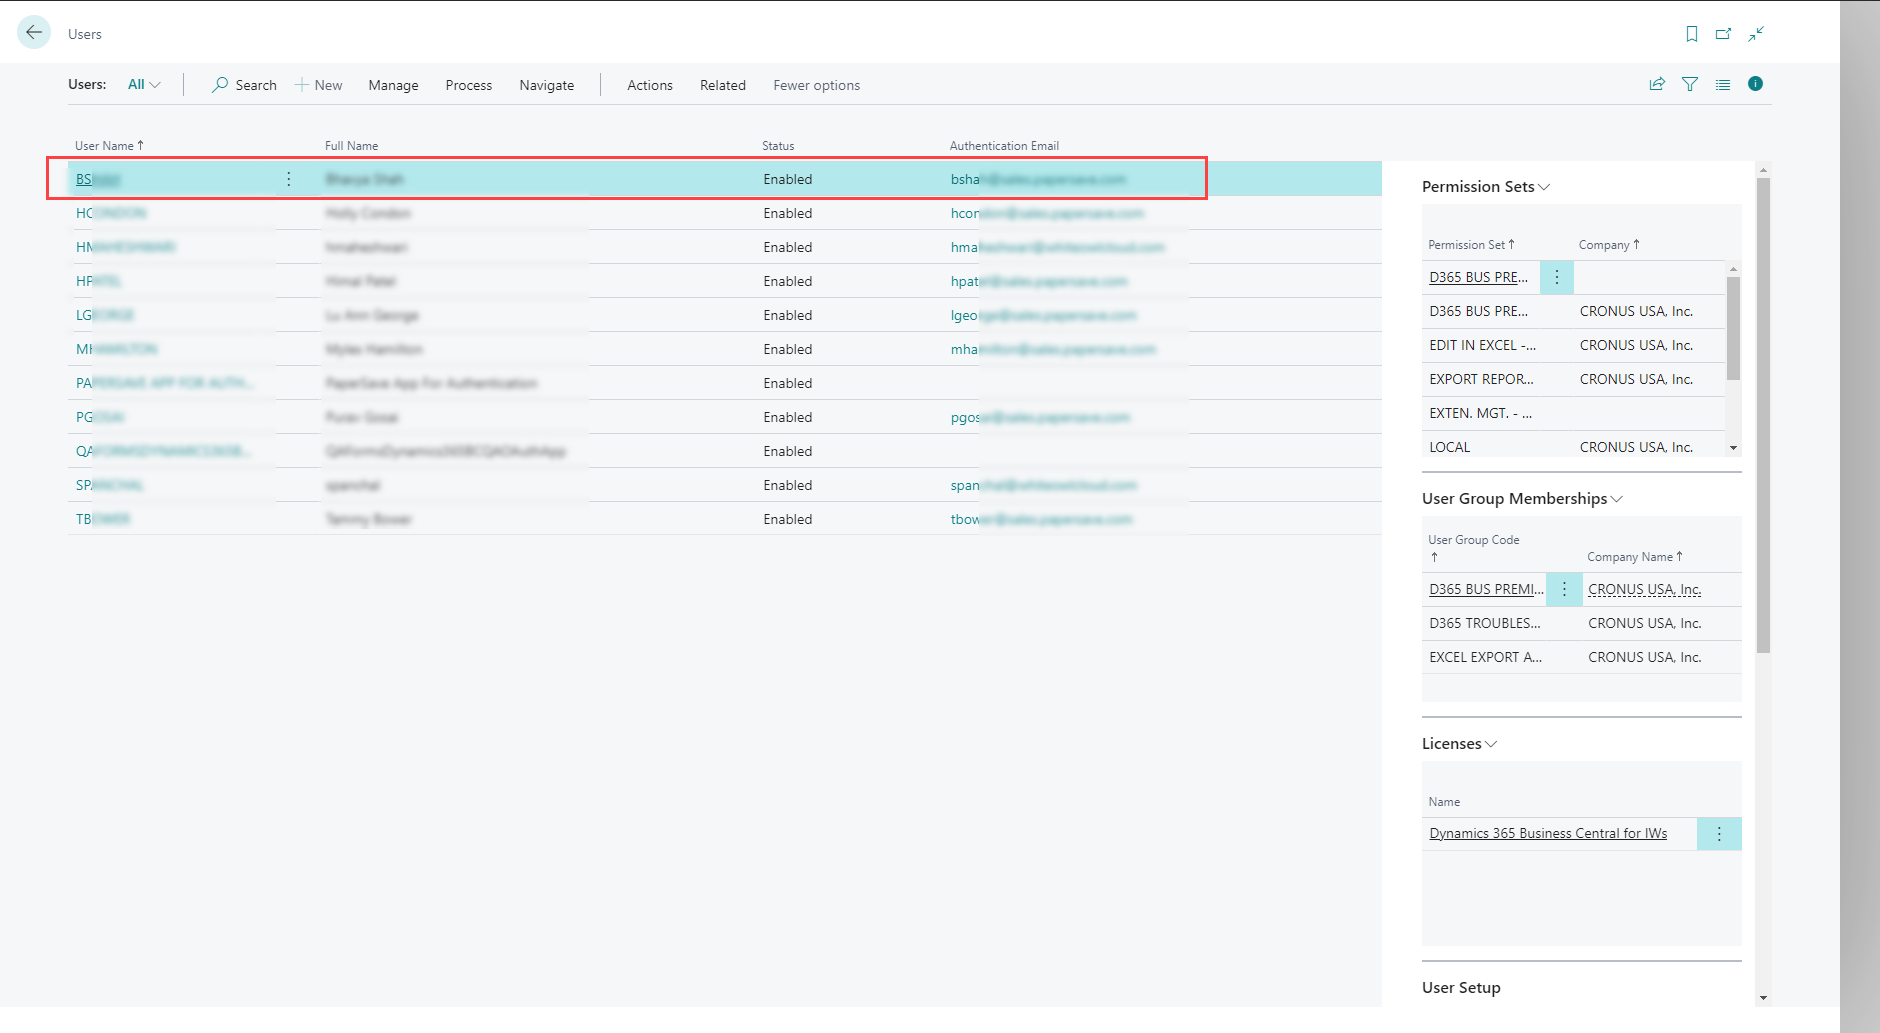
5. It shall open the user card with user details. Add “PaperSave” and “Security” in the User Permission Set with relevant details. Also, you need to add “D365 EXTENSION MGT” user group to the user (who will run the assisted setup).
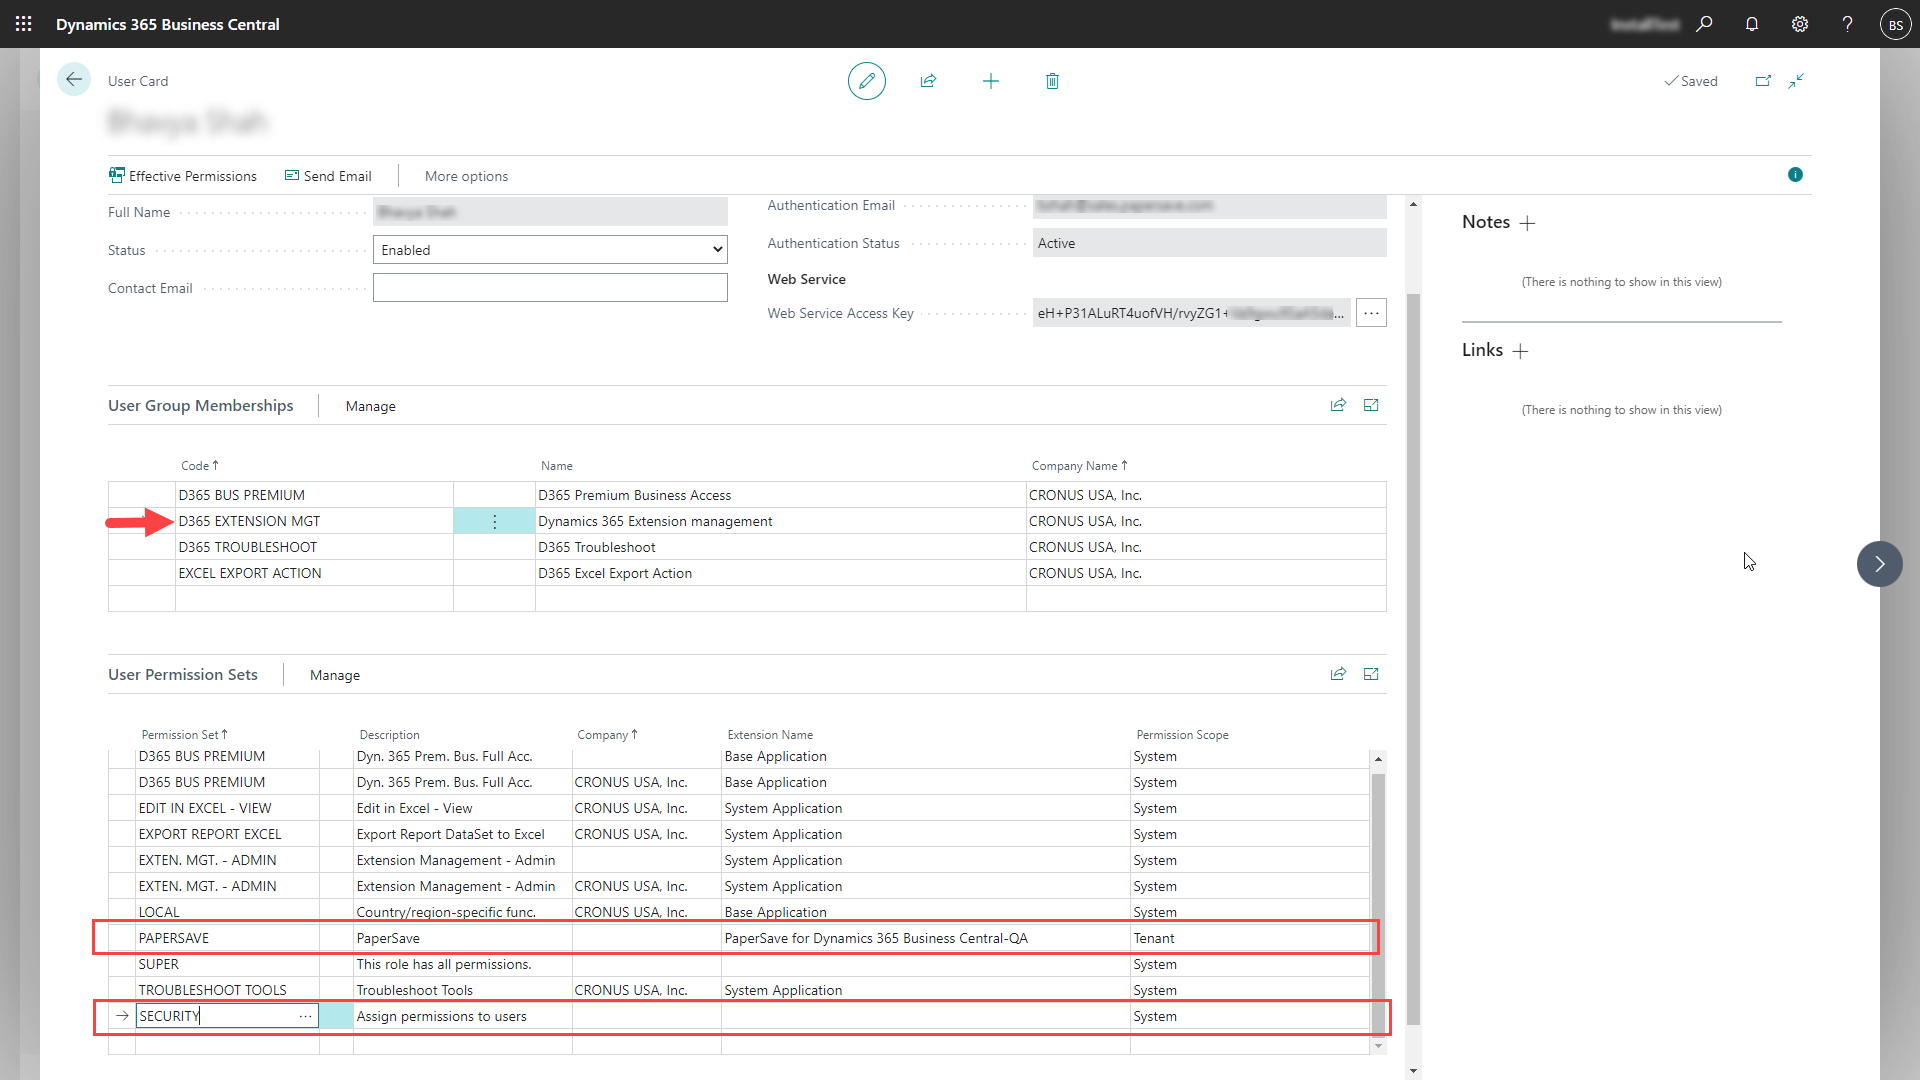
3.2 grant permissions to the Users added or imported in Dynamics 365 Business Central after running the Assisted setup
Follow the below steps to grant user permission for such users who are added or imported after running the assisted setup:
1. Enter “Users” in the search box of Dynamics 365 Business Central home.
2. Click on Users from “Go to Pages and Tasks”.

3. It shall load the list of all the users in the Dynamics 365 Business Central.
4. Click on the User Name to open the user card.
5. It shall open the user card with user details. Add “PaperSave” in the User Permission Set with relevant description, Company, and Permission Scope to grant the PaperSave access to the new user.
4 User Login steps for PaperSave
The following are one-time steps that a user needs to perform when accessing the PaperSave functionalities for the first time from within Dynamics 365 Business Central:
1) Enable PaperSave using the PaperSave tab from Actions on the Dynamics 365 Business Central Home if it is currently disabled.
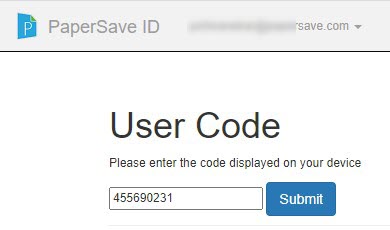
2) Now, PaperSave prompts the user (for the first time) to complete the login process as shown in the below screenshot:
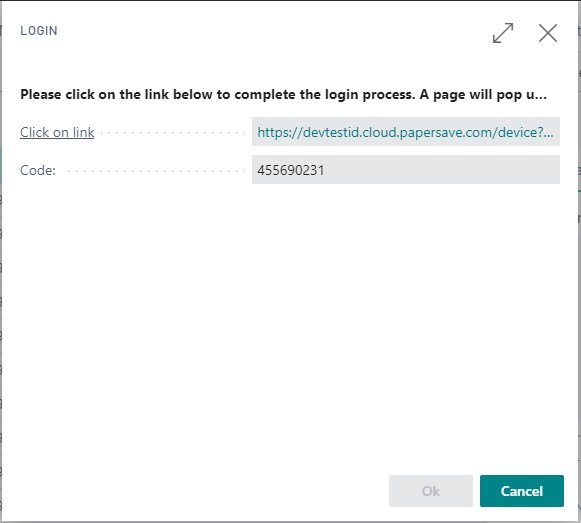
3) Click on the given link to proceed. It will navigate you to the following screen. Now, Copy the Code from the above dialog and paste it in the User Code text box as shown in the below screen. Click on Submit upon entering the Code.
4) Now, you can access PaperSave functionalities from within Dynamics 365 Business Central.
5 Steps to switch the company
The following are the steps to switch the company in Dynamics 365 Business Central:
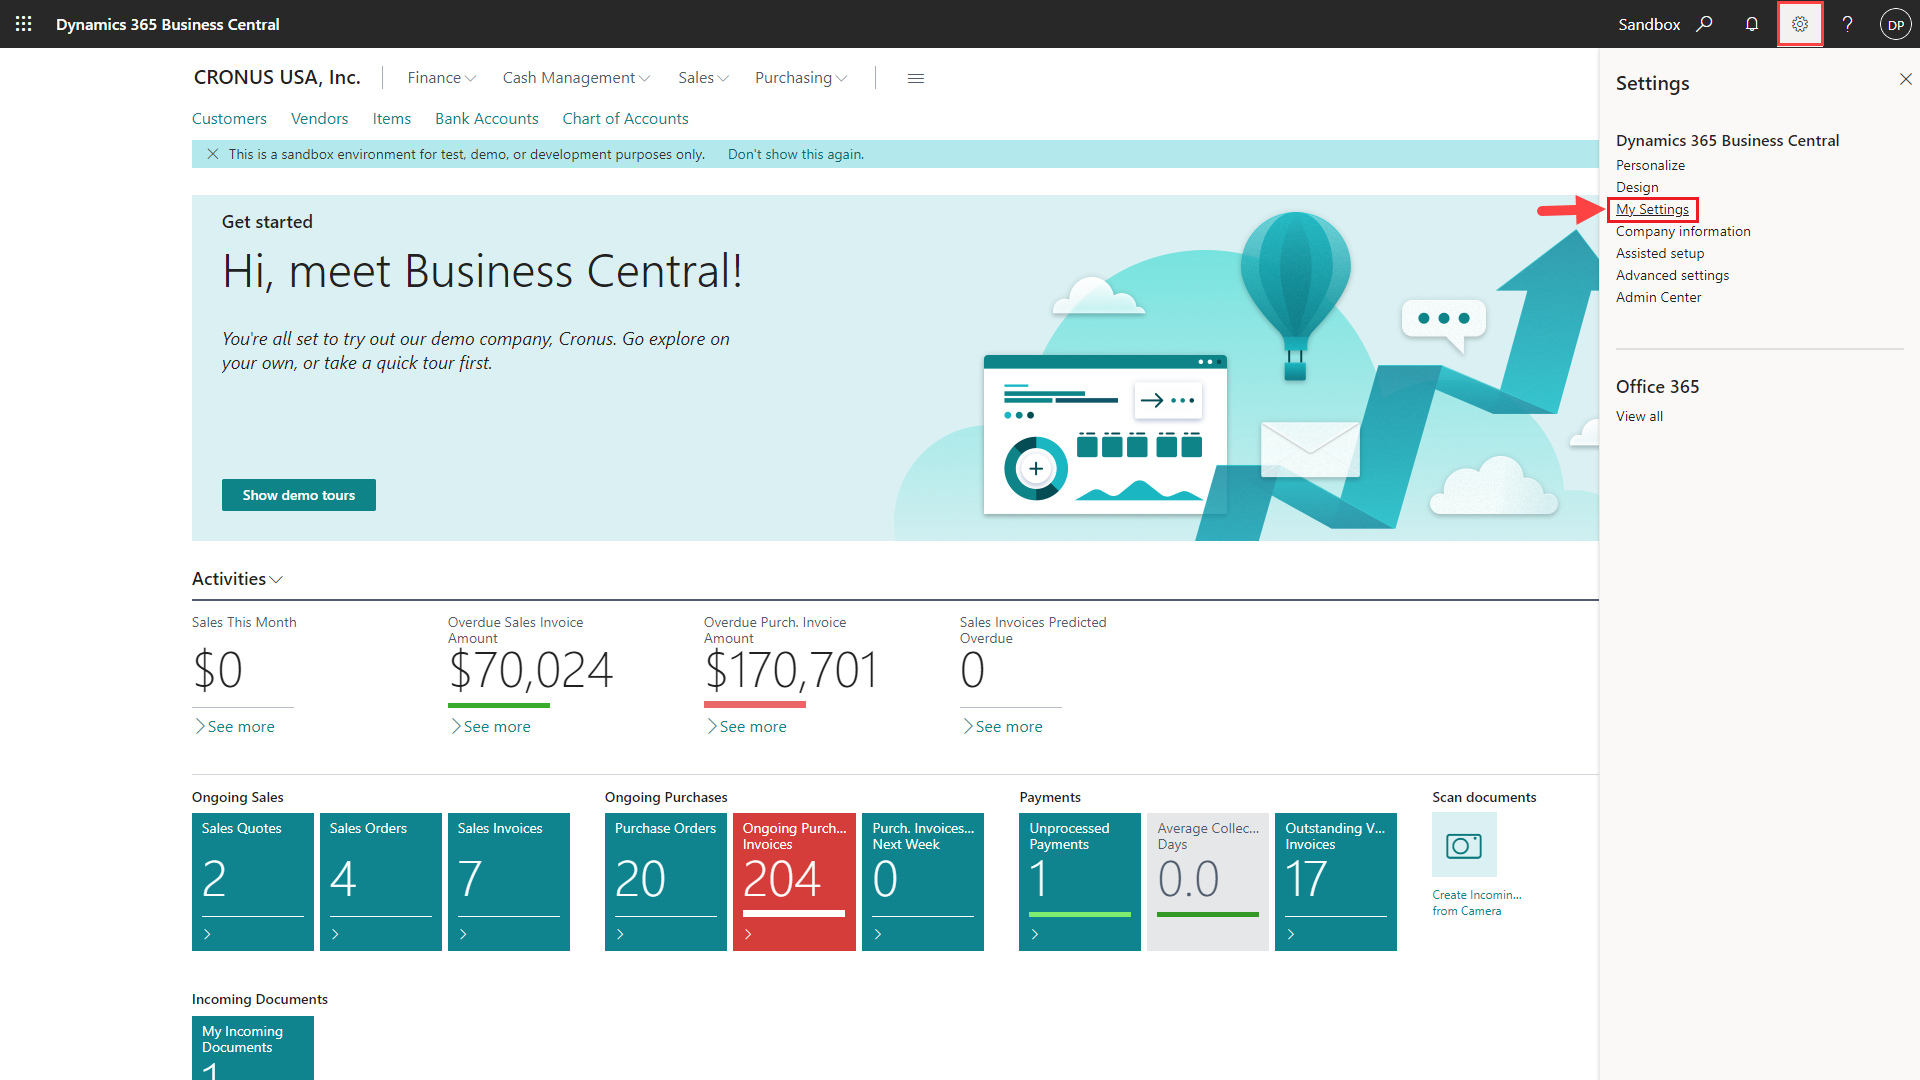
1) Go to Settings options from the application bar and click on My Settings option as shown below.
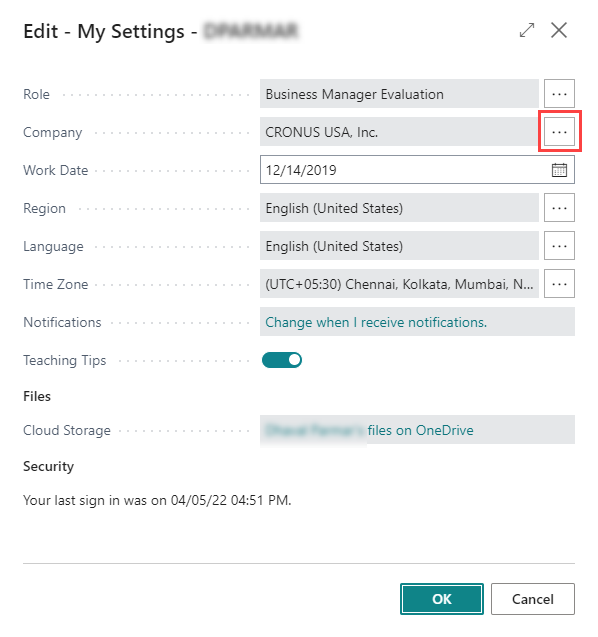
2) Now, “My Settings” dialog box appears where you should click on the Ellipse icon of the Company field as shown below.
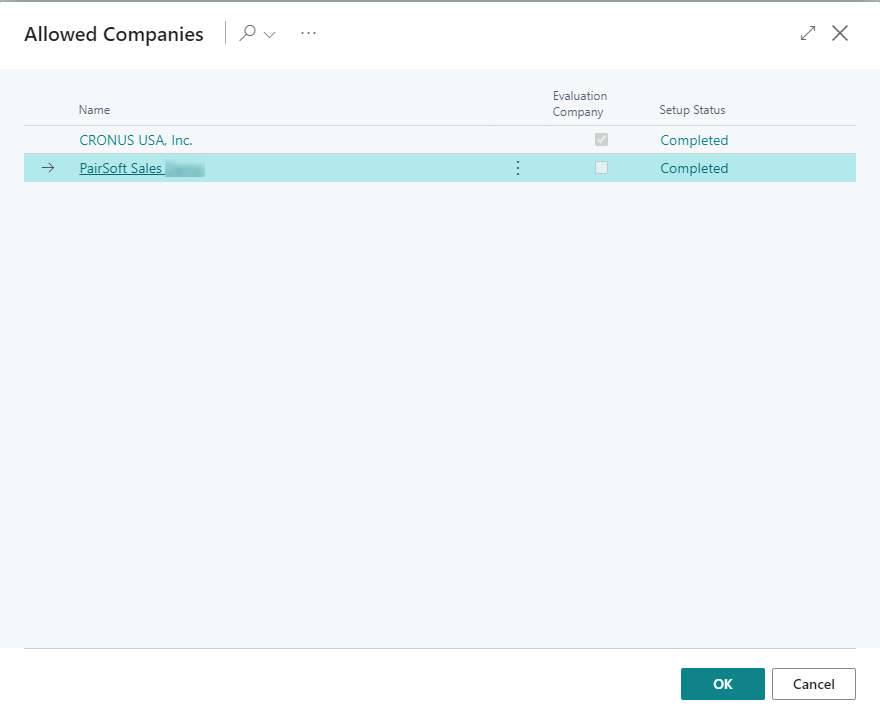
3) An “Allowed Companies” list appears where you must select the company you wish to switch as shown below.
4) After selecting the company, you are redirected to My settings page. Now, click on Ok to switch the company.
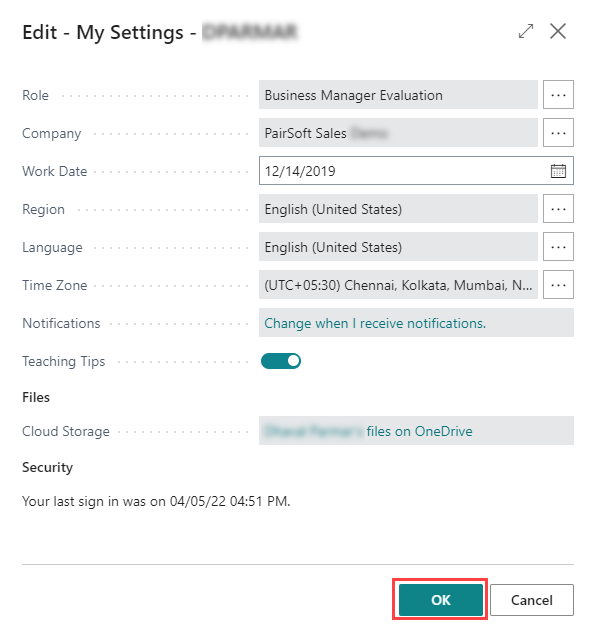
5) Once you click on Ok, the Business Central home page of your selected company opens and now, you can run the assisted setup step for the switched company.
PaperSave supported Modules and Record Types
|
Modules |
Record Types |
|
Cash Management |
Cash Receipt Journals |
|
|
Payment Journals |
|
Finance |
General Journals |
|
Purchasing |
Purchase Invoice |
|
|
Purchase Order |
|
|
Purchase Quote |
|
|
Vendor |
|
Sales |
Customer |
|
|
Sales Invoice |
|
|
Sales Item |
|
|
Sales Order |
|
|
Sales Quote |
6 User Scenarios
PaperSave extension offers following functionalities for various user scenarios in Dynamics 365 Business Central:
1) Add Document: You can add documents by dragging or selecting the files to desired records in various Record types from the record list or the record card.
2) Show Document: You can view the documents for desired records in various Record types from the record list or the record card.
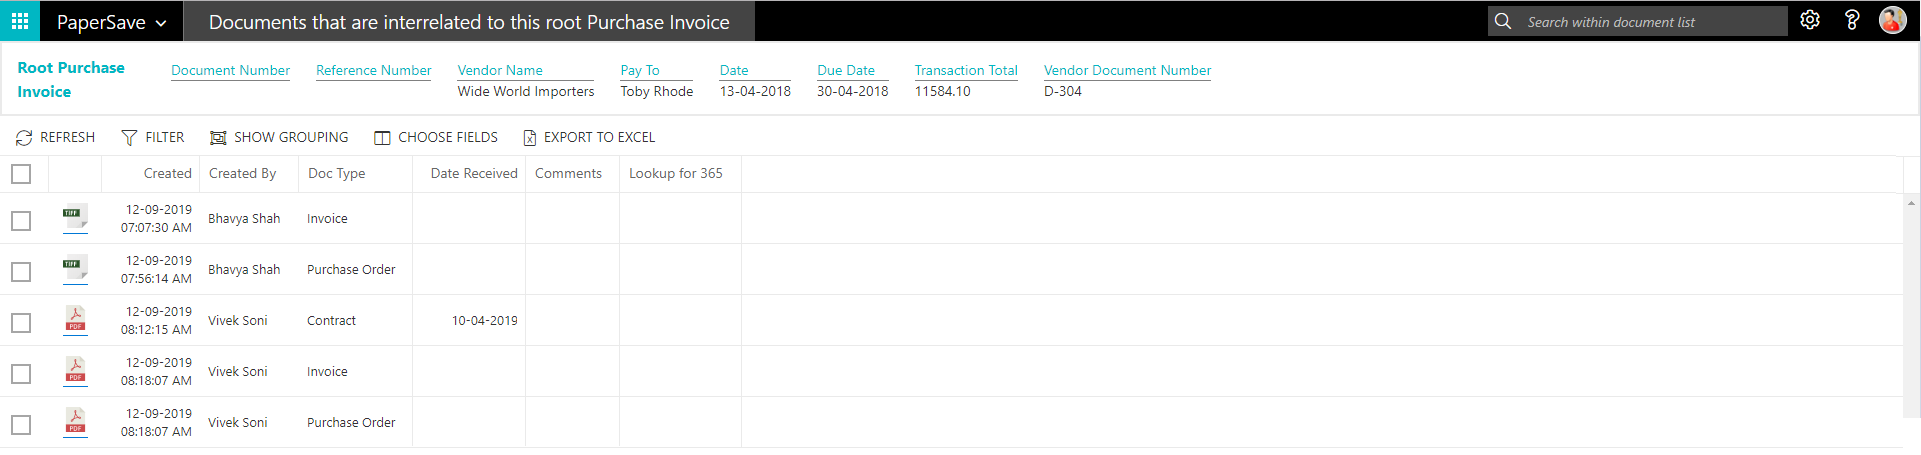
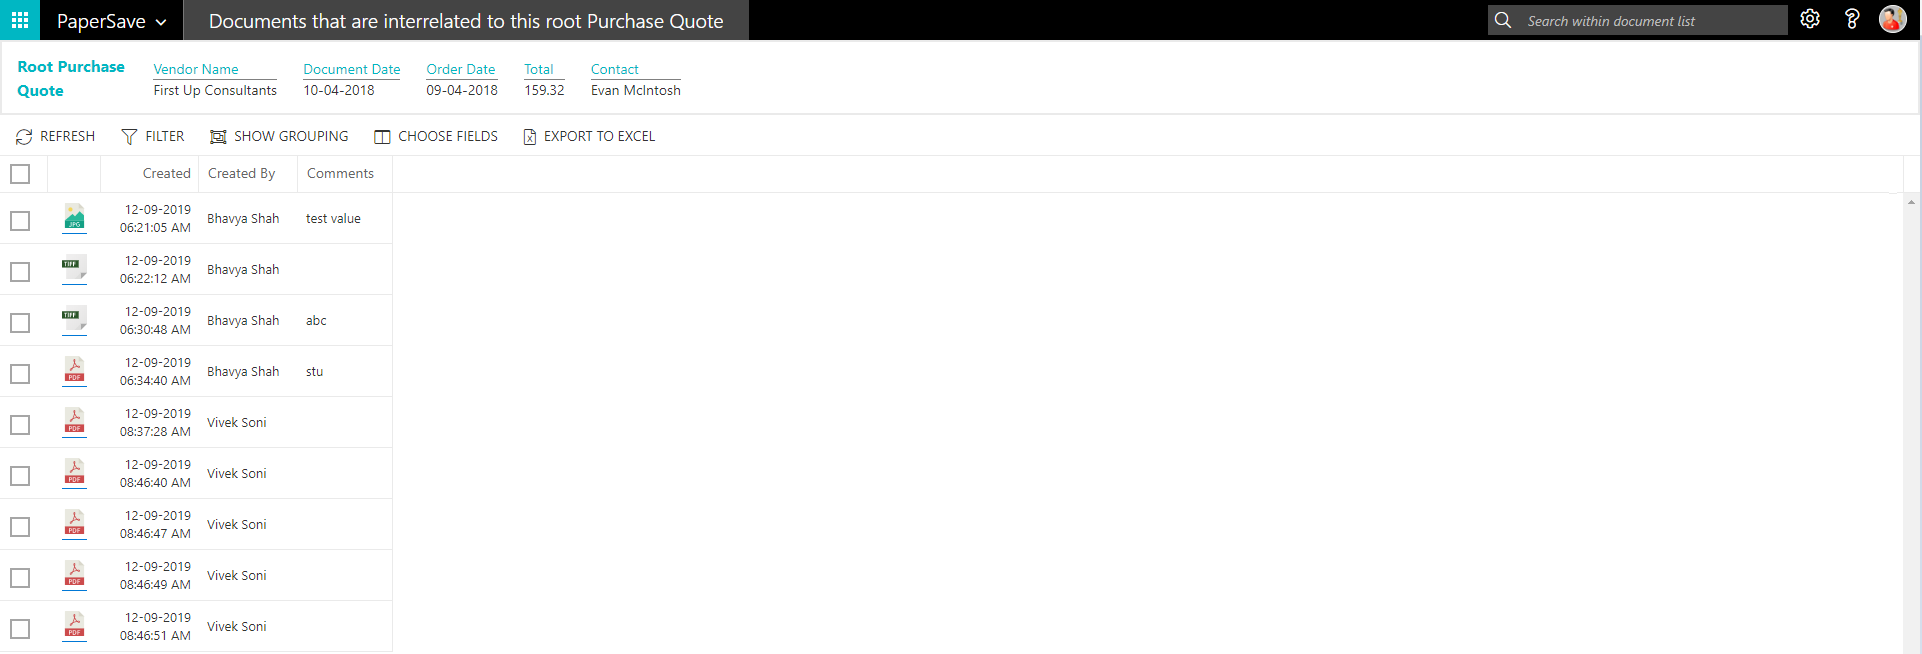
3) Show Interrelated Documents: You can view documents associated with the desired record in various Record types from the record list or the record card.
The above PaperSave functionalities can be divided into further User Scenarios based on the various Record Types as follows:
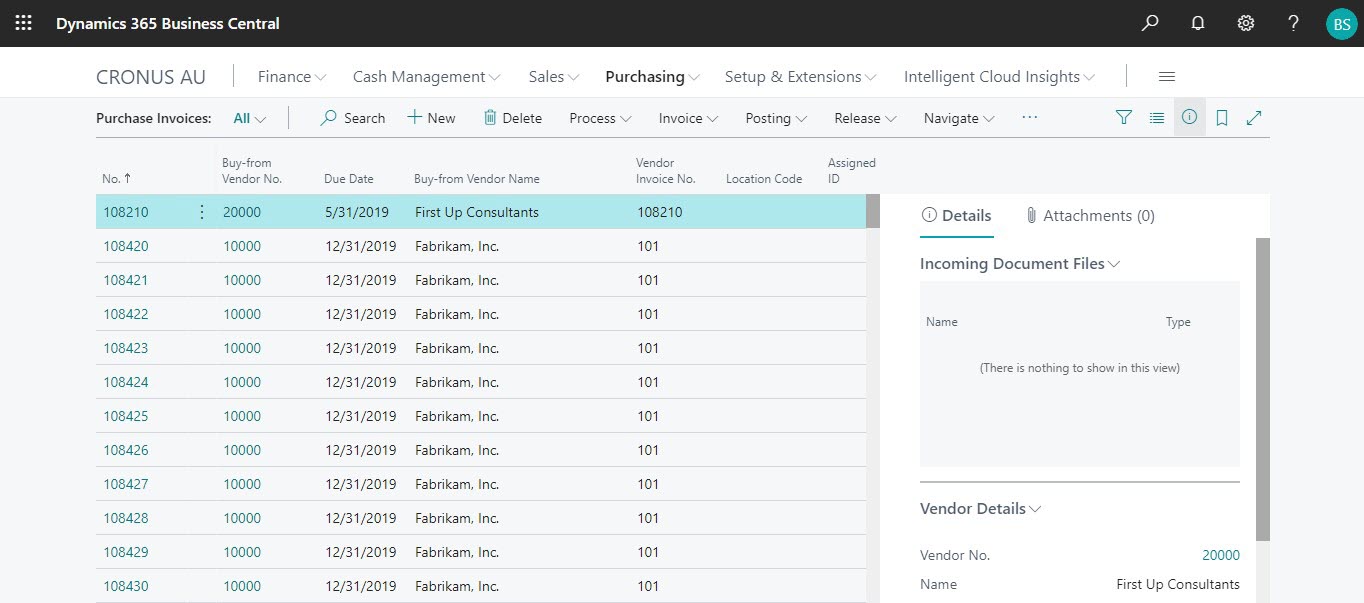
6.1 Purchase Invoice
1. On the Dynamics 365 Business Central Home Page, click on the Purchasing dropdown.
2. Click on Purchase Invoices.

Purchase Invoice List
Clicking on Purchase Invoices will display the list of all records for this record type. You can add documents to all the records in the list as well as view documents and interrelated documents for all the records in the list.
1. Click on the “Process” Tab from the Purchase Invoices list.
2. You will see the PaperSave options such as “Add Document”, “Show Documents”, and “Show Interrelated Documents”.
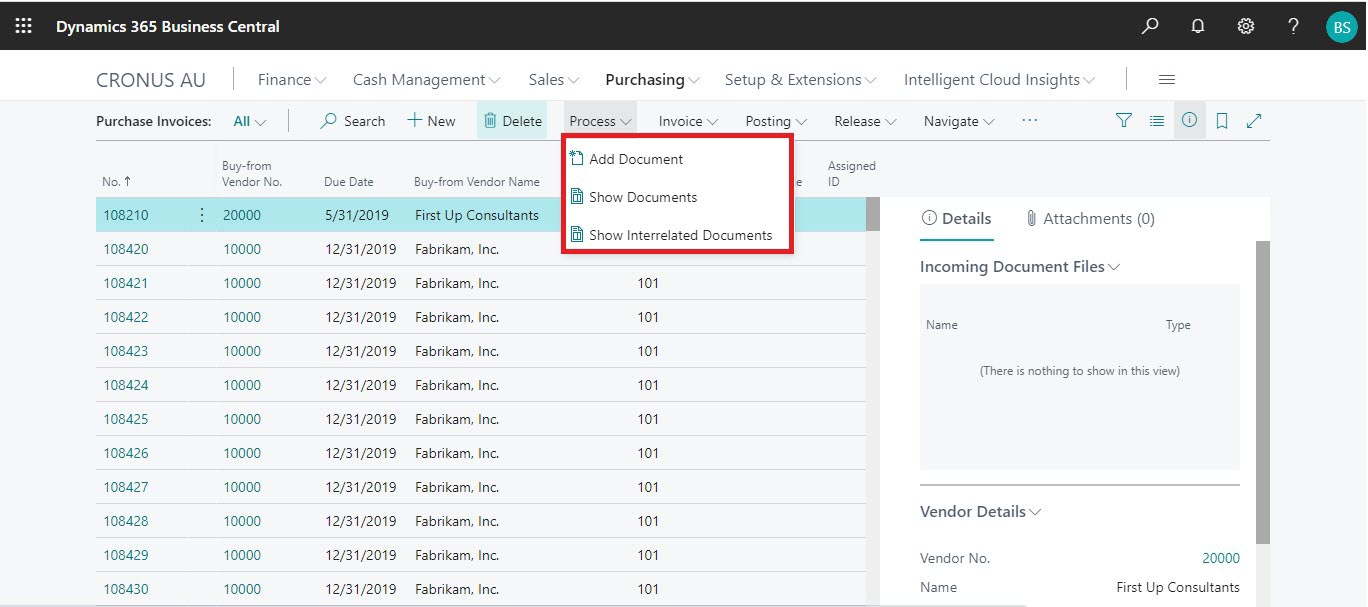
add documents from purchase invoice list
Follow the below steps to test the PaperSave functionality “Add Document” from the Purchase Invoice list:
1. On the Process Tab of Purchase Invoice list, click on “Add Document”.
2. If you are not already logged in, then it will open the PaperSave login prompt (on the first login). Enter your login credentials.
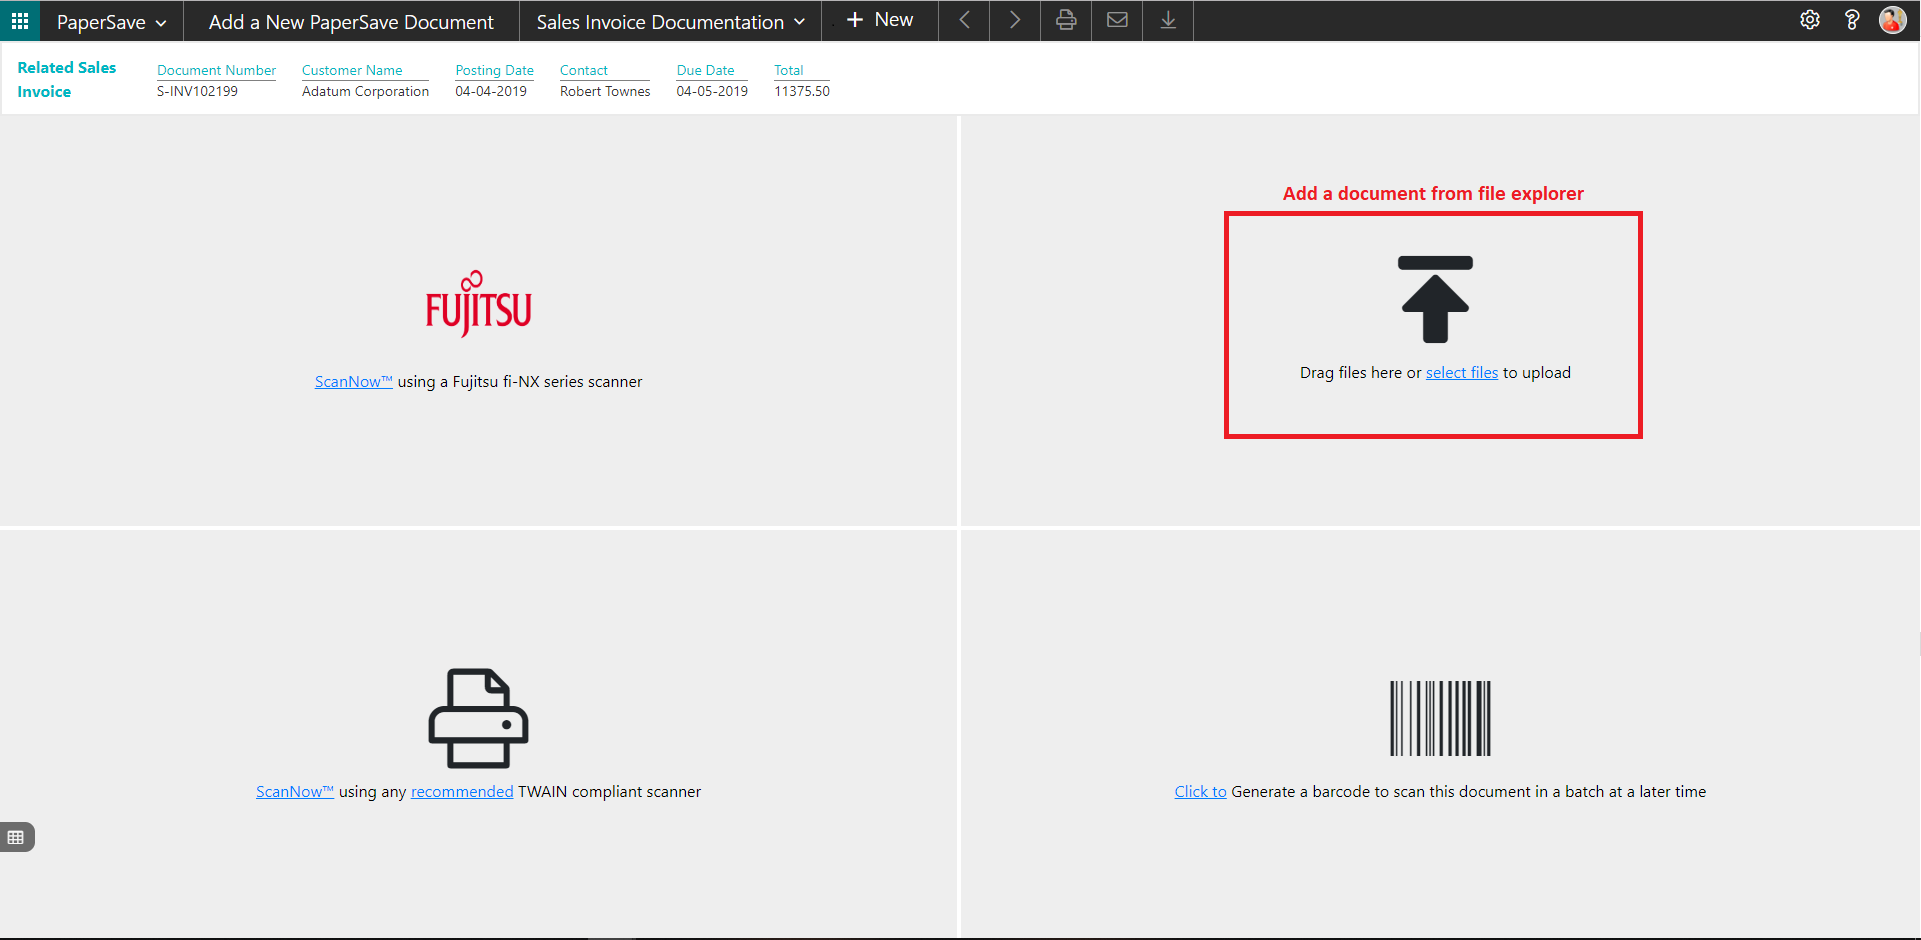
3. Upon login success, the system will navigate you to the “Add Document page”.
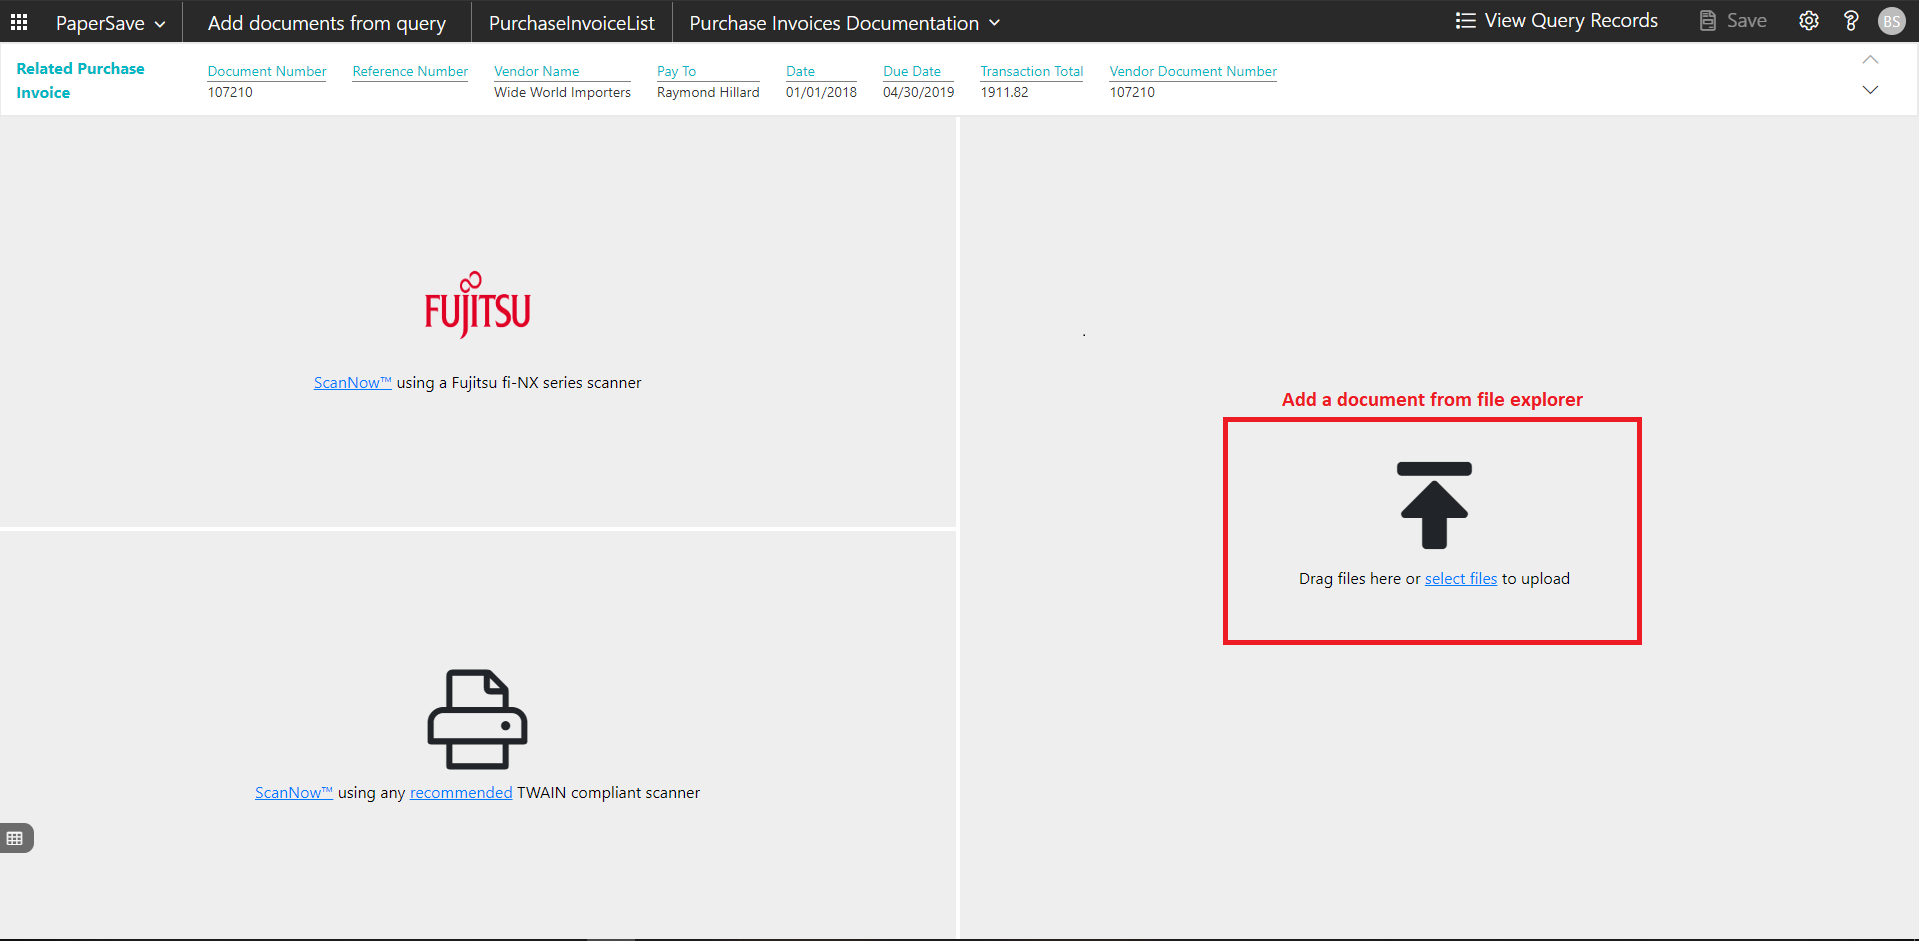
4. Drag or select files to upload documents from your file explorer.
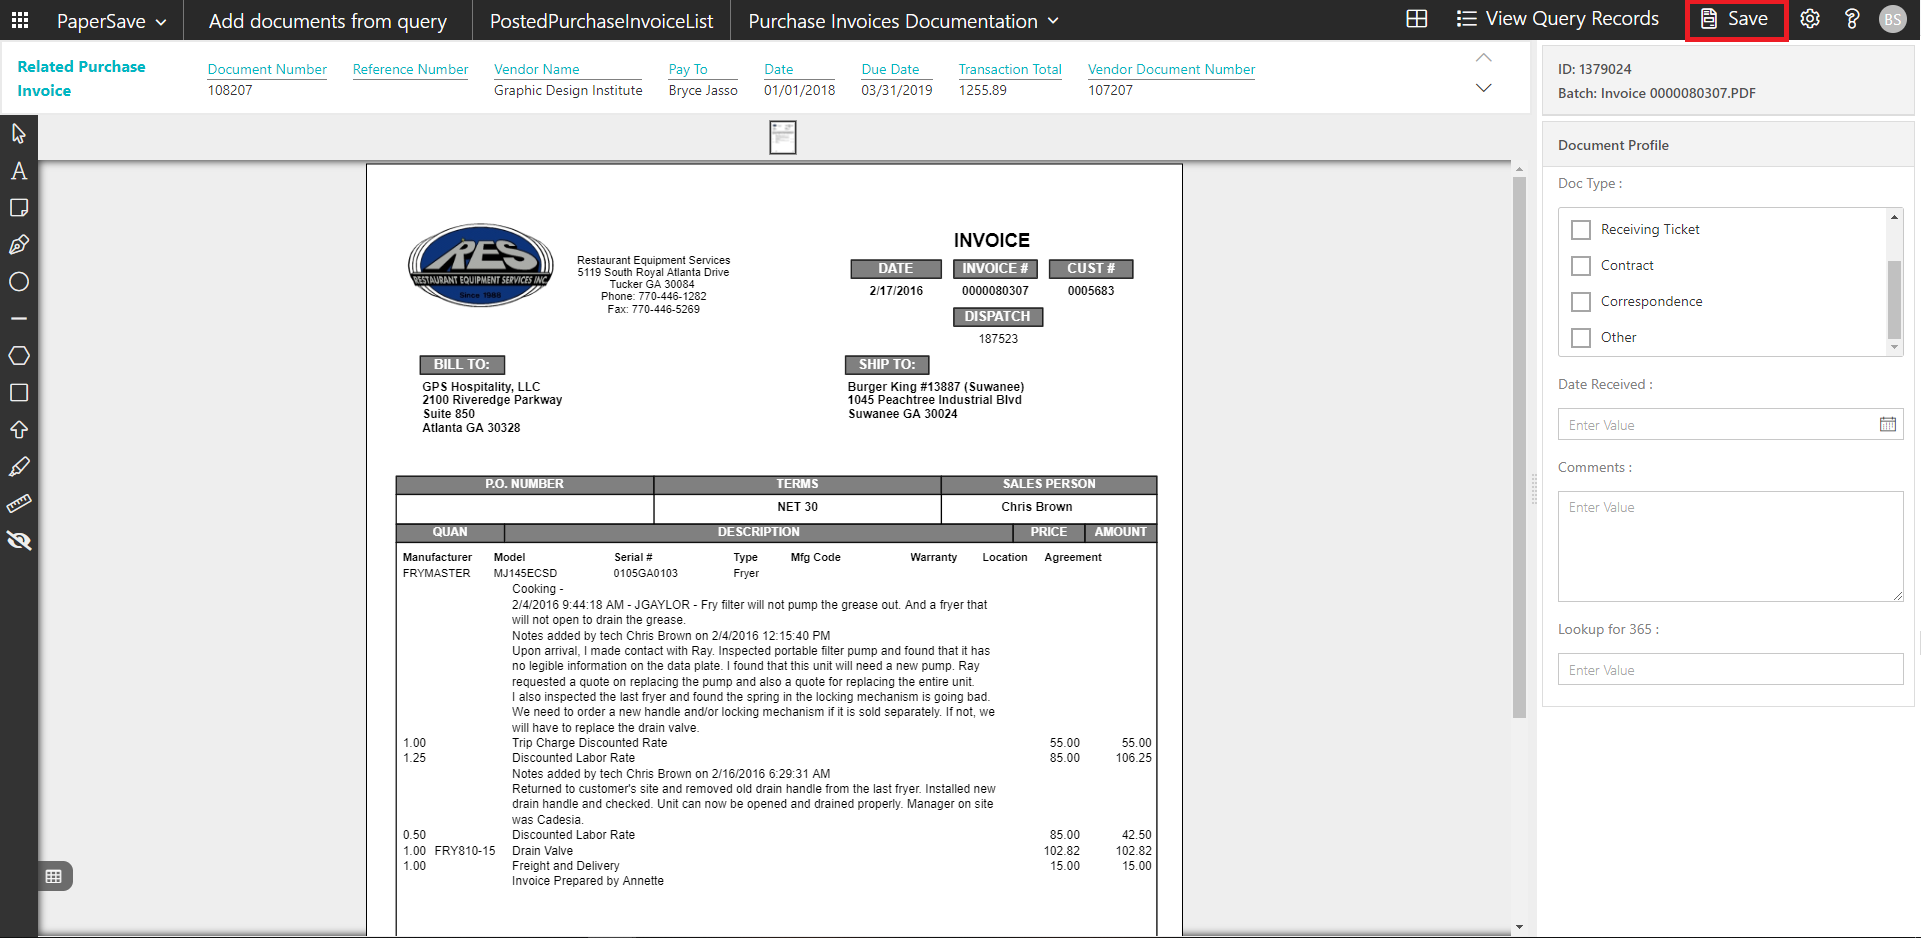
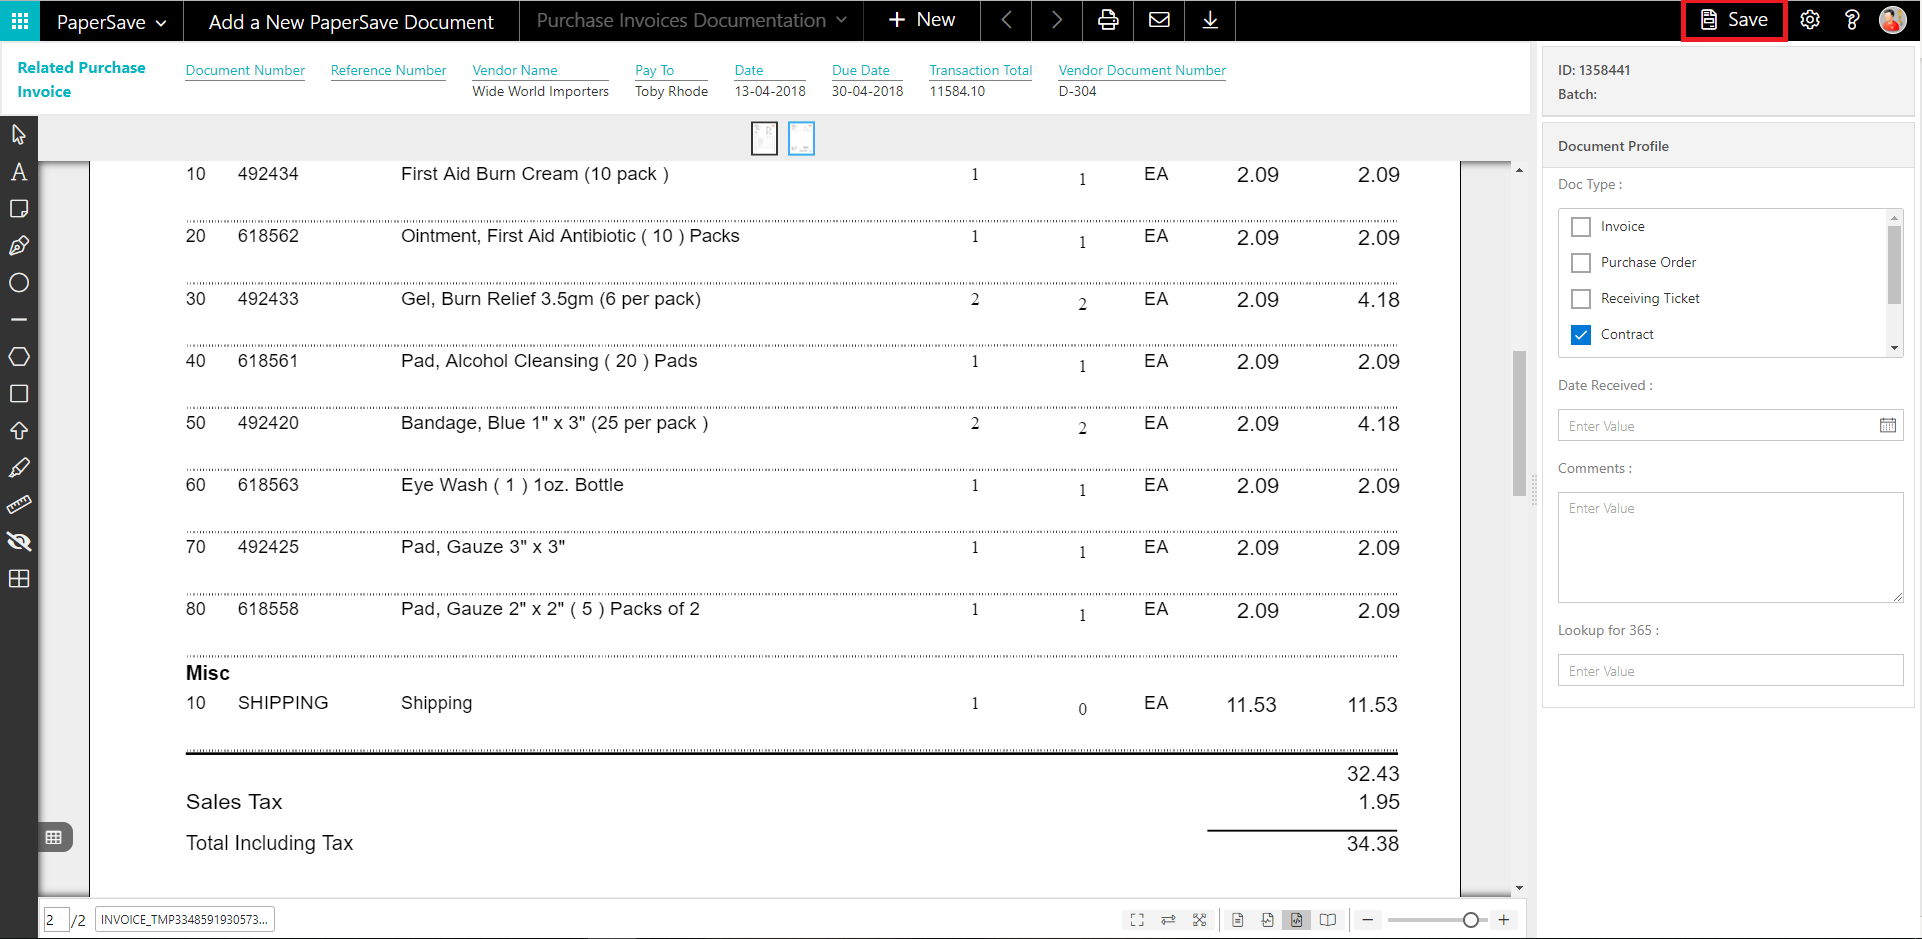
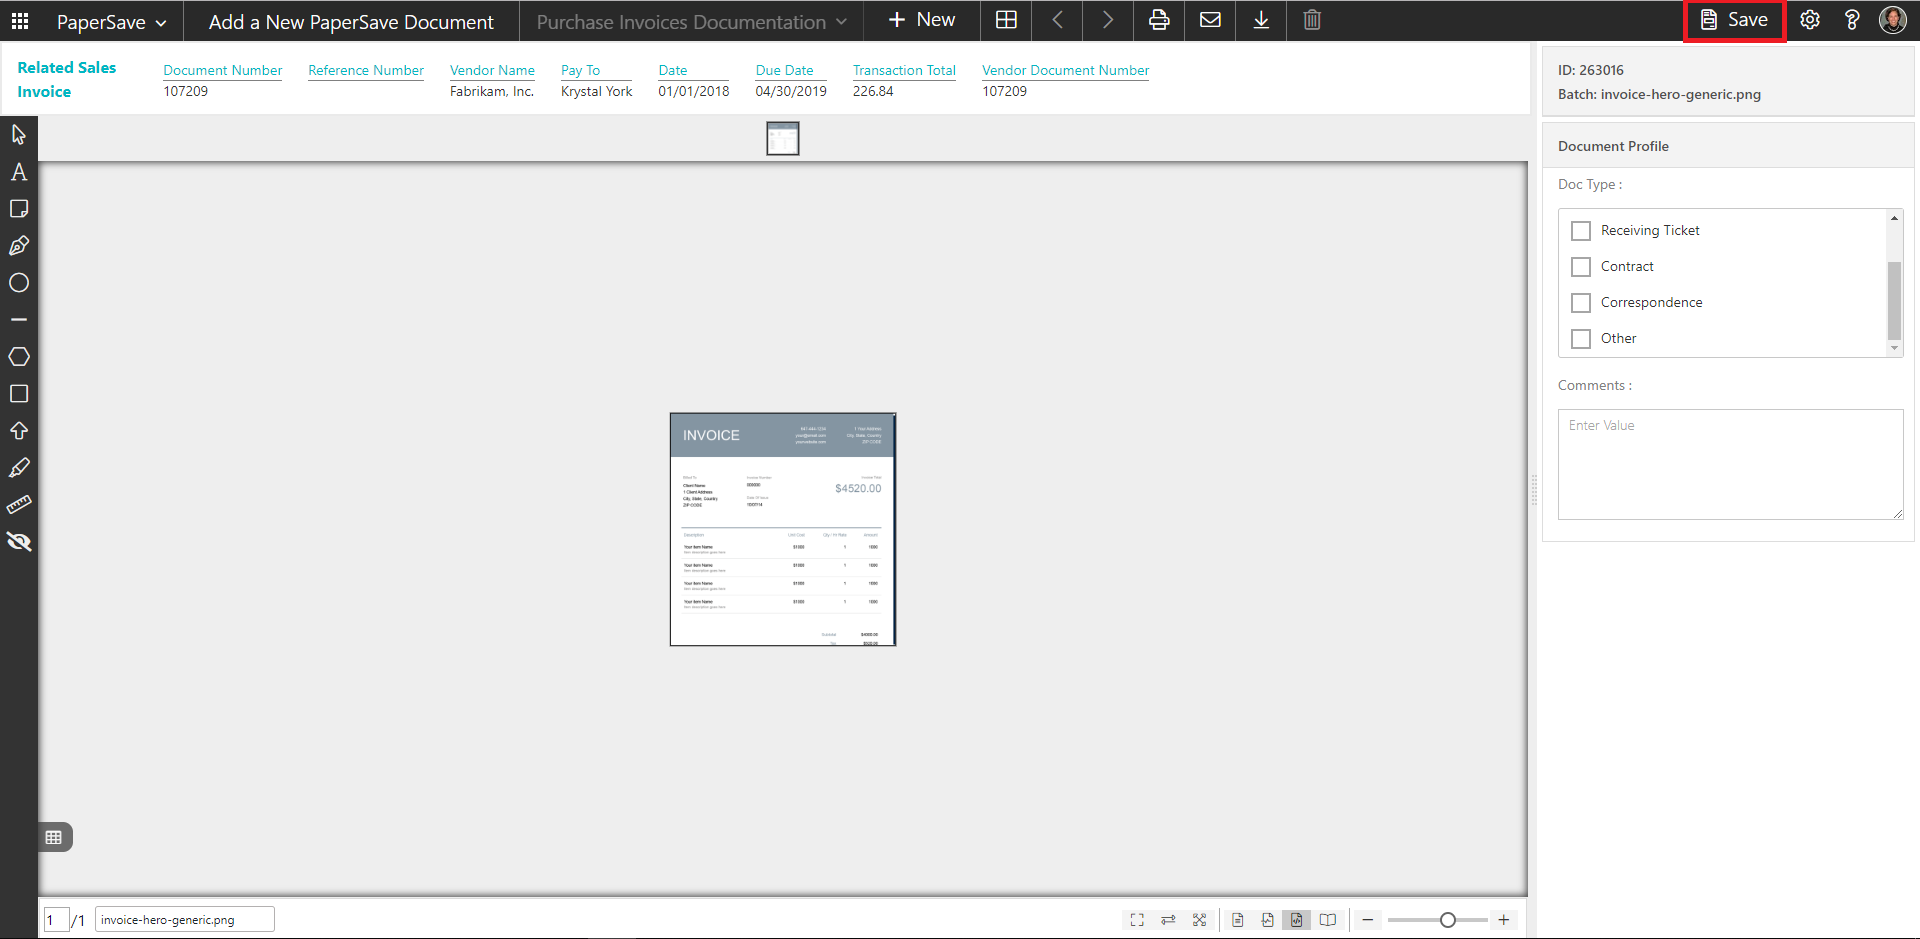
5. This will open the document preview screen. You can select the relevant “document type” in the checkbox, enter the “date received” and add a comment for the document.
6. Click on Save to add the document to all the records in the Purchase Invoice list.

7. Upon successful submission, it will show the toast notification in the upper right corner “1 Document(s) successfully submitted.”
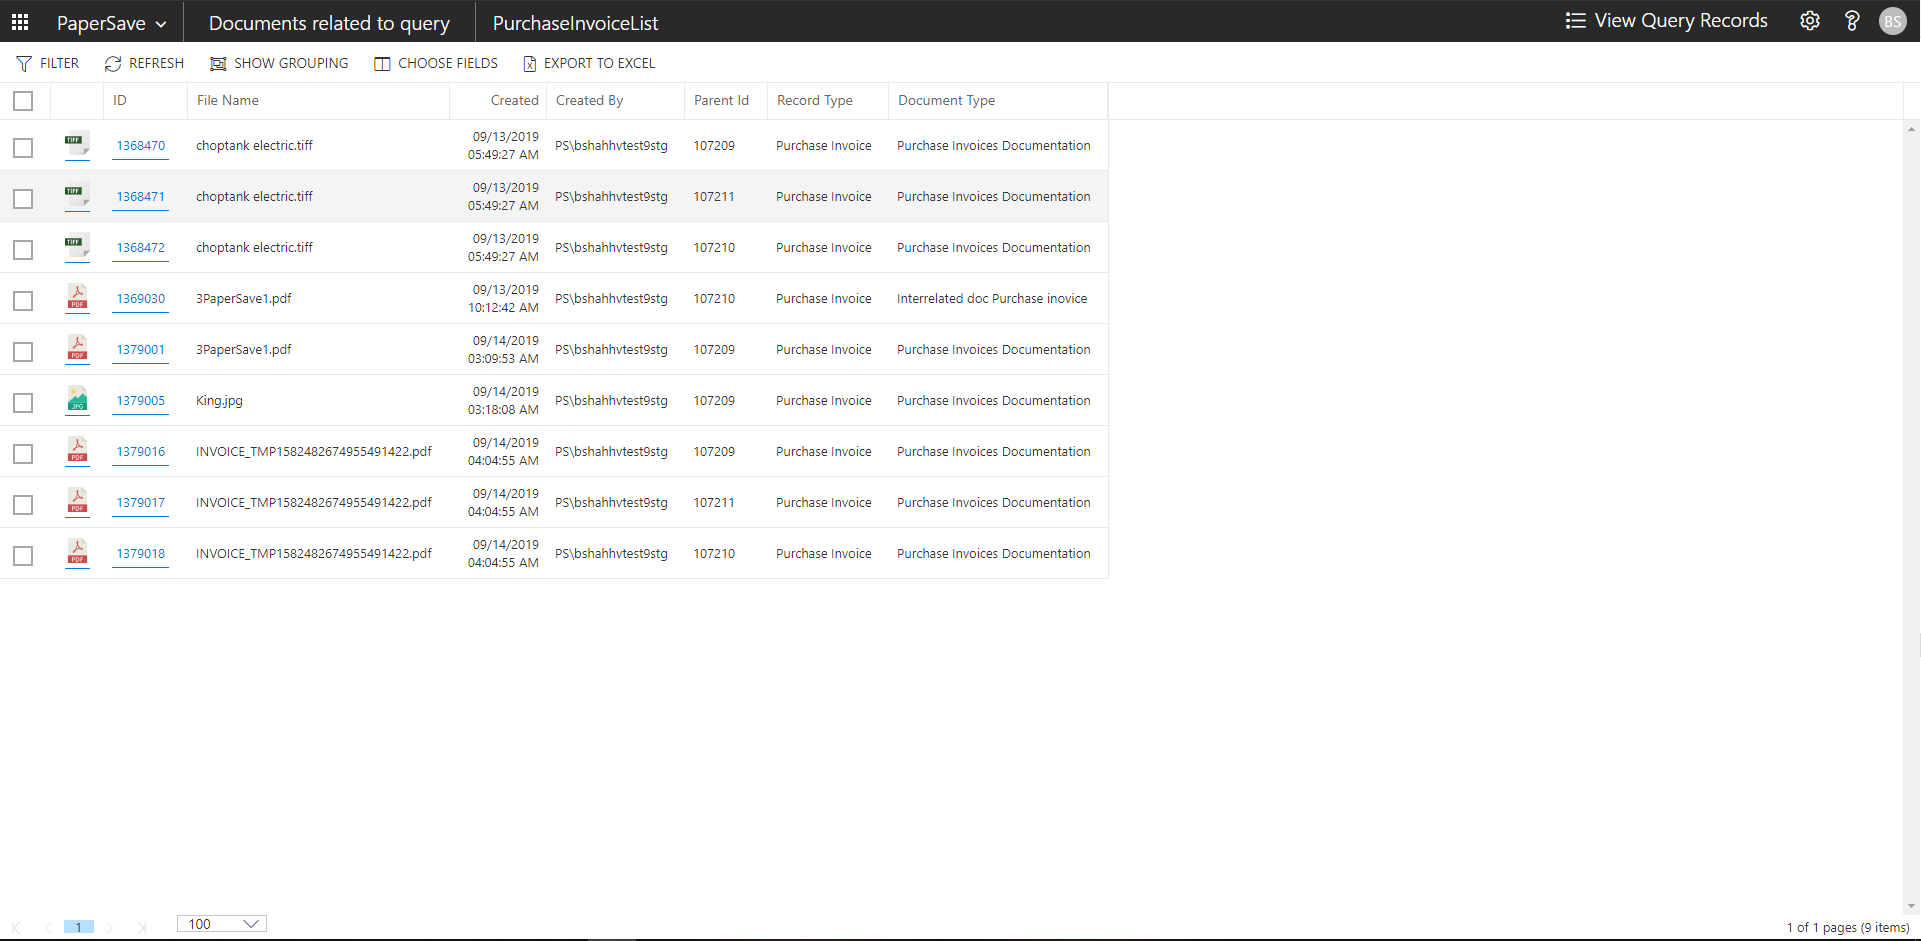
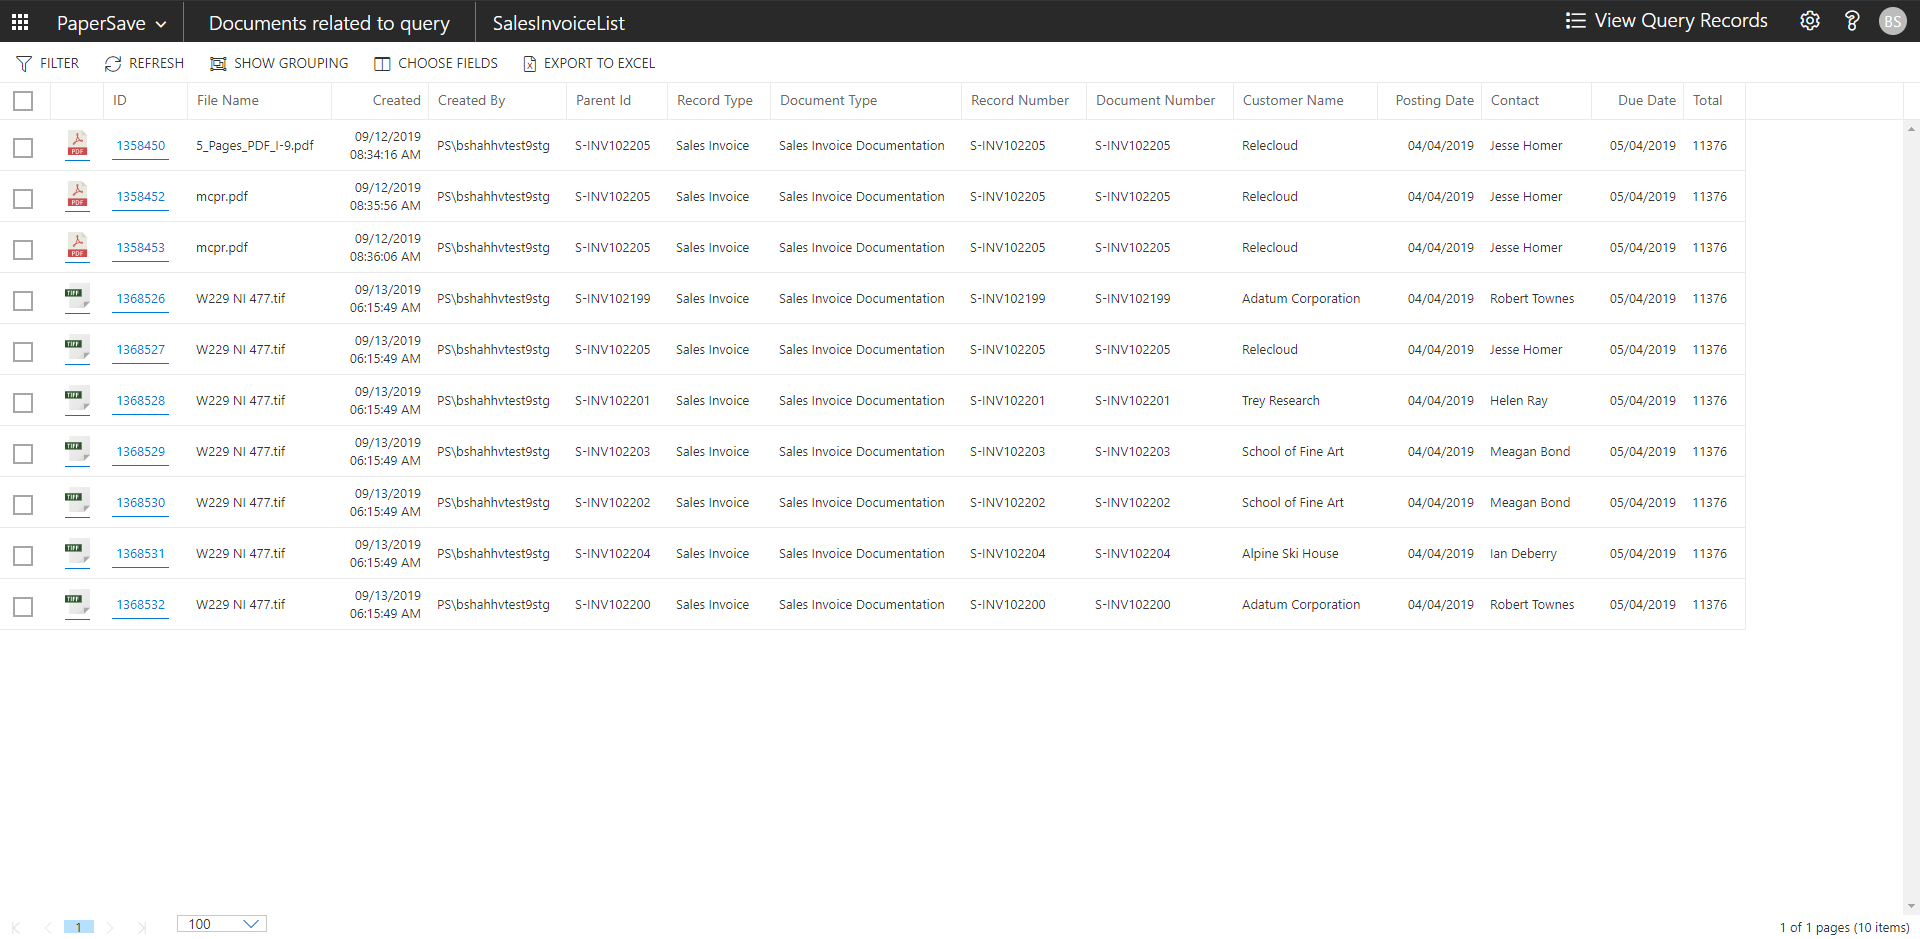
show documents from purchase invoice list
Follow the below steps to test the PaperSave functionality “Show Documents” from Purchase Invoice list:
1. On the Process Tab of Purchase Invoice list, click on “Show Documents”.
2. This will open PaperSave cloud login prompt (on the first login). Enter login credentials.
3. On login success, it will show the available documents for all the records in Purchase Invoice list.
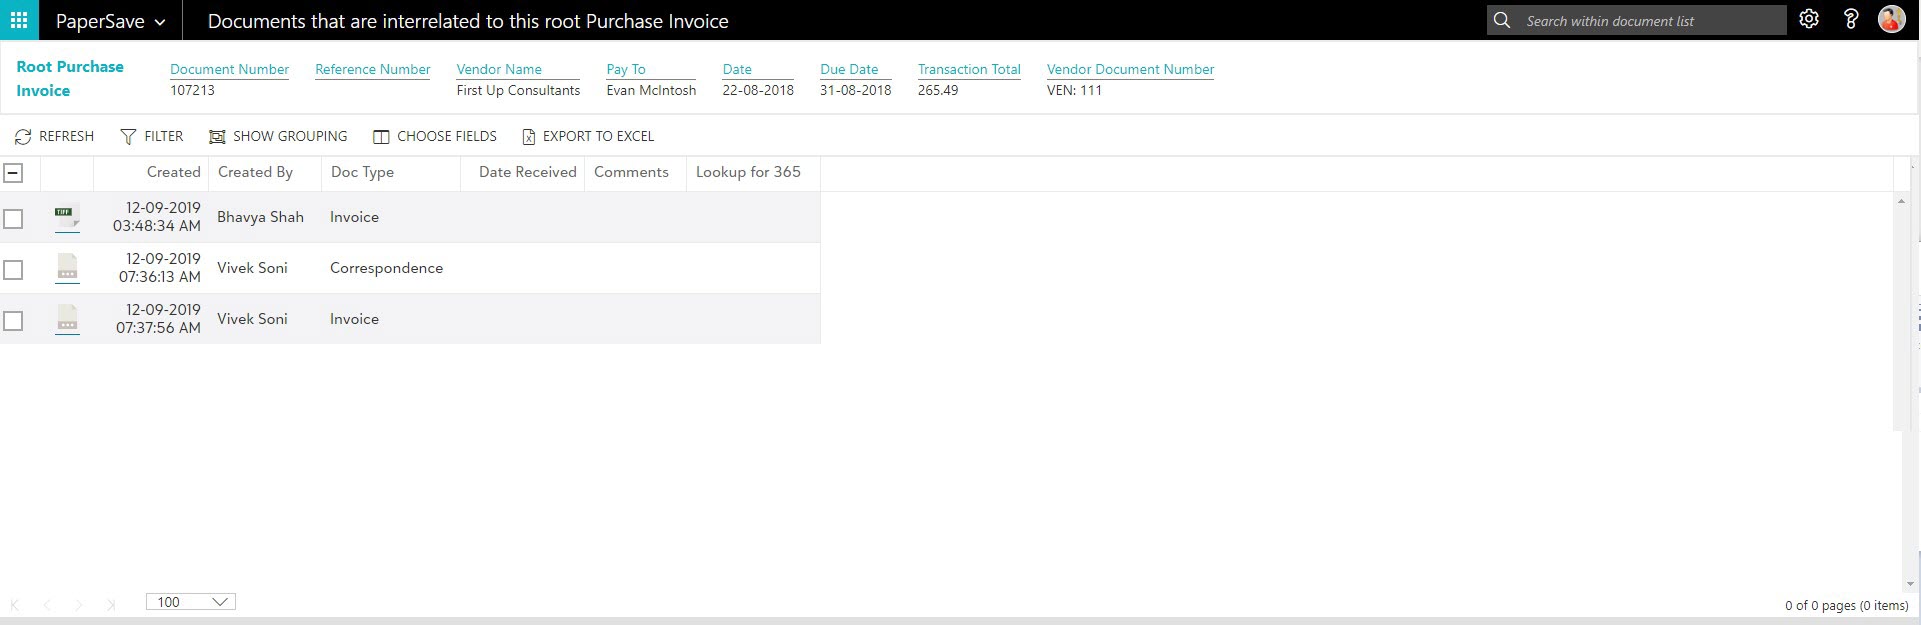
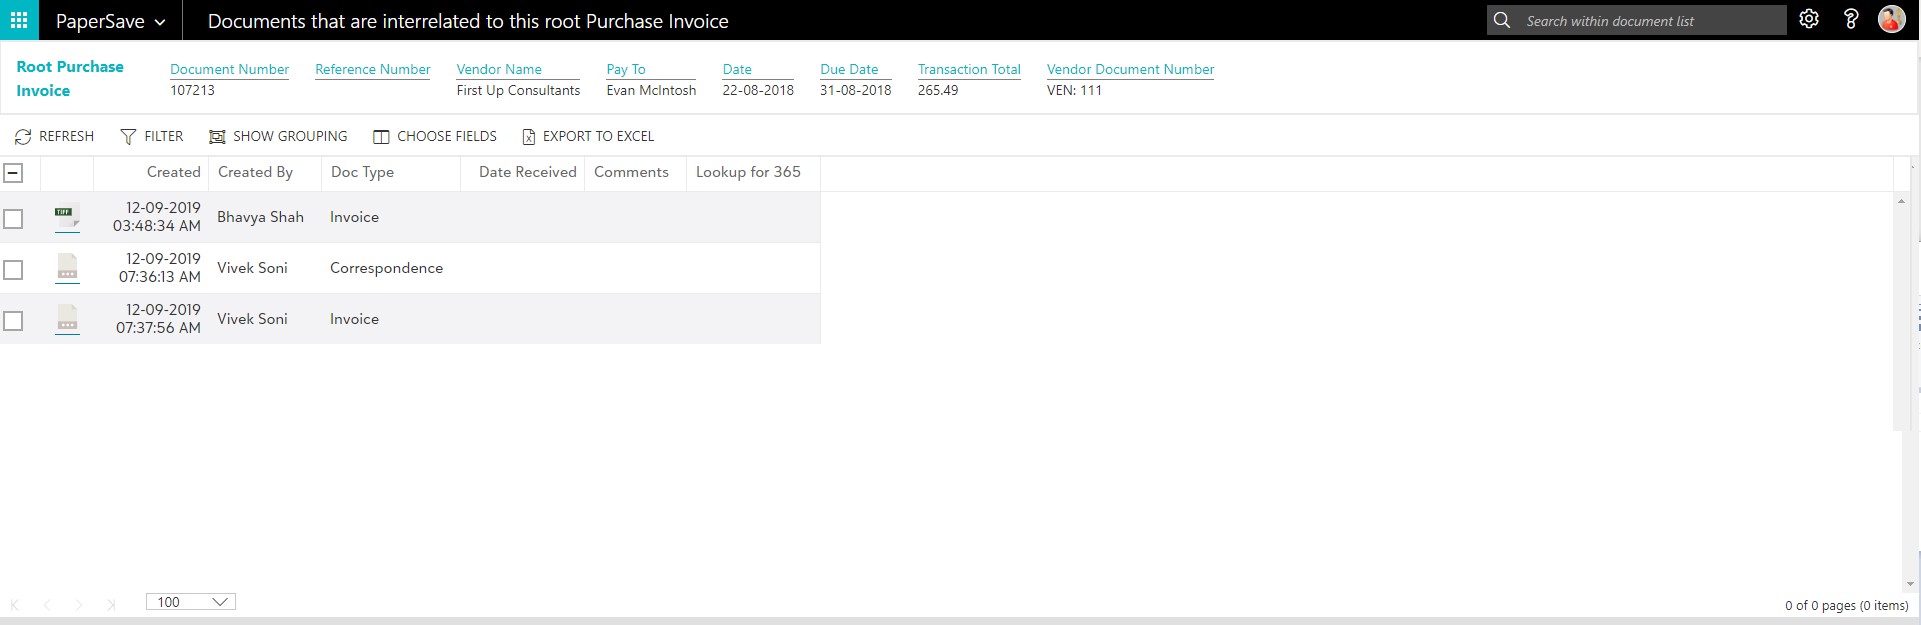
show interrelated documents from purchase invoice list
Follow the below steps to test the PaperSave functionality “Show Interrelated Documents” from Purchase Invoice list:
1. Select the desired record from the list. On the Process Tab of Purchase Invoice list, click on “Show Interrelated Documents”.
2. This will open PaperSave cloud login prompt (on the first login). Enter login credentials.
3. On login success, it will show the available Interrelated documents for the selected record in Purchase Invoice list.
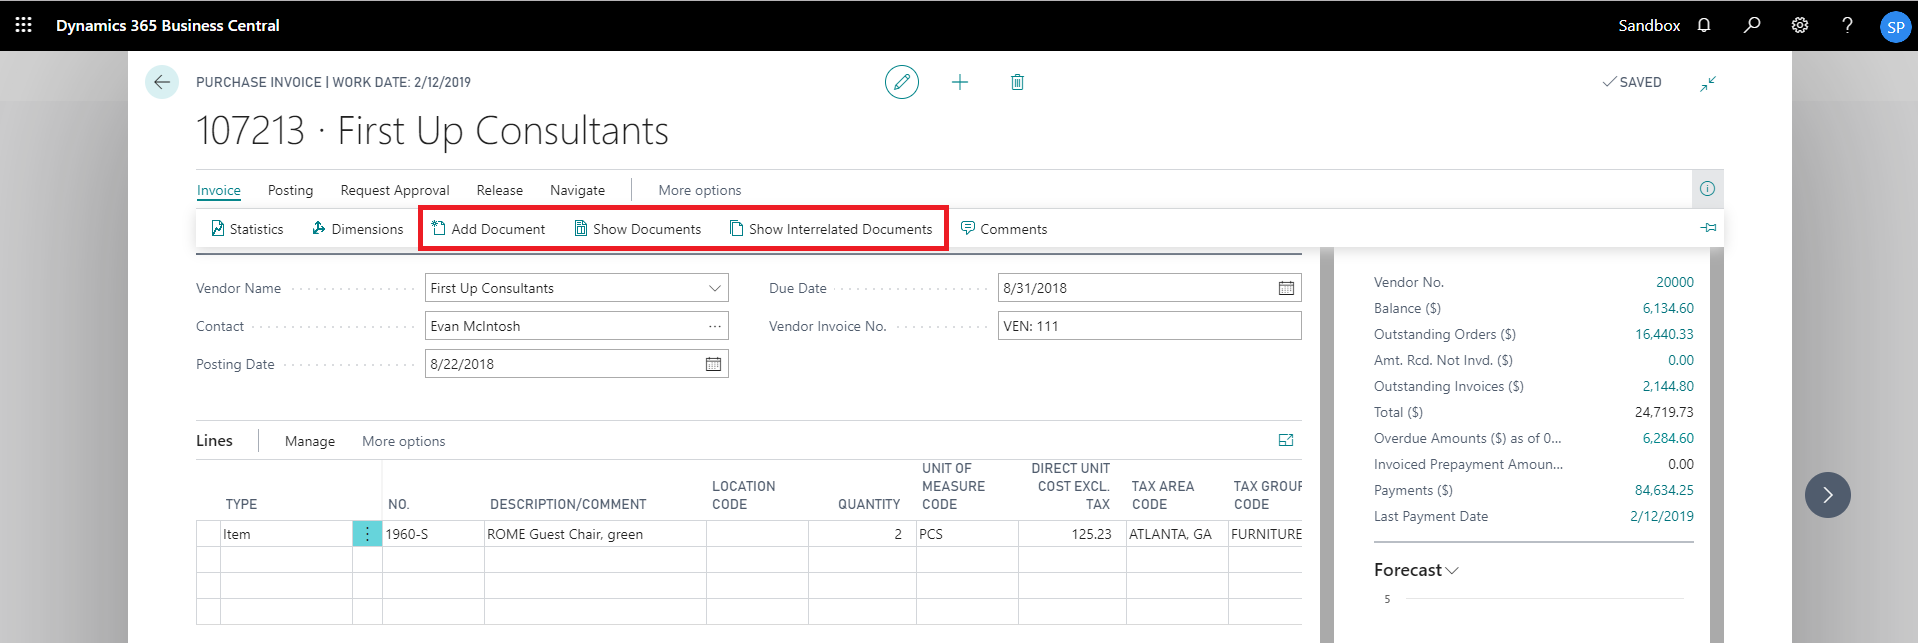
Purchase Invoice Card
Clicking on the Purchase Invoice card opens the selected record in card view with all the record details:
1. Click on the number field of desired record in the Purchase Invoices list.
2. This will launch the Purchase Invoice record.

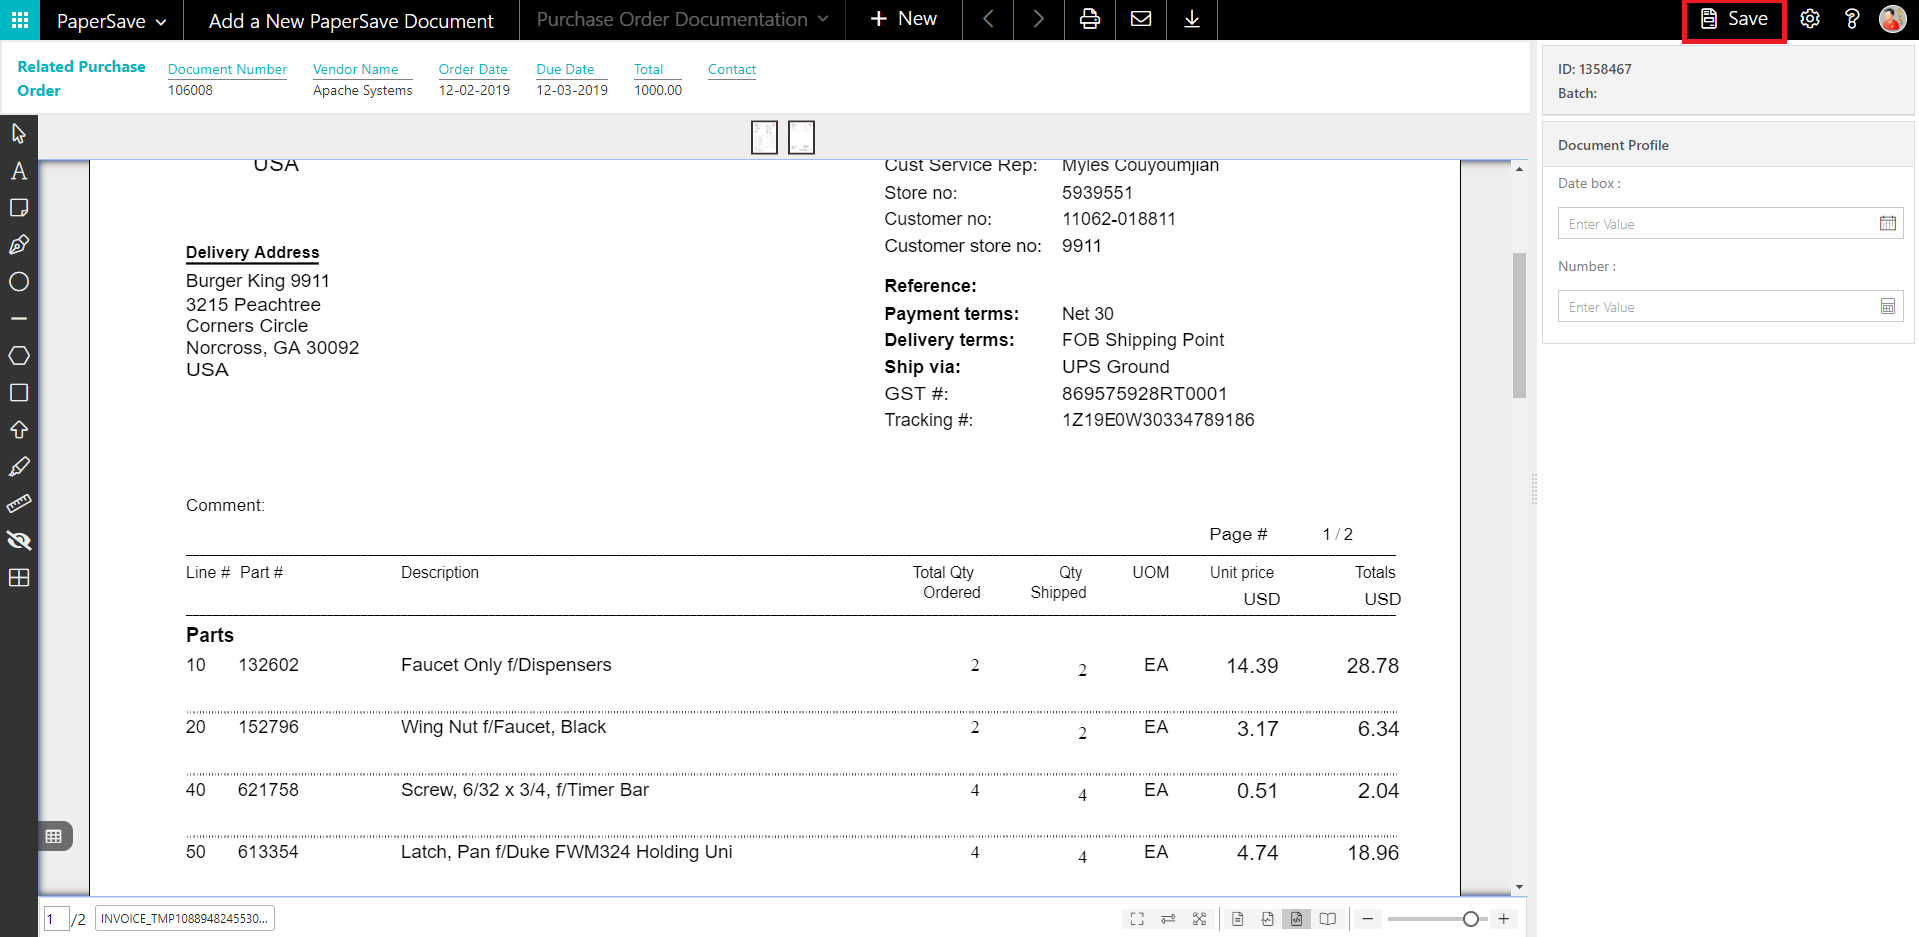
3. Click “Invoice” to access the PaperSave functionalities such as “Add Document”, “Show Documents” and “Show Interrelated Documents”.
add documents from purchase invoice card
Follow the below steps to test the PaperSave functionality “Add Document” from Purchase Invoice card:
1. On the Invoice tab of Purchase Invoice Card, click on “Add Document”.
2. This will open PaperSave Cloud login prompt (on the first login). Enter login credentials.
3. On login success, it will open the “Add Document” page.

4. Drag or select files to upload the desired document.
5. This will open the document preview screen. You can select the relevant “document type” in the checkbox, enter the “date received” and add a comment for the document.
6. Click “Save” to add the document to the selected record.

7. Upon successful submission, it will show the toast notification in the upper right corner “1 Document(s) successfully submitted.”
show documents from purchase invoice card
Follow the below steps to test the PaperSave functionality “Show Documents” from Purchase Invoice card:
1. On the Invoice tab of Purchase Invoice Card, click on “Show Documents”.
2. This will open PaperSave cloud login prompt (on the first login). Enter login credentials.
3. On login success, it will show the available document/s.
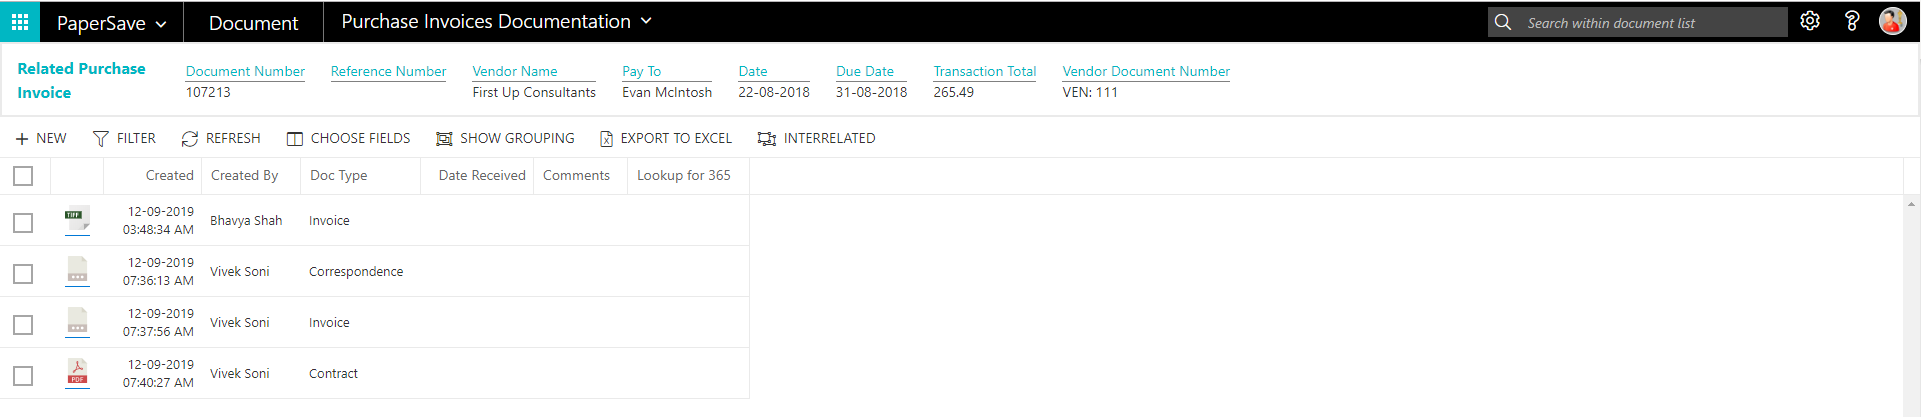
show interrelated documents from purchase invoice card
Follow the below steps to test the PaperSave functionality “Show Interrelated Documents” from Purchase Invoice card:
1. On the Invoice tab of Purchase Invoice Card, click on “Show Interrelated Documents”.
2. This will open PaperSave Cloud login prompt (on the first login). Enter login credentials.
3. On login success, it will show the available Interrelated documents to the record.
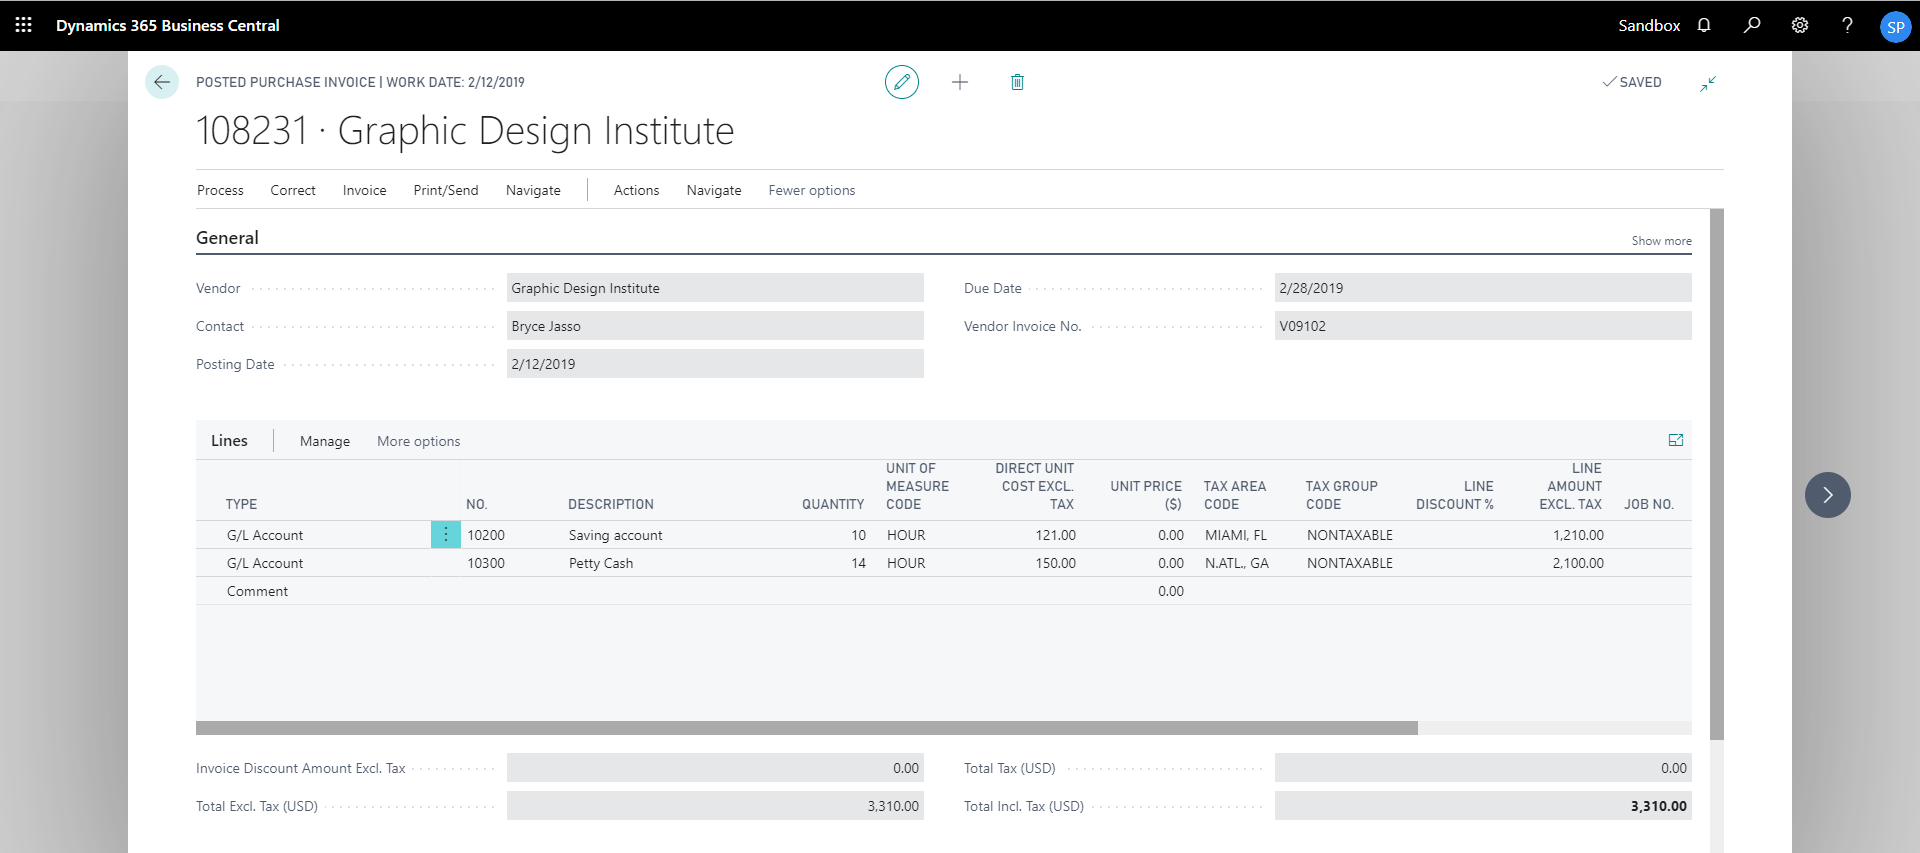
6.2 Posted Purchase Invoice
The following steps describe how to interact with PaperSave within the “Posted Purchase Invoice” record type’s main screen:
1. On the Dynamics 365 Business Central Home Page, click on the Purchasing dropdown.
2. Click on Posted Purchase Invoices.

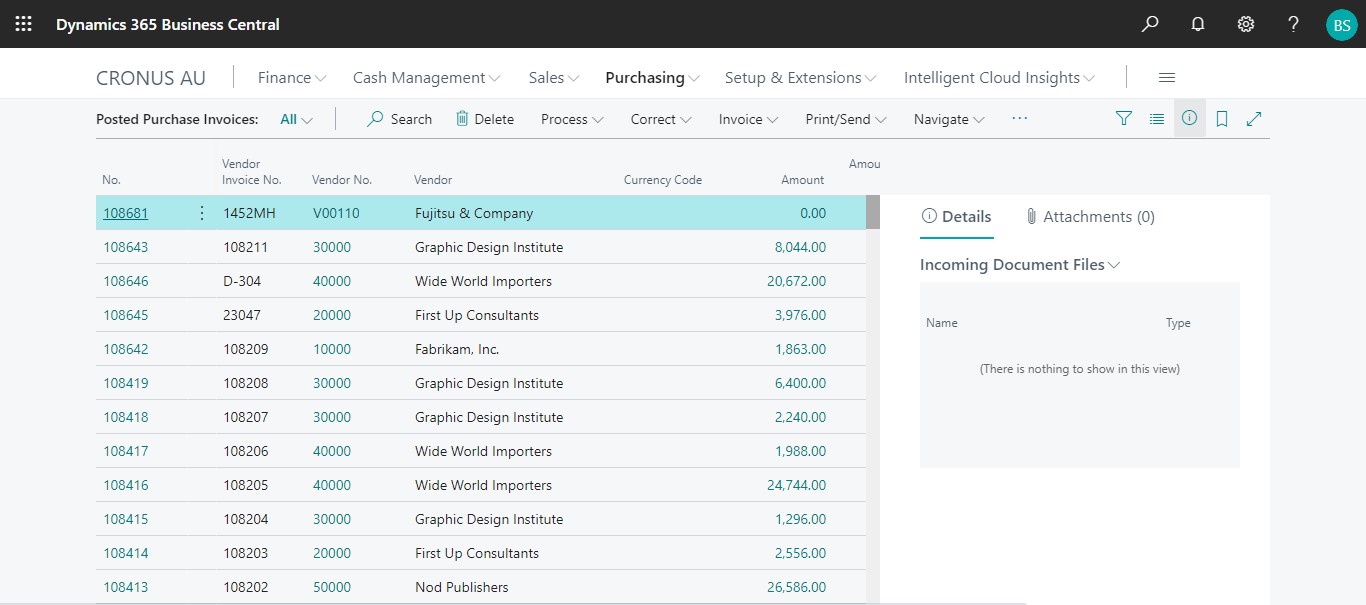
Posted Purchase Invoice List
Clicking on Posted Purchase Invoices will display the list of all records for this record type. You can add documents to all the records in the list as well as view documents and Interrelated documents for all the records in the list.
1. Click on “Process” Tab from the Posted Purchase Invoices list.
2. You will see the PaperSave options such as “Add Document”, “Show Documents”, and “Show Interrelated Documents”.

add documents from posted purchase invoice list
Follow the below steps to test the PaperSave functionality “Add Document” from Posted Purchase Invoice list:
1. On the Process Tab of Posted Purchase invoice list, click on “Add Document”.
2. If you are not already logged in, then it will open the PaperSave login prompt (on the first login). Enter your login credentials.
3. Upon login success, the system will navigate you to the “Add Document page”.
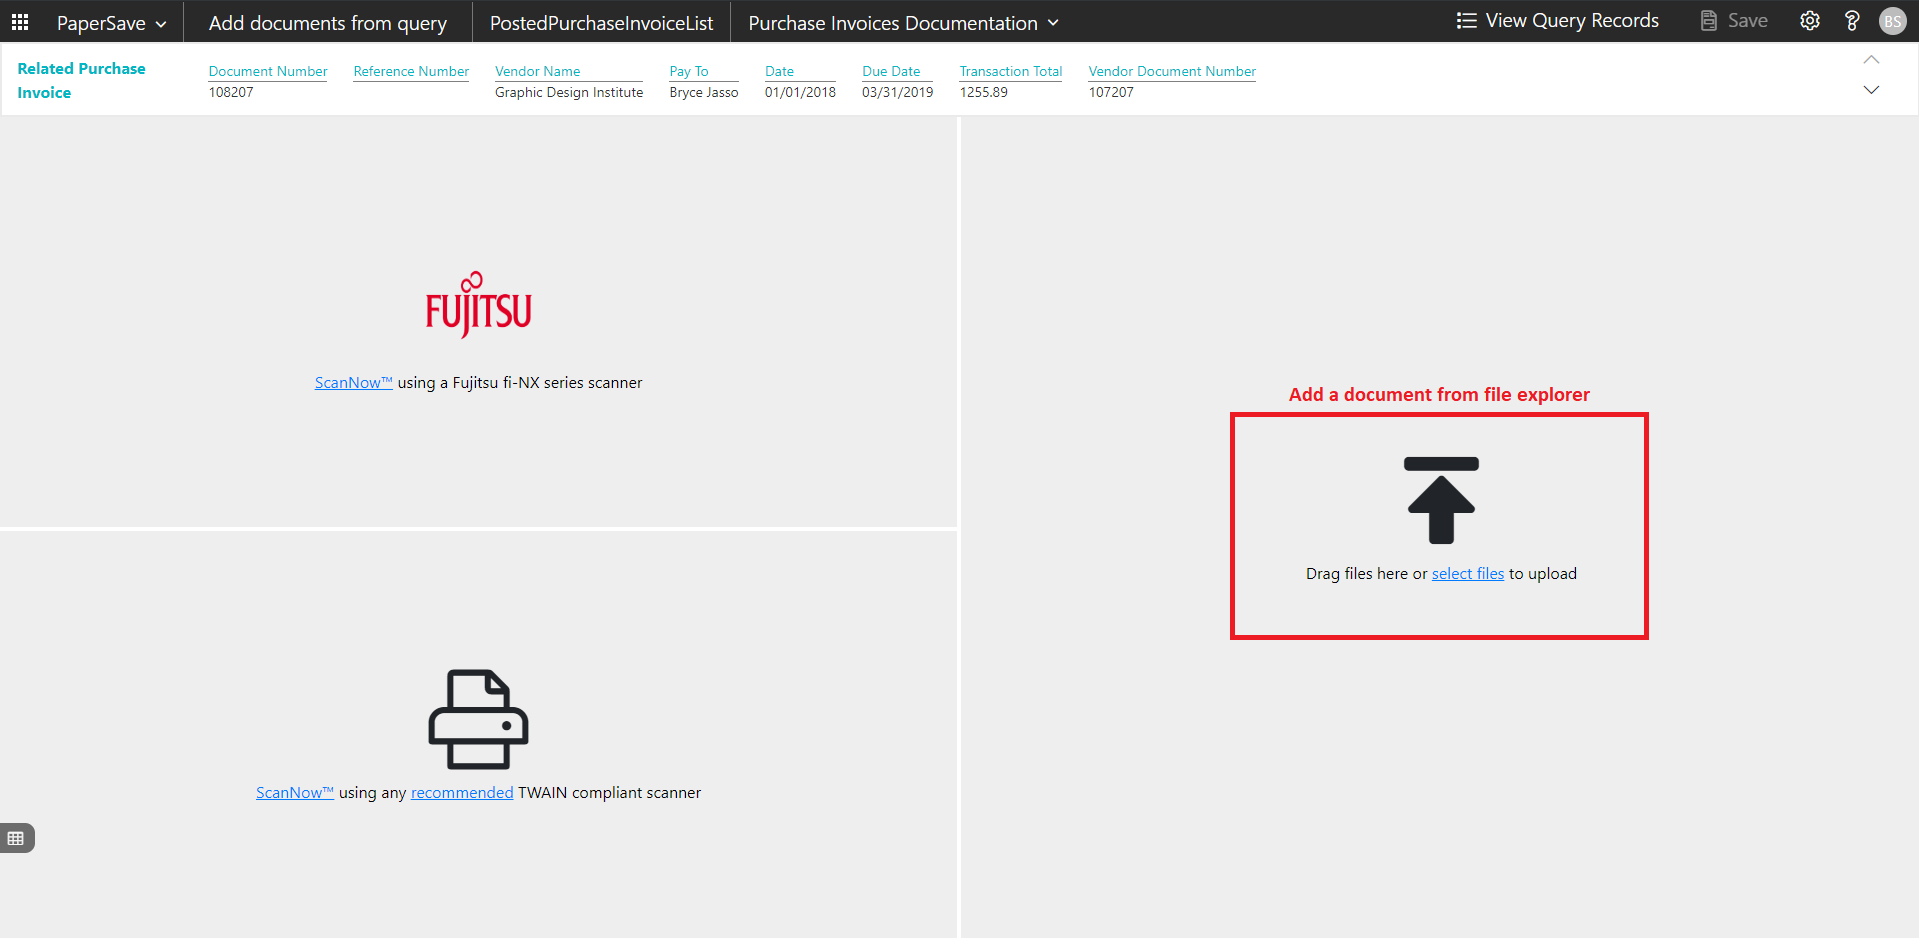
4. Drag or select files to upload documents from your file explorer.
5. This will open the document preview screen. You can select the relevant “document type” in the checkbox, enter the “date received” and add a comment for the document.
6. Click on Save to add the document to all the records in the Posted Purchase Invoice list.
7. Upon successful submission, it will show the toast notification in the upper right corner “1 Document(s) successfully submitted.”
show documents from posted purchase Invoice list
Follow the below steps to test the PaperSave functionality “Show Documents” from Posted Purchase Invoice list:
1. On the Process Tab of Posted Purchase invoice list, click on “Show Documents”.
2. This will open PaperSave cloud login prompt (on the first login). Enter login credentials.
3. On login success, it will show the available documents for all the records in the Posted Purchase Invoice list.

show interrelated documents from posted purchase Invoice list
Follow the below steps to test the PaperSave functionality “Show Interrelated Documents” from Posted Purchase Invoice list:
1. Select the desired record from the list. On the Process Tab of Posted Purchase invoice list, click on “Show Interrelated Documents”.
2. This will open PaperSave cloud login prompt (on the first login). Enter login credentials.
3. On login success, it will show the available Interrelated documents for the selected record in the Posted Purchase Invoice list.

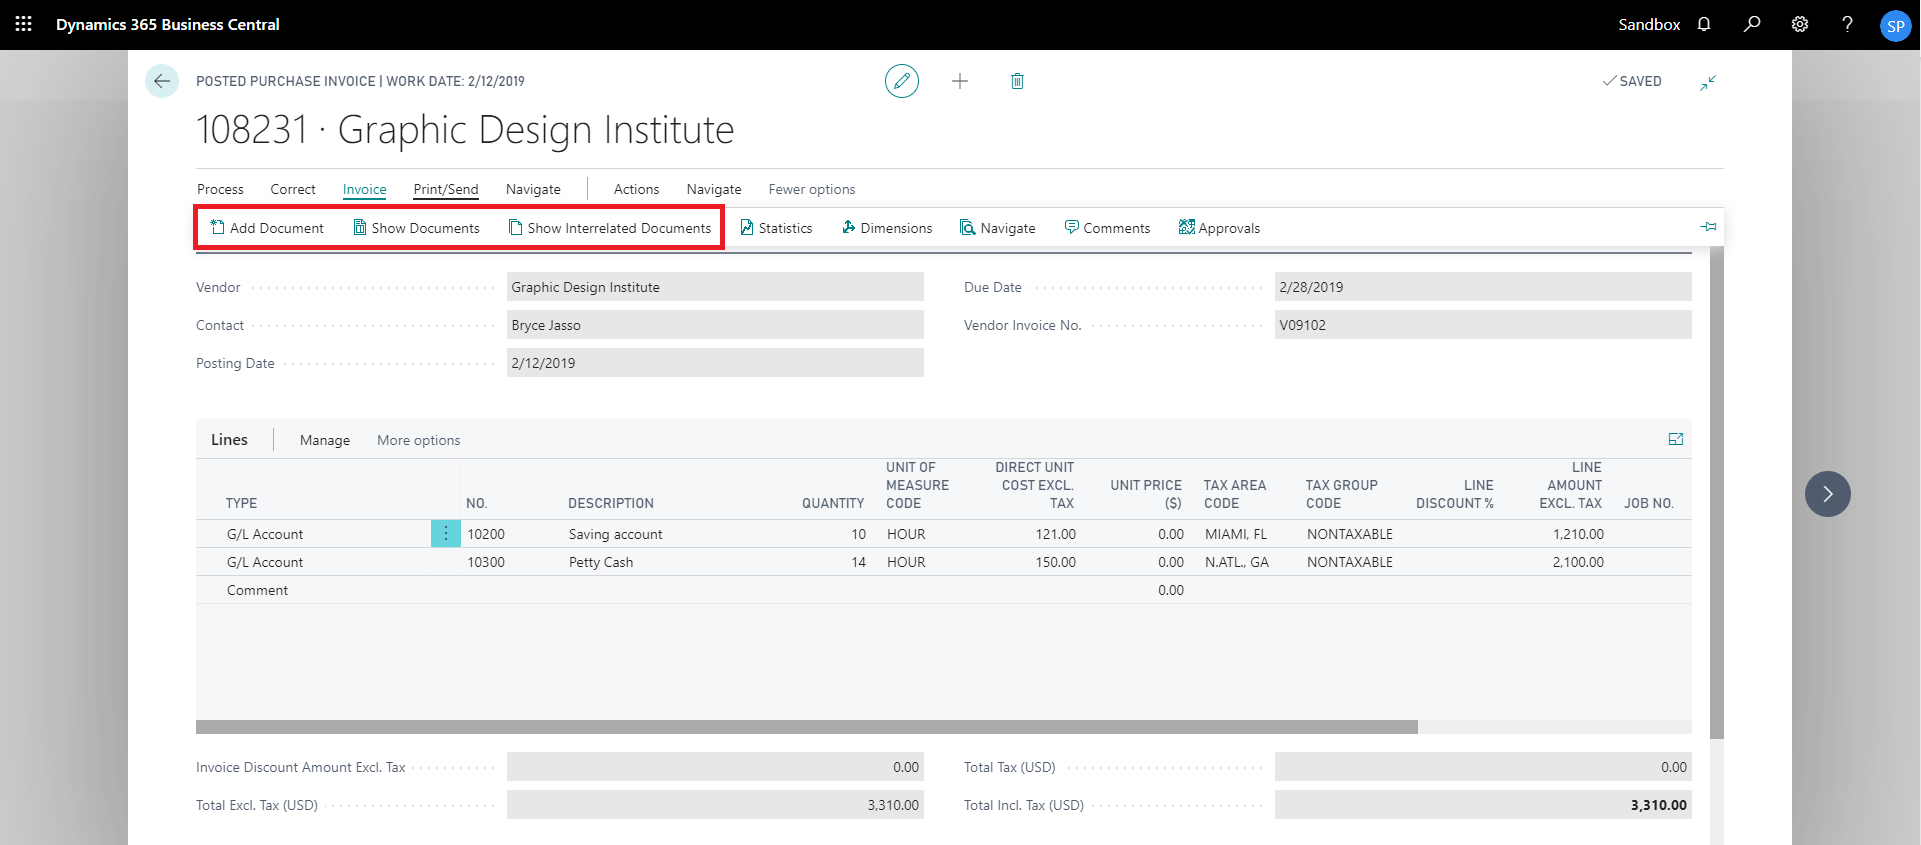
Posted Purchase Invoice Card
Clicking on the Posted Purchase Invoice card opens the selected record in card view with all the record details:
1. Click on the number field of the desired record in the Posted Purchase Invoices list.
2. This will launch the Posted Purchase Invoice record.
3. Click on “Invoice” to access the PaperSave functionalities such as “Add Document”, “Show Documents” and “Show Interrelated Documents”.
add documents from posted purchase invoice card
Follow the below steps to test the PaperSave functionality “Add document” from Posted Purchase Invoice card:
1. On the Invoice tab of Posted Purchase Invoice Card, click on “Add Document”.
2. This will open PaperSave Cloud login prompt (on the first login). Enter login credentials.
3. On login success, it will open the “Add Document” page.

4. Drag or select files to upload the desired document.
5. This will open the document preview screen. You can select the relevant “document type” in the checkbox, enter the “date received” and add a comment for the document.
6. Click on “Save” to add the document to the selected record.
7. Upon successful submission, it will show the toast notification in the upper right corner “1 Document(s) successfully submitted.”
show documents from posted purchase invoice card
Follow the below steps to test the PaperSave functionality “Show documents” from Posted Purchase Invoice card:
1. On the Invoice tab of Posted Purchase Invoice Card, click on “Show Documents”.
2. This will open PaperSave Cloud login prompt (on the first login). Enter login credentials.
3. On login success, it will show the available document/s.

show interrelated documents from posted purchase invoice card
Follow the below steps to test the PaperSave functionality “Show Interrelated Documents” from Posted Purchase Invoice card:
1. On the Invoice tab of Posted Purchase Invoice Card, click on “Show Interrelated Documents”.
2. This will open the PaperSave Cloud login prompt (on the first login). Enter login credentials.
3. On login success, it will show the available Interrelated documents to the record.
6.3 Purchase Quote
The following steps describe how to interact with PaperSave within the “Purchase Quote” record type’s main screen:
1. On the Dynamics 365 Business Central Home Page, click on the Purchasing dropdown.
2. Click on Purchase Quotes.

Purchase Quote List
Clicking on Purchase Quotes will display the list of all records for this record type. You can add documents to all the records in the list as well as view documents and Interrelated documents for all the records in the list.
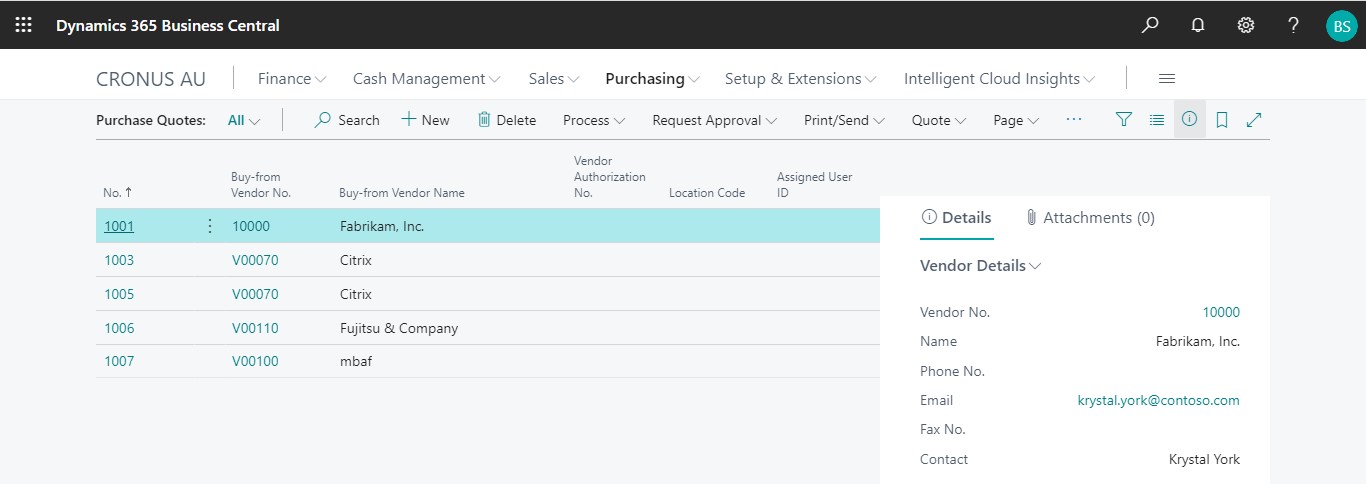
1. Click on “Process” Tab from the Purchase Quote list.
2. You will see the PaperSave options such as “Add Document”, “Show Documents”, and “Show Interrelated Documents”.

add documents from purchase quote list
Follow the below steps to test the PaperSave functionality “Add Document” from the Purchase Invoice list
1. On the Process Tab of Purchase Quote list, click on “Add Document”.
2. If you are not already logged in, then it will open the PaperSave cloud login prompt (on the first login). Enter your login credentials.
3. Upon login success, the system will navigate you to the “Add Document page”.
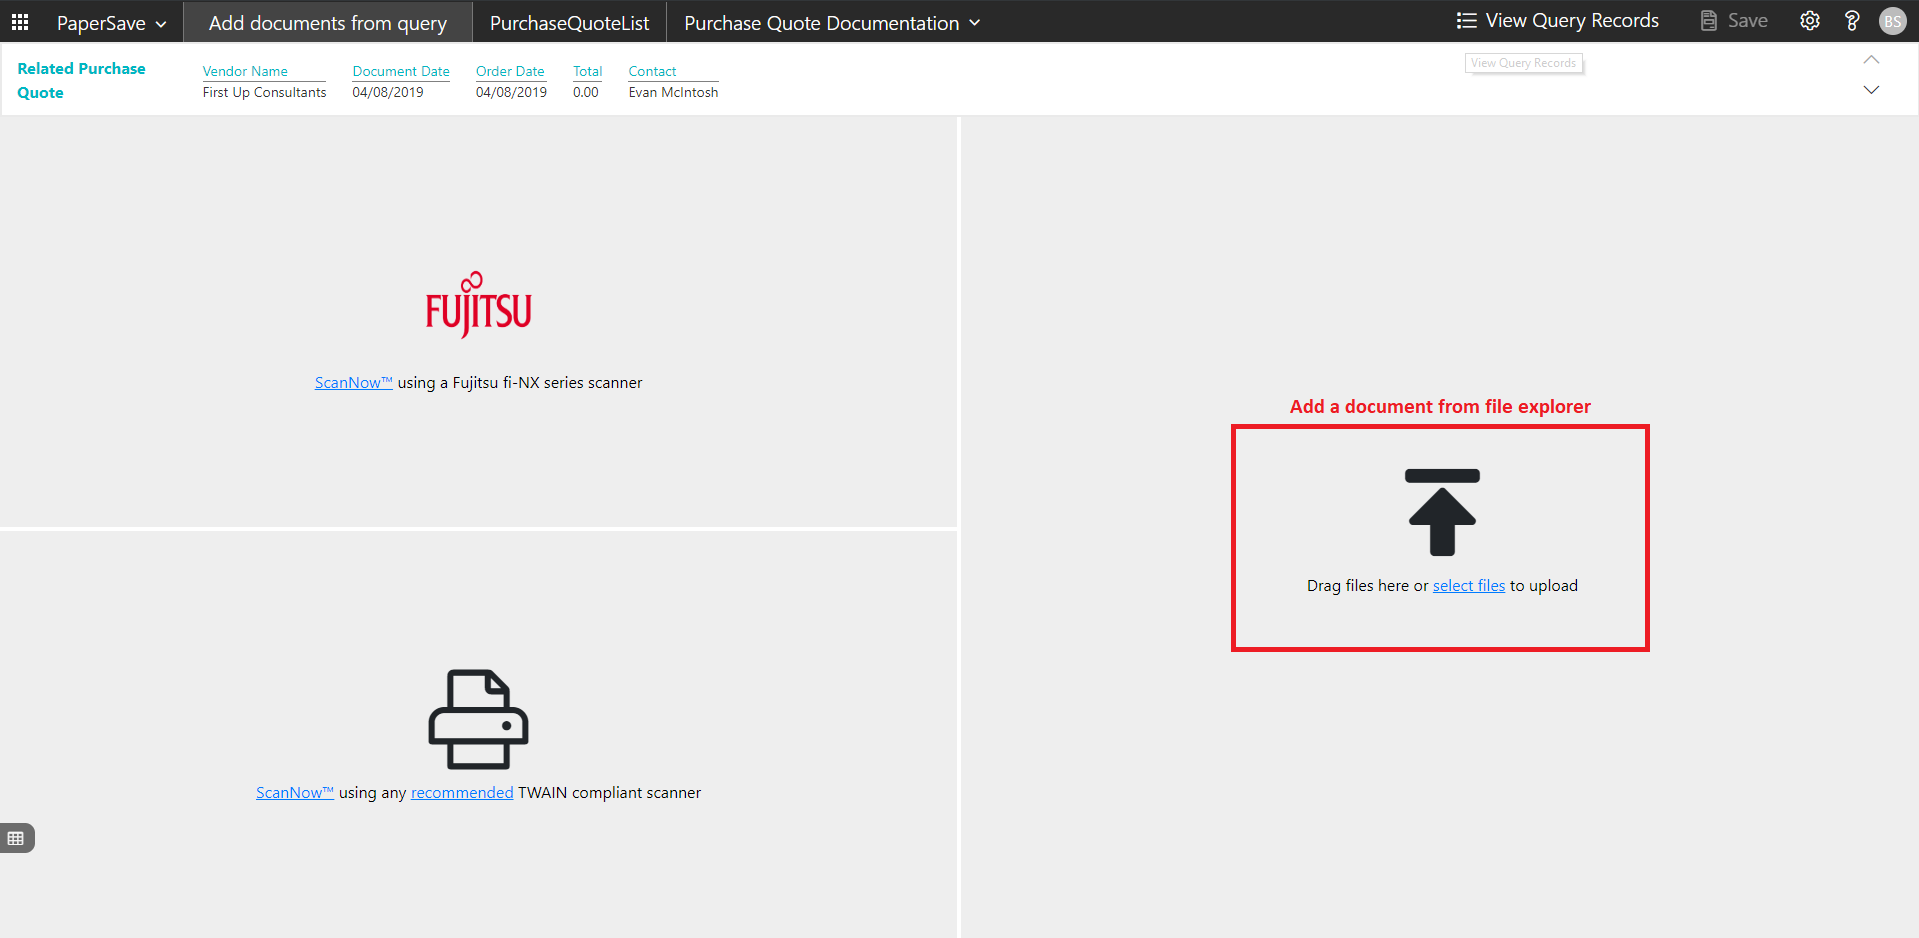
4. Drag or select files to upload documents from your file explorer.
5. This will open the document preview screen. You can add a comment for the document.
6. Click Save to add the document to all the records in the Purchase Quote list.

7. Upon successful submission, it will show the toast notification in the upper right corner “1 Document(s) successfully submitted.”
show documents from purchase quote list
Follow the below steps to test the PaperSave functionality “Show Documents” from Purchase Quote list:
1. On the Process Tab of Purchase Quote list, click on “Show Documents”.
2. This will open the PaperSave cloud login prompt (on the first login). Enter login credentials.
3. On login success, it will show the available documents for all the records in the Purchase Quote list.

show interrelated documents from purchase quote list
Follow the below steps to test the PaperSave functionality “Show Interrelated Documents” from Purchase Quote list:
1. Select the desired record from the list. On the Process Tab of Purchase Quote list, click on “Show Interrelated Documents”.
2. This will open the PaperSave cloud login prompt (on the first login). Enter login credentials.
3. On login success, it will show the available Interrelated documents for the selected record in the Purchase Quote list.

Purchase Quote Card
Clicking on the Purchase Quote card opens the selected record in card view with all the record details:
1. Click on the number field of the desired record in the Purchase Quote list.
2. This will launch the Purchase Quote record.

3. Click on “Process” to access the PaperSave functionalities such as “Add Document”, “Show Documents” and “Show Interrelated Documents”.
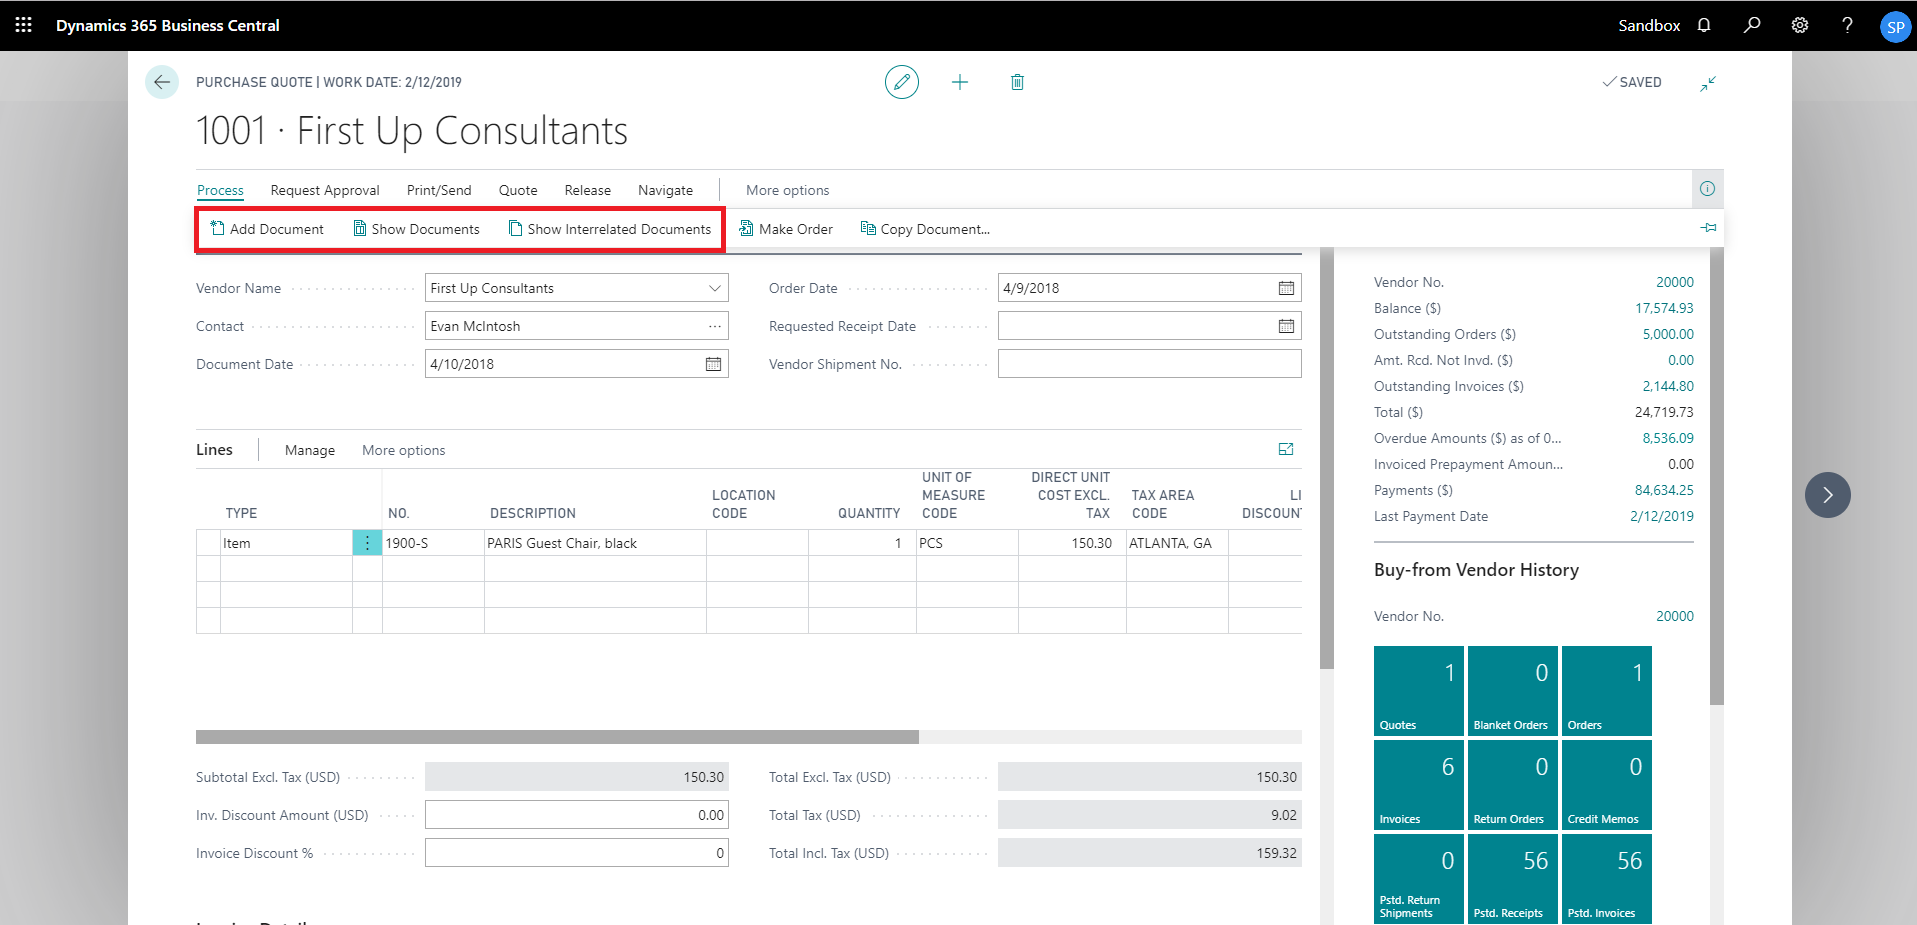
add documents from purchase quote card
Follow the below steps to test the PaperSave functionality “Add Document” from Purchase Quote card:
1. On the Process tab of Purchase Quote Card, click on “Add Document”.
2. This will open the PaperSave cloud login prompt (on the first login). Enter login credentials.
3. On login success, it will open the “Add Document” page.

4. Drag or select files to upload the desired document.
5. This will open the document preview screen. You can add a comment for the document.
6. Click on “Save” to add the document to the selected record.
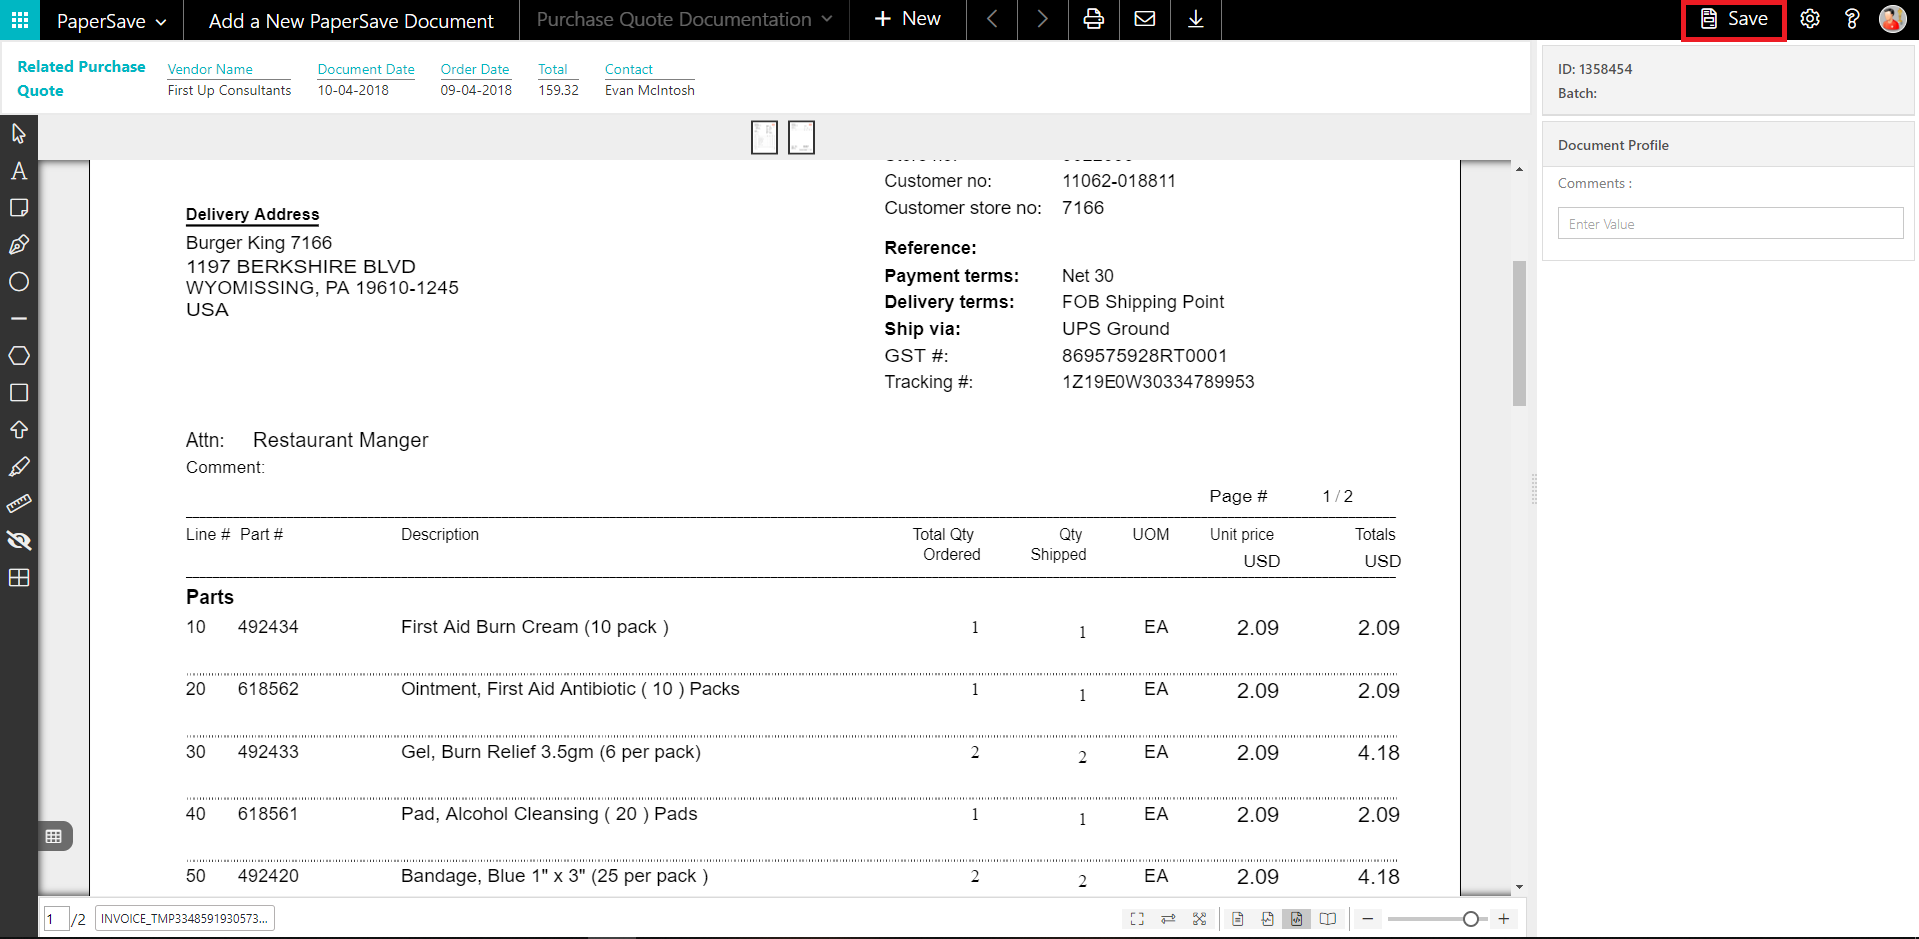
7. Upon successful submission, it will show the toast notification in the upper right corner “1 Document(s) successfully submitted.”
show documents from purchase quote card
Follow the below steps to test the PaperSave functionality “Show Documents” from Purchase Quote card:
1. On the Invoice tab of Purchase Quote Card, click on “Show Documents”.
2. This will open PaperSave cloud login prompt (on the first login). Enter login credentials.
3. On login success, it will show the available document/s.

show interrelated documents from purchase quote card
Follow the below steps to test the PaperSave functionality “Show Interrelated Documents” from Purchase Quote card:
1. On the Invoice tab of Purchase Quote Card, click on “Show Interrelated Documents”.
2. This will open PaperSave cloud login prompt (on the first login). Enter login credentials.
3. On login success, it will show the available Interrelated documents to the record.
6.4 Purchase Order
The following steps describe how to interact with PaperSave within the “Purchase Order” record type’s main screen:
1. On the Dynamics 365 Business Central Home Page, click on the Purchasing dropdown.
2. Click on Purchase Order.

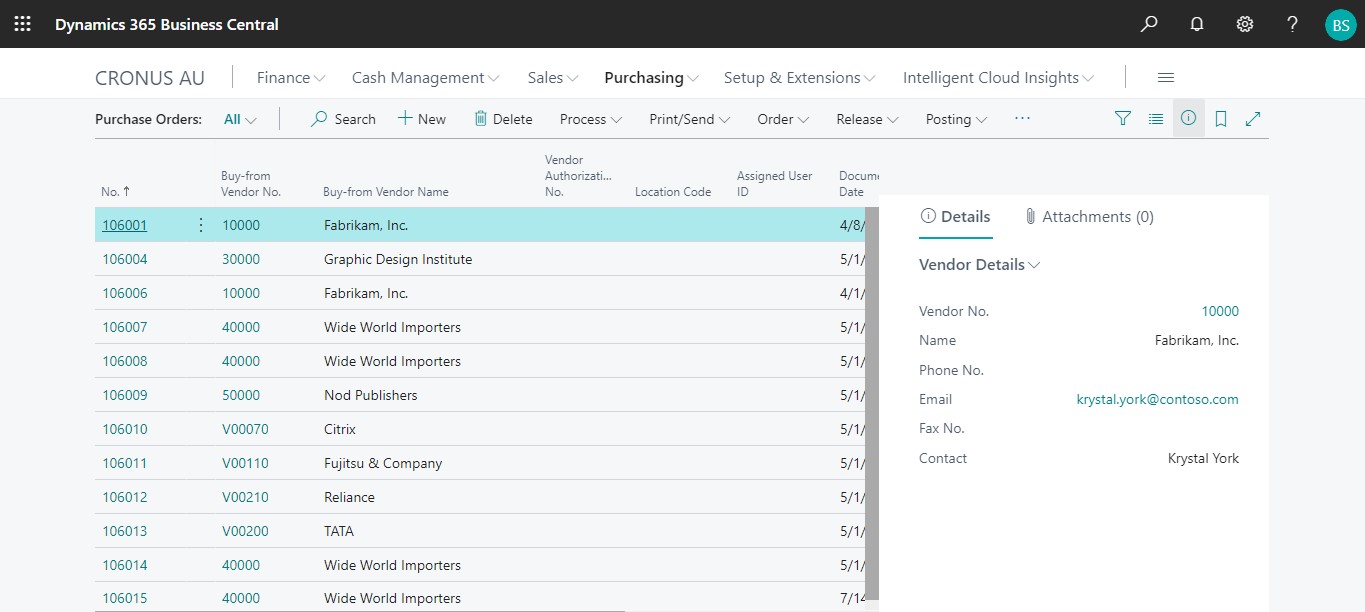
Purchase Order List
Clicking on Purchase Order will display the list of all records for this record type. You can add documents to all the records in the list as well as view documents and Interrelated documents for all the records in the list.
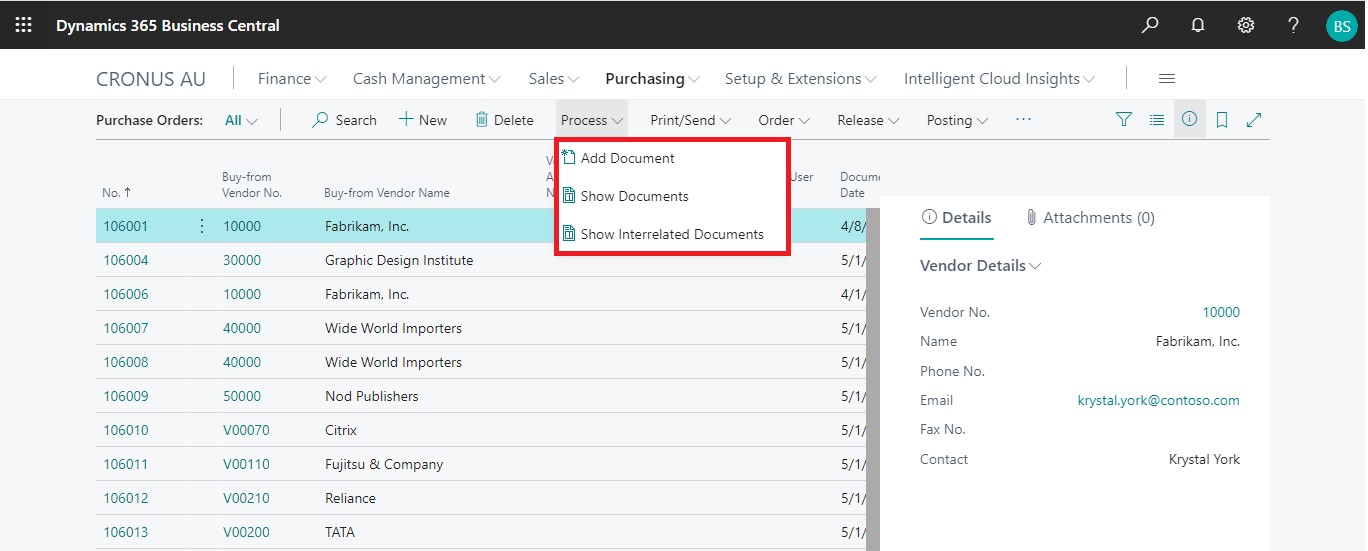
1. Click on “Process” Tab from Purchase Order list.
2. You will see the PaperSave options such as “Add Document”, “Show Documents”, and “Show Interrelated Documents”.
add documents from purchase order list
Follow the below steps to test the PaperSave functionality “Add document” from Purchase Order list
1. On the Process Tab of Purchase Order list, click on “Add document”.
2. If you are not already logged in, then it will open PaperSave cloud login prompt (on the first login). Enter your login credentials.
3. Upon login success, the system will navigate you to the “Add Document page”.

4. Drag or select files to upload documents from your file explorer.
5. This will open the document preview screen. You can enter the “date” in the document.
6. Click on “Save” to add the document to all the records in the Purchase Order list.

7. Upon successful submission, it will show the toast notification in the upper right corner “1 Document(s) successfully submitted.”
show documents from purchase order list
Follow the below steps to test the PaperSave functionality “Show Documents” from Purchase Order list:
1. On the Process Tab of Purchase Order list, click on “Show Documents”.
2. This will open PaperSave cloud login prompt (on the first login). Enter login credentials.
3. On login success, it will show the available documents for all the records in Purchase Order list.
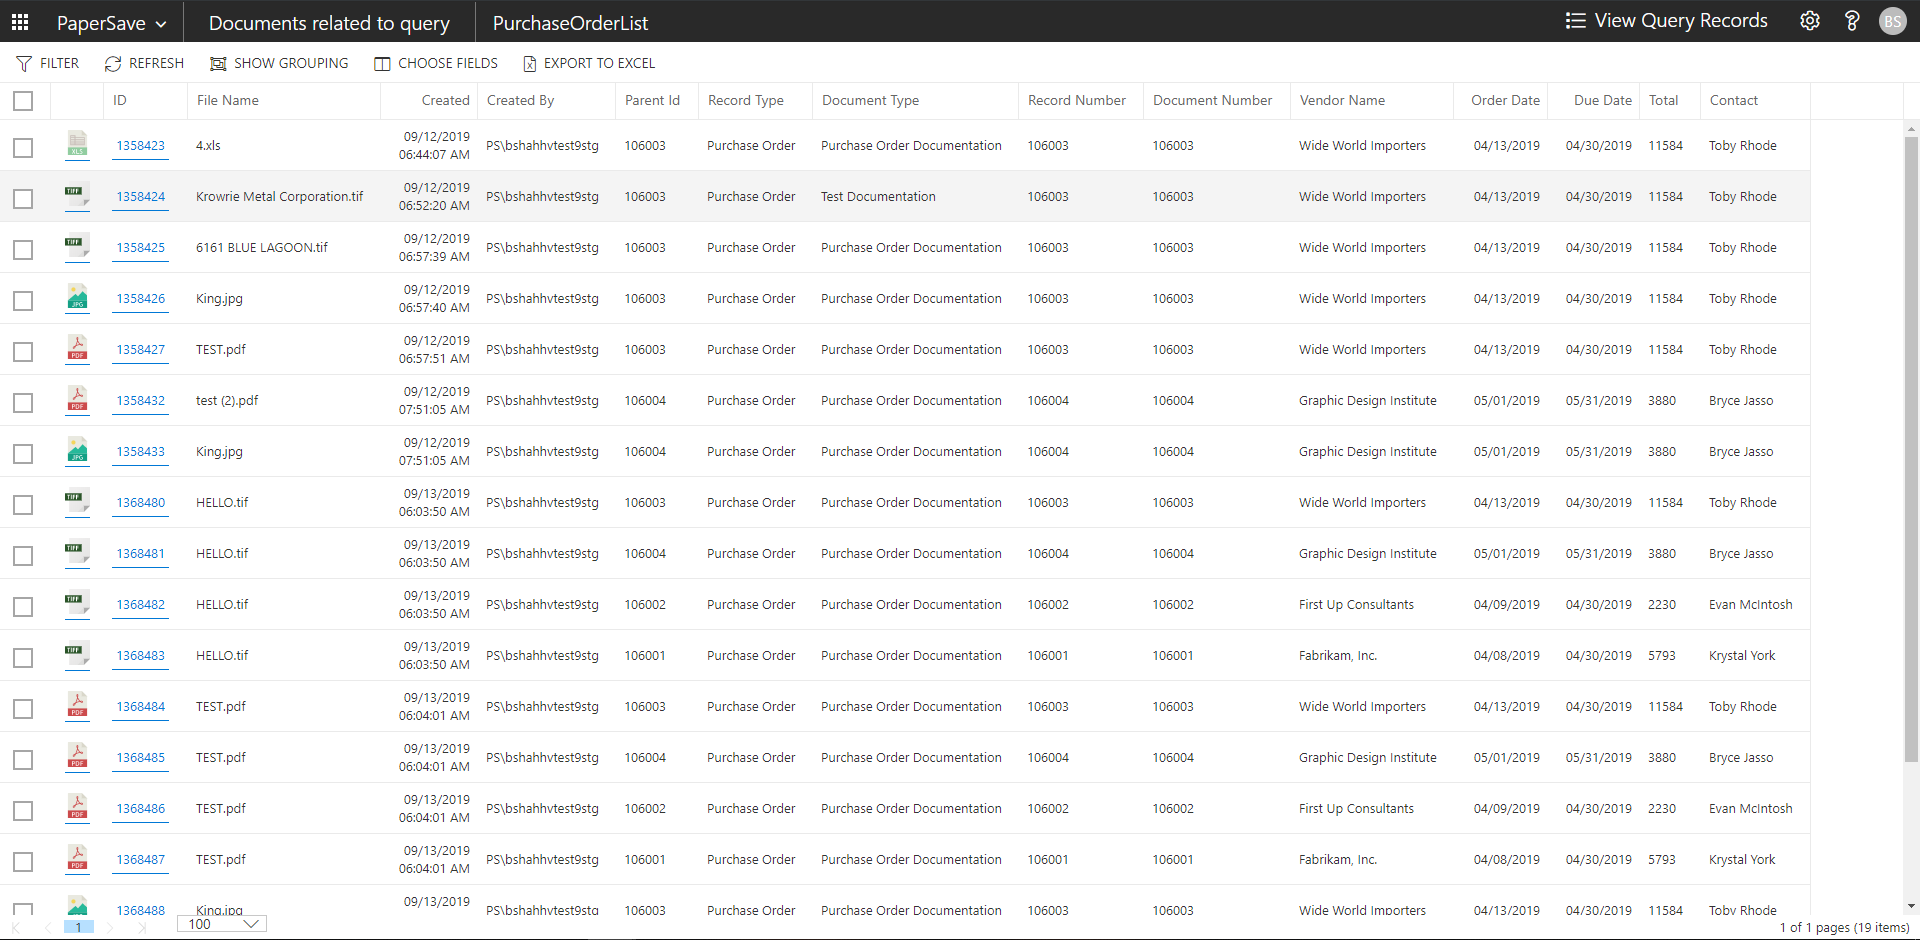
show interrelated documents from purchase order list
Follow the below steps to test the PaperSave functionality “Show Interrelated Documents” from Purchase Order list:
1. Select the desired record from the list. On the Process Tab of Purchase Order list, click on “Show Interrelated Documents”.
2. This will open PaperSave cloud login prompt (on the first login). Enter login credentials.
3. On login success, it will show the available Interrelated documents for the selected record in Purchase Order list.
Purchase Order Card
Clicking on the Purchase Order card opens the selected record in card view with all the record details:
1. Click on the number field of desired record in the Purchase Order list.
2. This will launch the Purchase Order record.
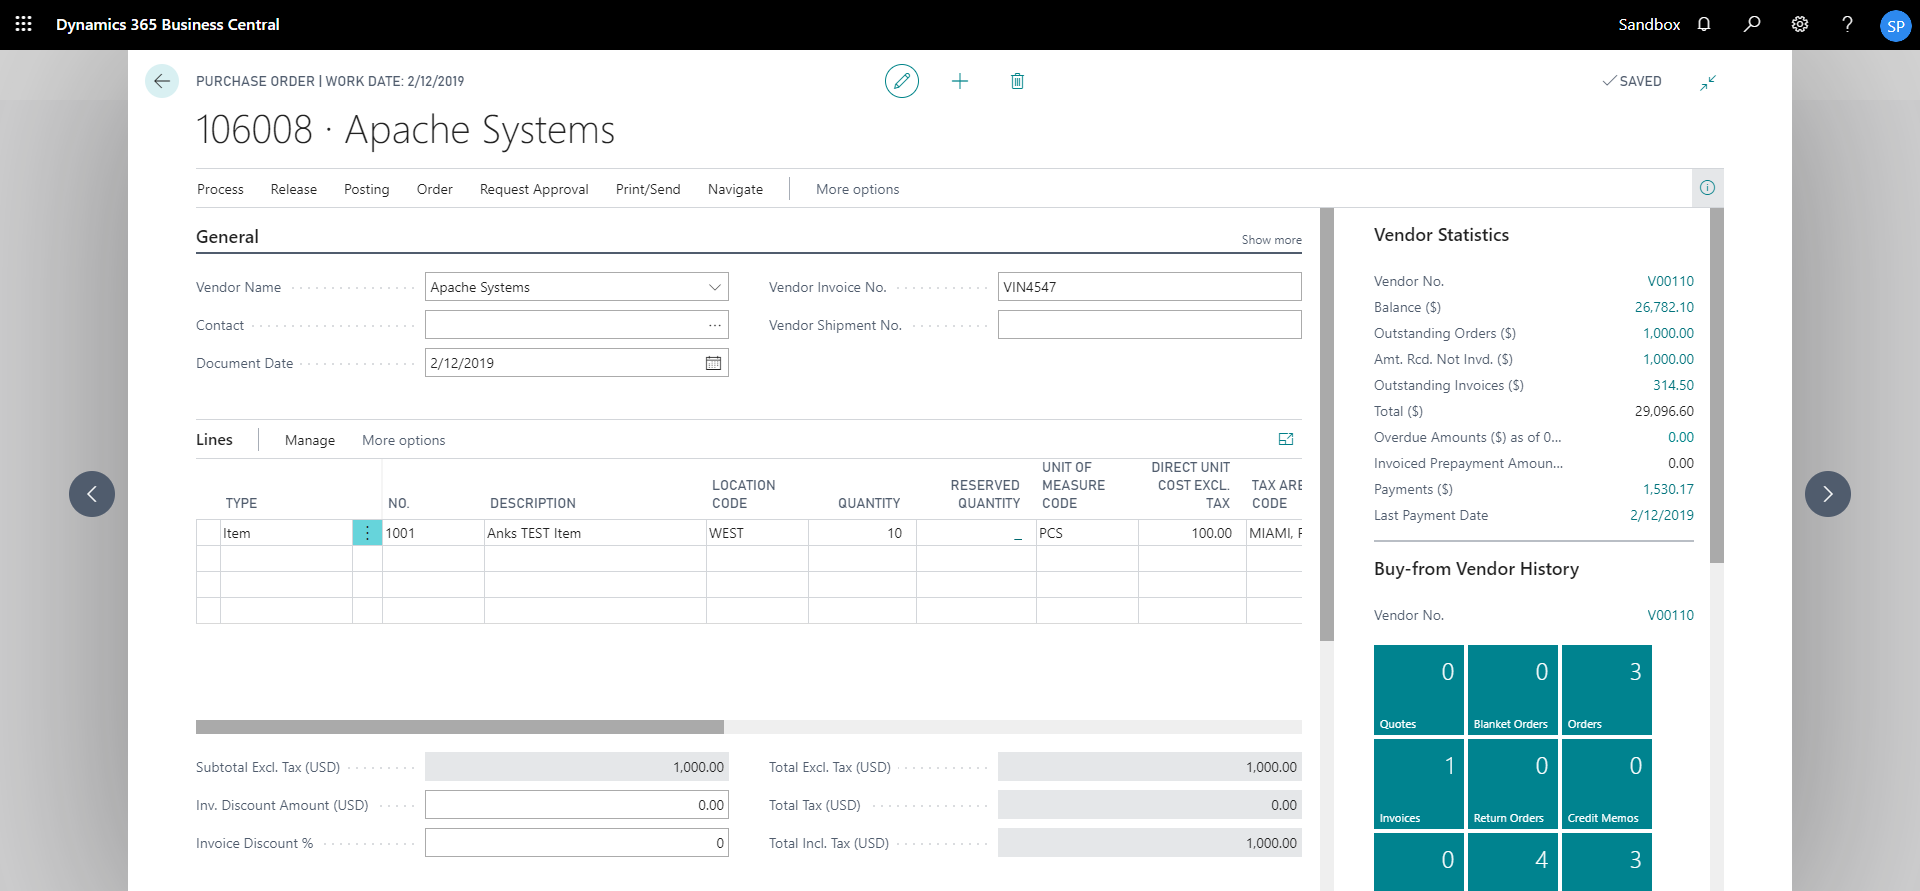
3. Click on “Process” to access the PaperSave functionalities such as “Add Document”, “Show Documents” and “Show Interrelated Documents”.
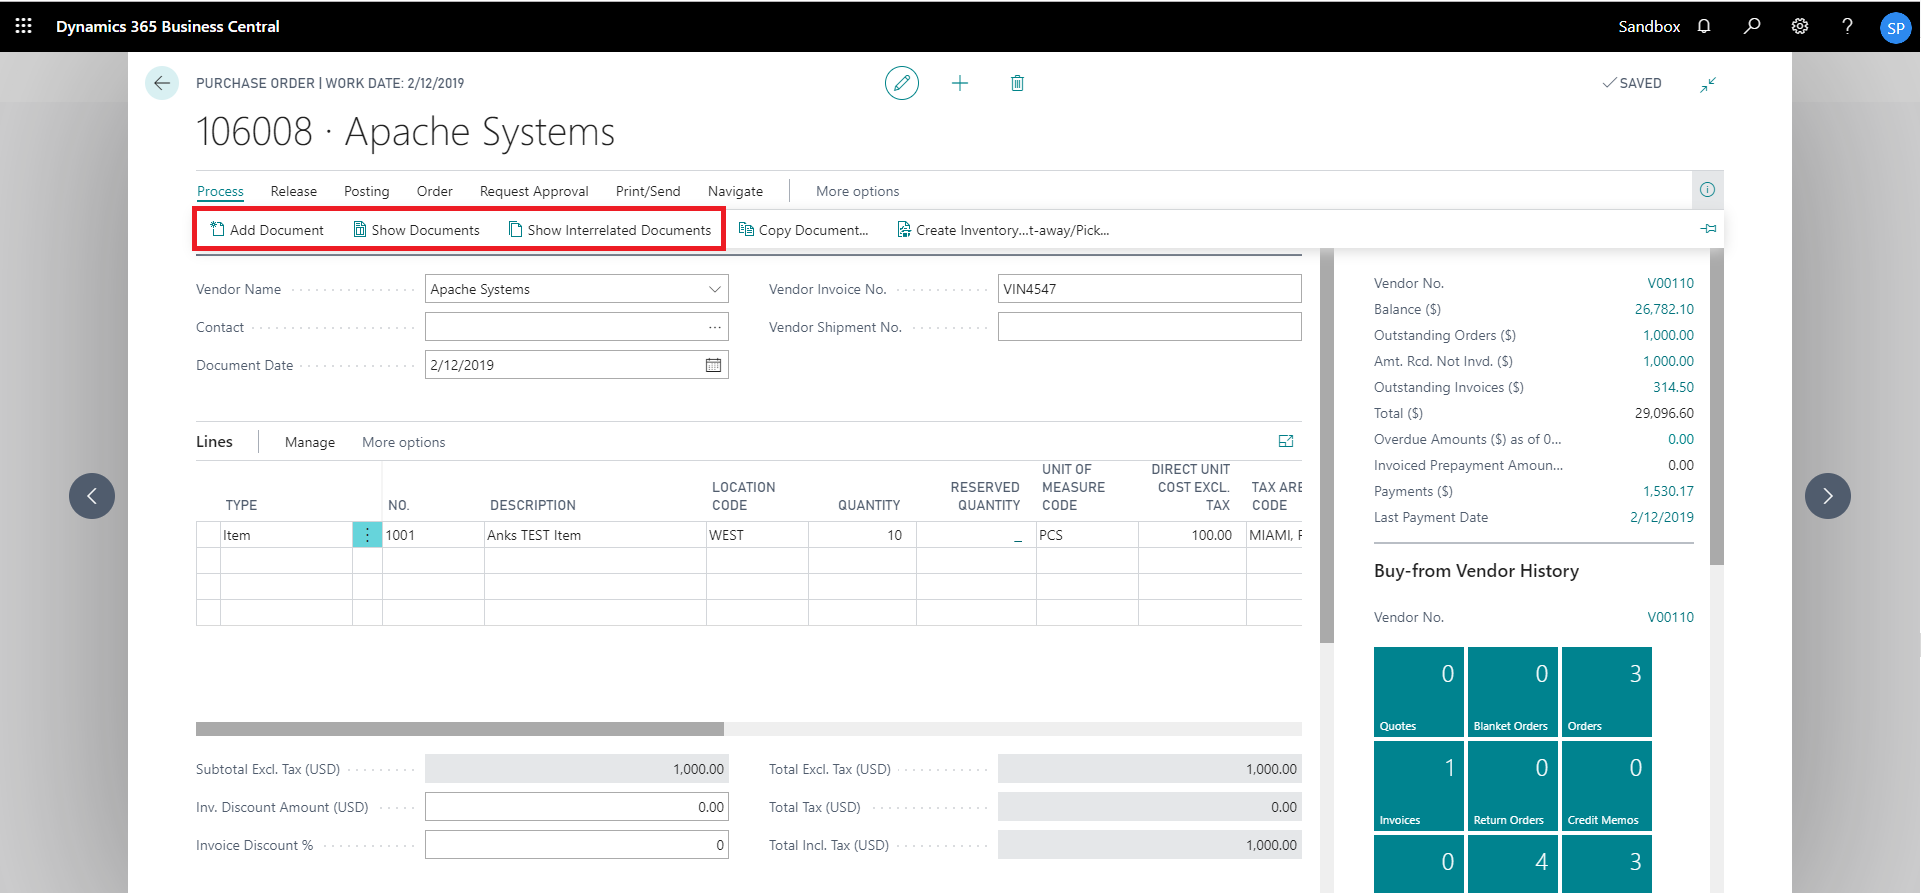
add documents from purchase order card
Follow the below steps to test the PaperSave functionality “Add Document” from Purchase Order card:
1. On the Process tab of Purchase Order Card, click on “Add Document”.
2. This will open PaperSave cloud login prompt (on the first login). Enter login credentials.
3. On login success, it will open the “Add Document” page.
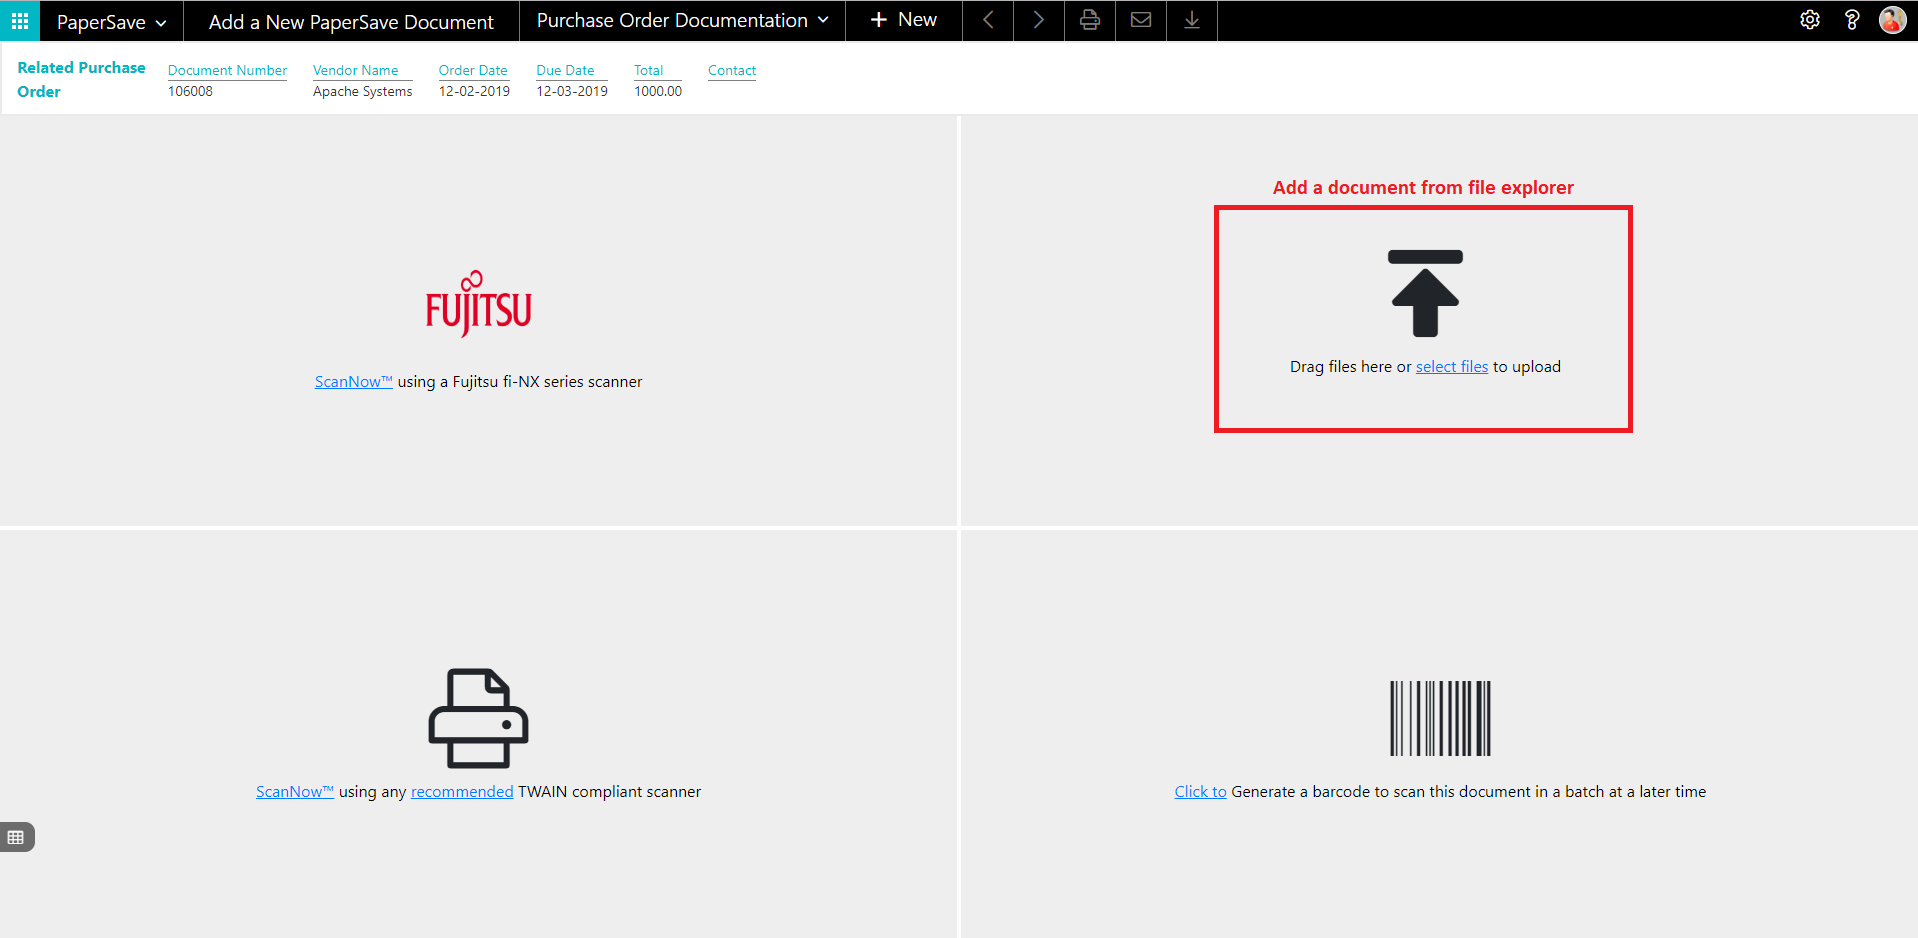
4. Drag or select files to upload the desired document.
5. This will open the document preview screen. You can enter the “date received” for the document.
6. Click on “Save” to add the document to the selected record.
7. Upon successful submission, it will show the toast notification in the upper right corner “1 Document(s) successfully submitted.”
show documents from purchase order card
Follow the below steps to test the PaperSave functionality “Show documents” from Purchase Order card:
1. On the Process tab of Purchase Invoice Card, click on “Show Documents”.
2. This will open PaperSave cloud login prompt (on the first login). Enter login credentials.
3. On login success, it will show the available document/s.

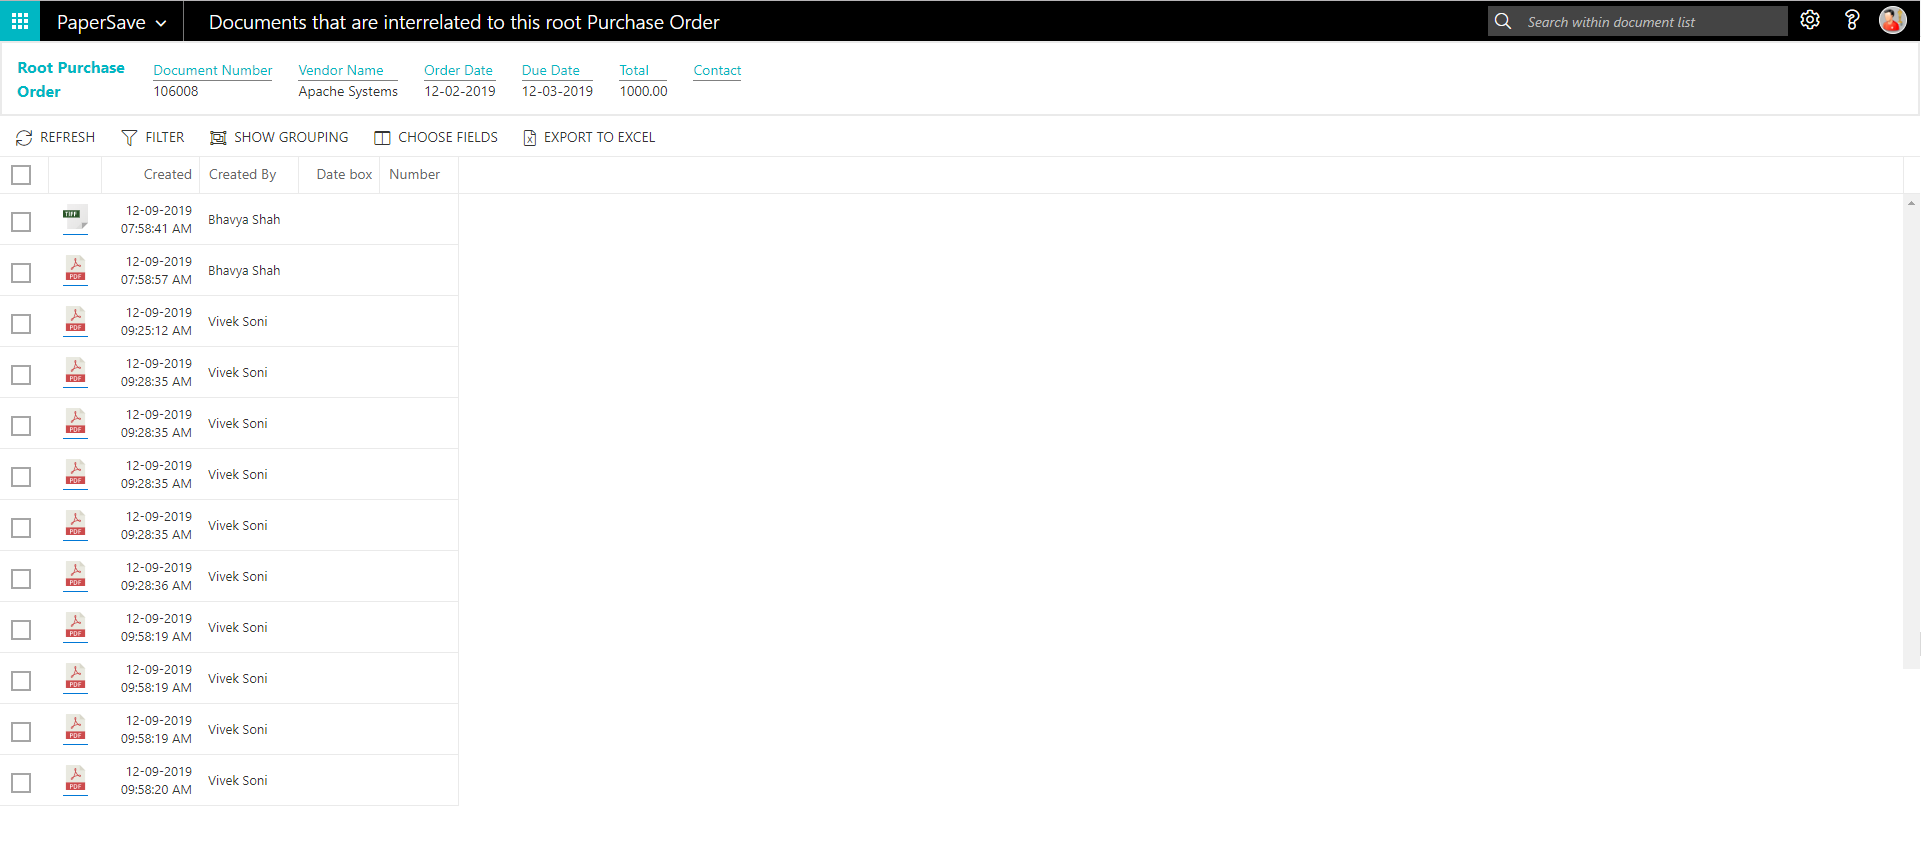
show interrelated documents from purchase order card
Follow the below steps to test the PaperSave functionality “Show Interrelated Documents” from Purchase Order card:
1. On the Process tab of Purchase Invoice Card, click on “Show Interrelated Documents”.
2. This will open PaperSave cloud login prompt (on the first login). Enter login credentials.
3. On login success, it will show the available Interrelated documents to the record.

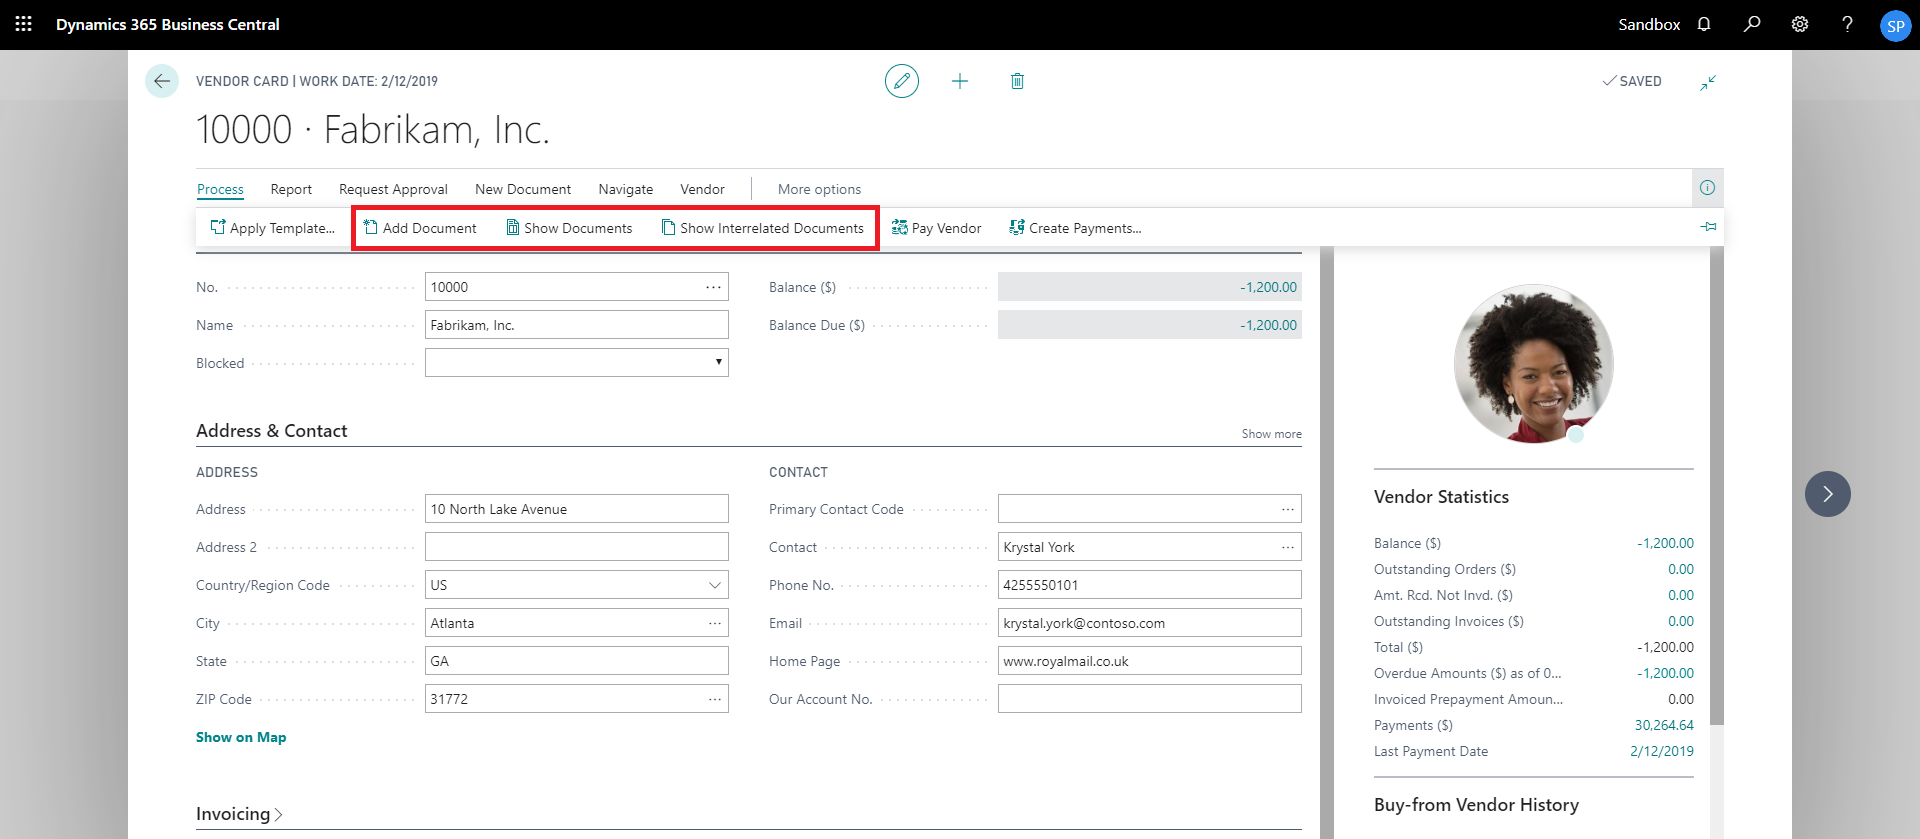
6.5 Vendor
The following steps describe how to interact with PaperSave within the “Vendor” record type’s main screen:
1. On the Dynamics 365 Business Central Home Page, click on the Purchasing dropdown.
2. Click on Vendors.

Vendor List
Clicking on Vendors will display the list of all records for this record type. You can add documents to all the records in the list as well as view documents and Interrelated documents for all the records in the list.

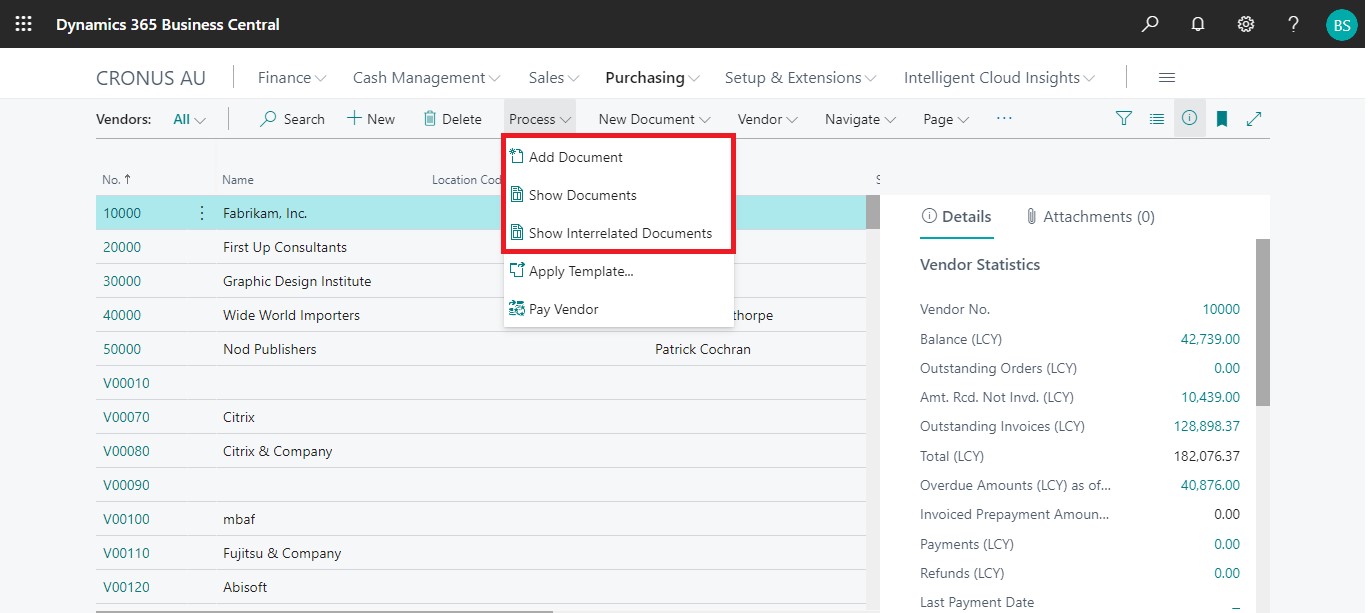
1. Click on “Process” Tab from Vendor list.
2. You will see the PaperSave options such as “Add Document”, “Show Documents”, and “Show Interrelated Documents”.
add documents from vendor list
Follow the below steps to test the PaperSave functionality “Add Document” from Vendor list
1. On the Process Tab of Vendor list, click on “Add Document”.
2. If you are not already logged in, then it will open PaperSave cloud login prompt (on the first login). Enter your login credentials.
3. Upon login success, the system will navigate you to the “Add Document page”.

4. Drag or select files to upload documents from your file explorer.
5. This will open the document preview screen.
6. Click on Save to add the document to all the records in the Vendor list.

7. Upon successful submission, it will show the toast notification in the upper right corner “1 Document(s) successfully submitted.”
show documents from vendor list
Follow the below steps to test the PaperSave functionality “Show Documents” from Vendor list:
1. On the Process Tab of Vendor list, click on “Show Documents”.
2. This will open PaperSave cloud login prompt (on the first login). Enter login credentials.
3. On login success, it will show the available documents for all the records in Vendor list.
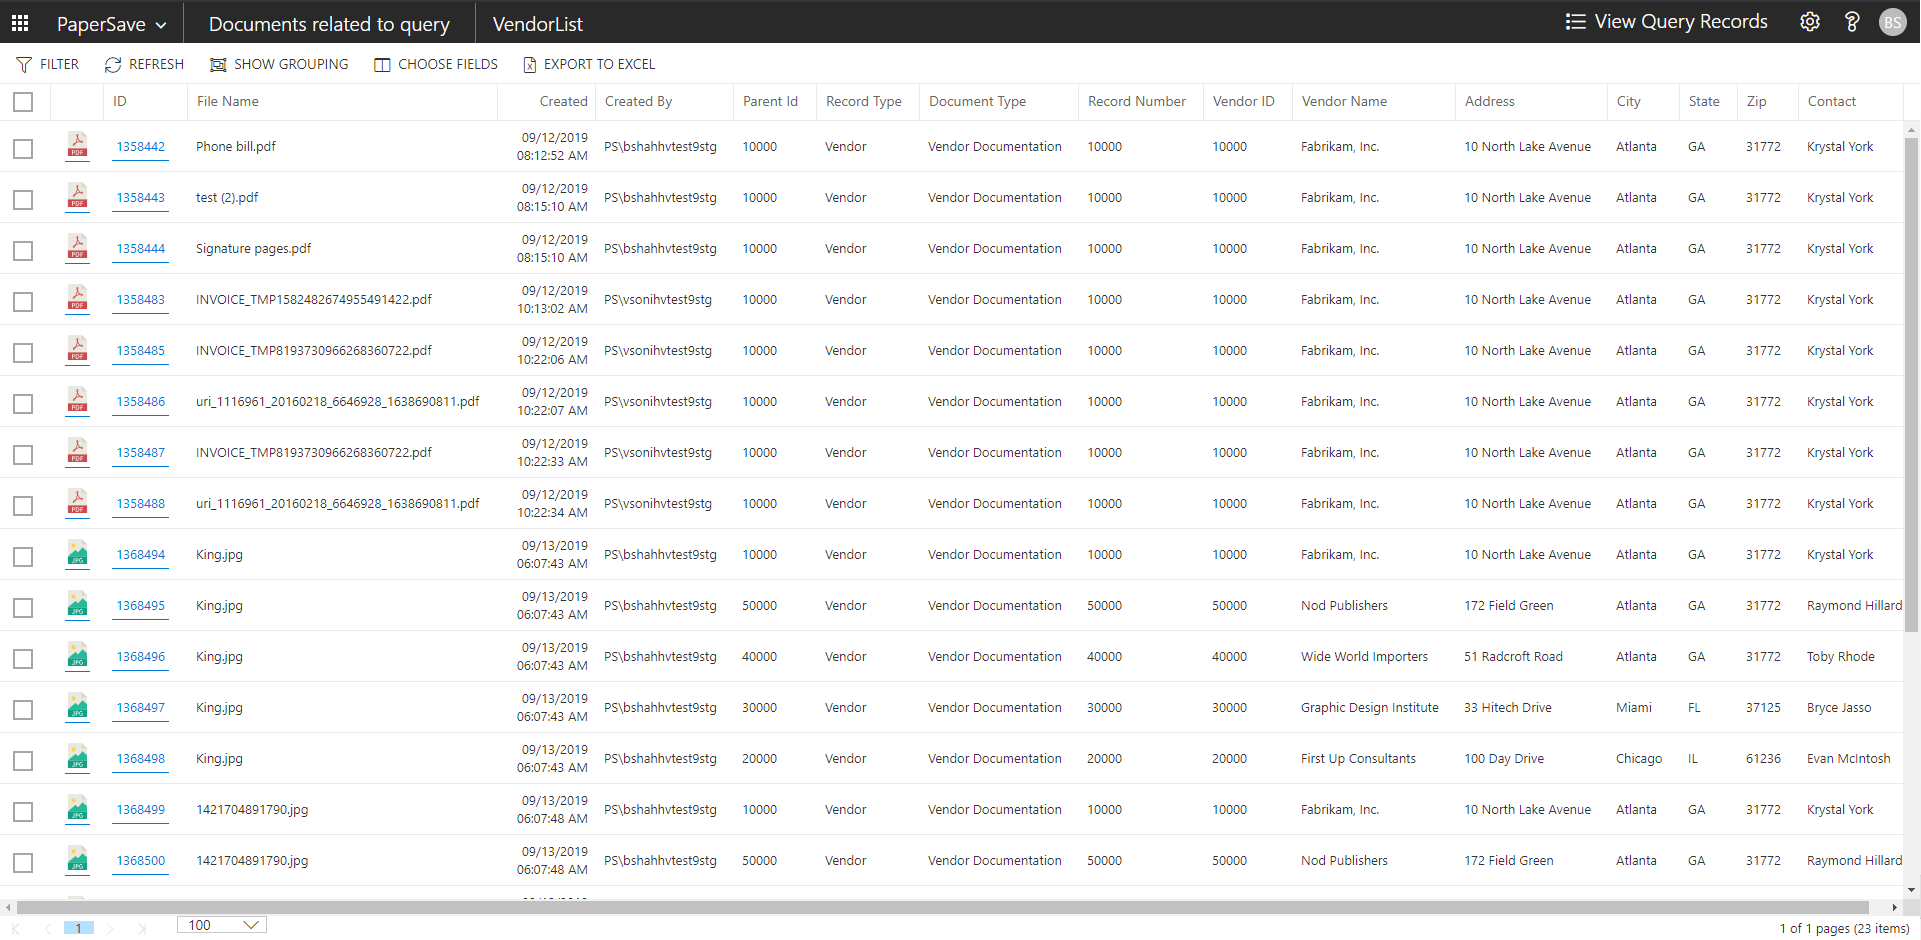
show interrelated documents from vendor list
Follow the below steps to test the PaperSave functionality “Show Interrelated Documents” from Vendor list:
1. Select the desired record from the list. On the Process Tab of Vendor list, click on “Show Interrelated Documents”.
2. This will open PaperSave cloud login prompt (on the first login). Enter login credentials.
3. On login success, it will show the Interrelated documents for the selected record in Vendor list.

Vendor Card
Clicking on the Vendor card opens the selected record in card view with all the record details:
1. Click on the number field of desired record in the Vendor list.
2. This will launch the Vendor record.
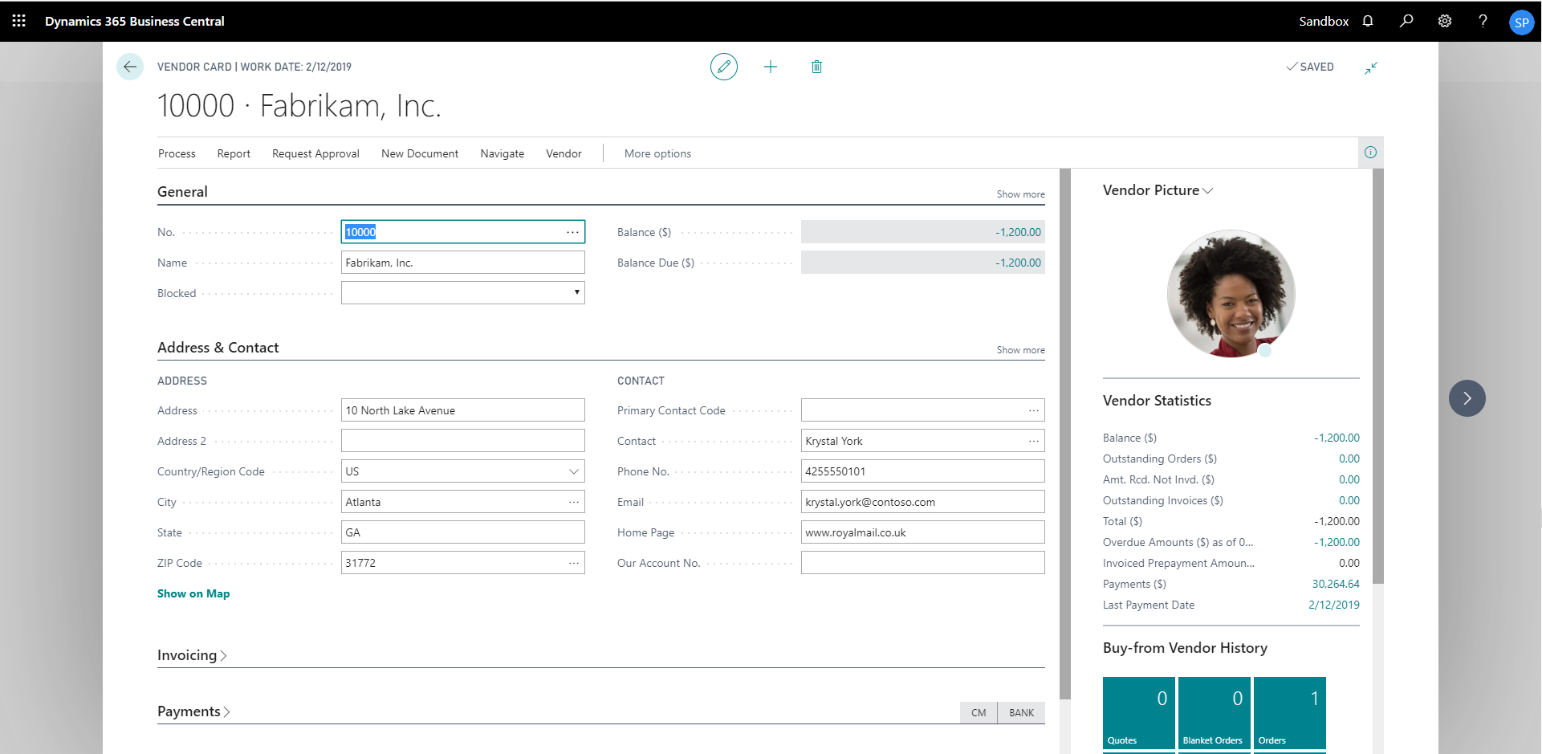
3. Click on “Process” to access the PaperSave functionalities such as “Add Document”, “Show Documents” and “Show Interrelated Documents”.
add documents from vendor card
Follow the below steps to test the PaperSave functionality “Add Document” from Vendor card:
1. On the Process tab of Vendor Card, click on “Add Document”.
2. This will open PaperSave cloud login prompt (on the first login). Enter login credentials.
3. On login success, it will open the “Add Document” page.
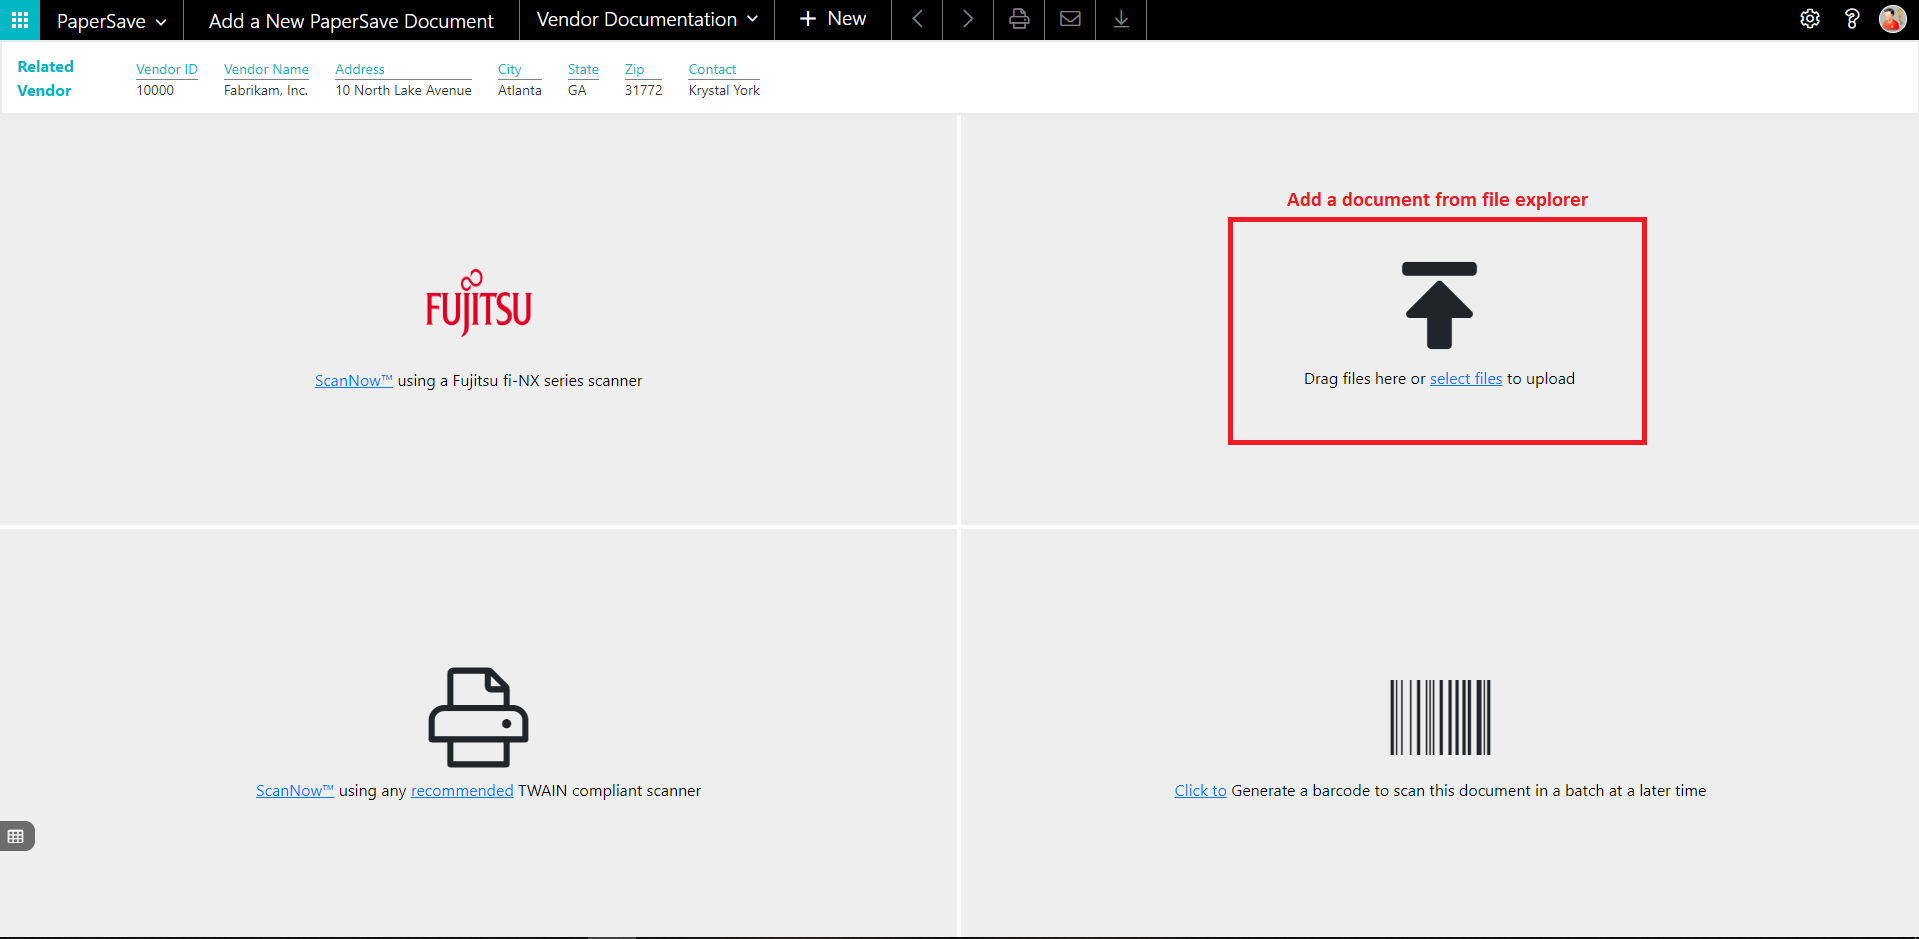
4. Drag or select files to upload the desired document.
5. This will open the document preview screen.
6. Click on “Save” to add the document to the selected record.
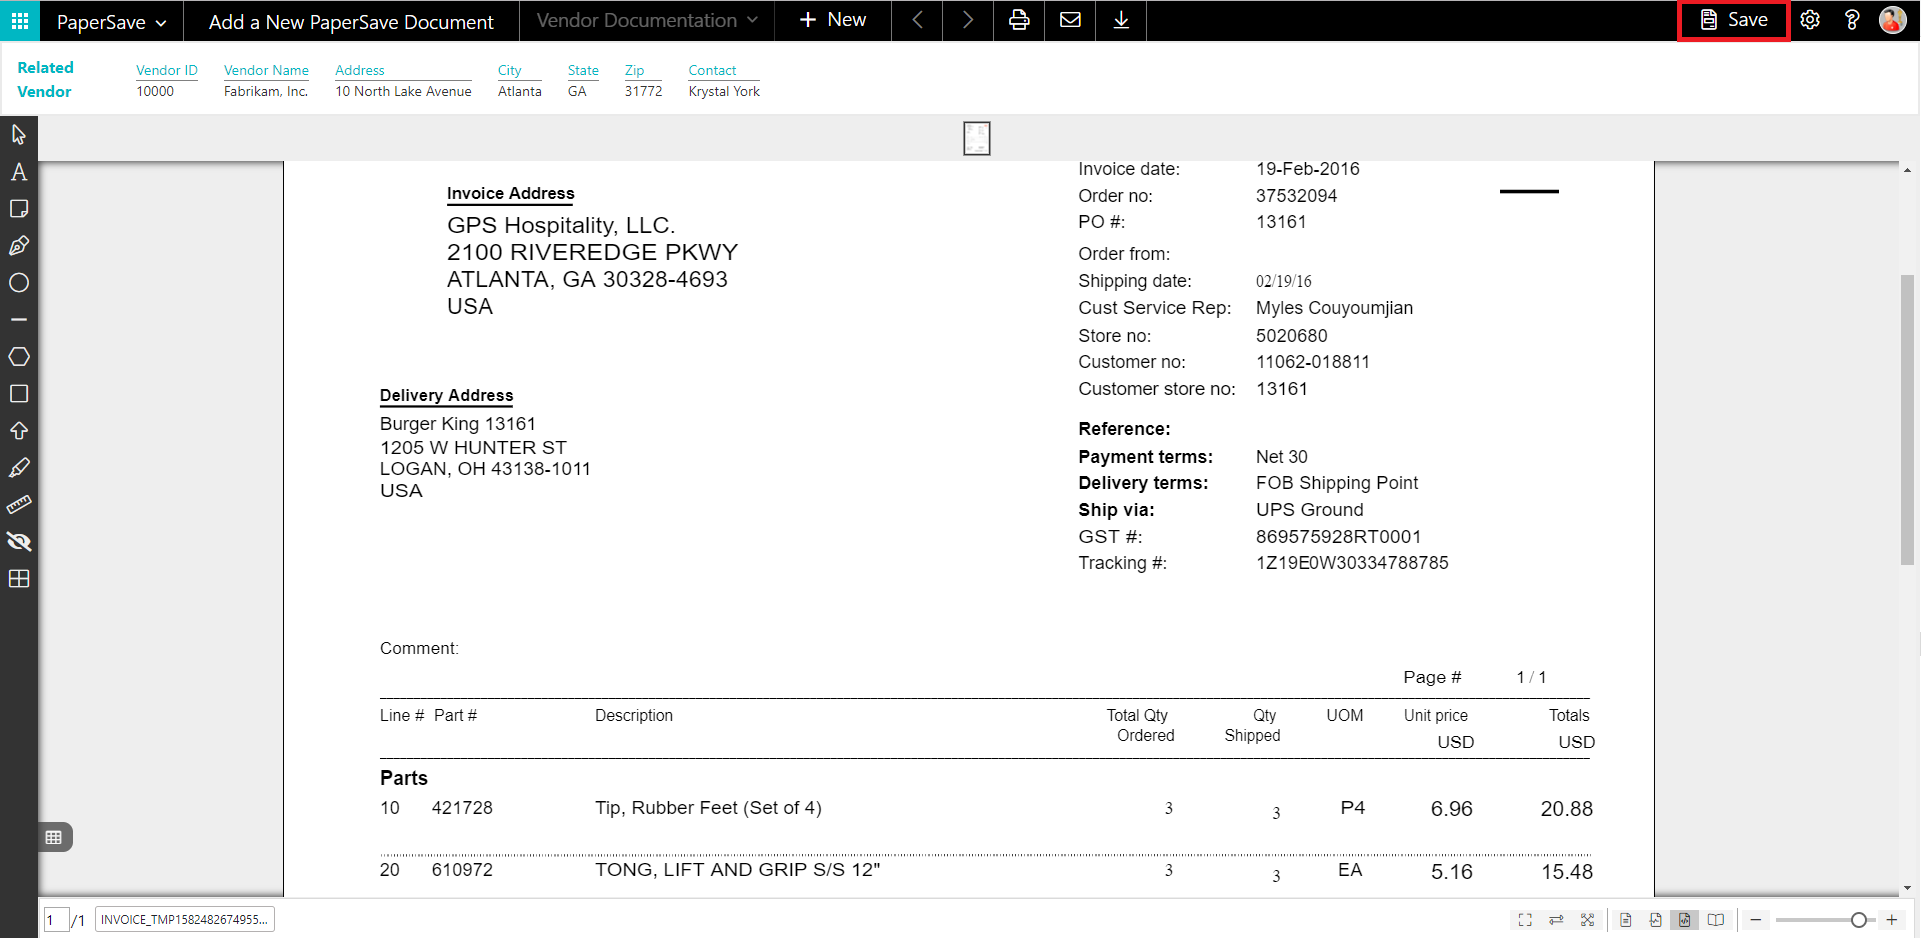
7. Upon successful submission, it will show the toast notification in the upper right corner “1 Document(s) successfully submitted.”
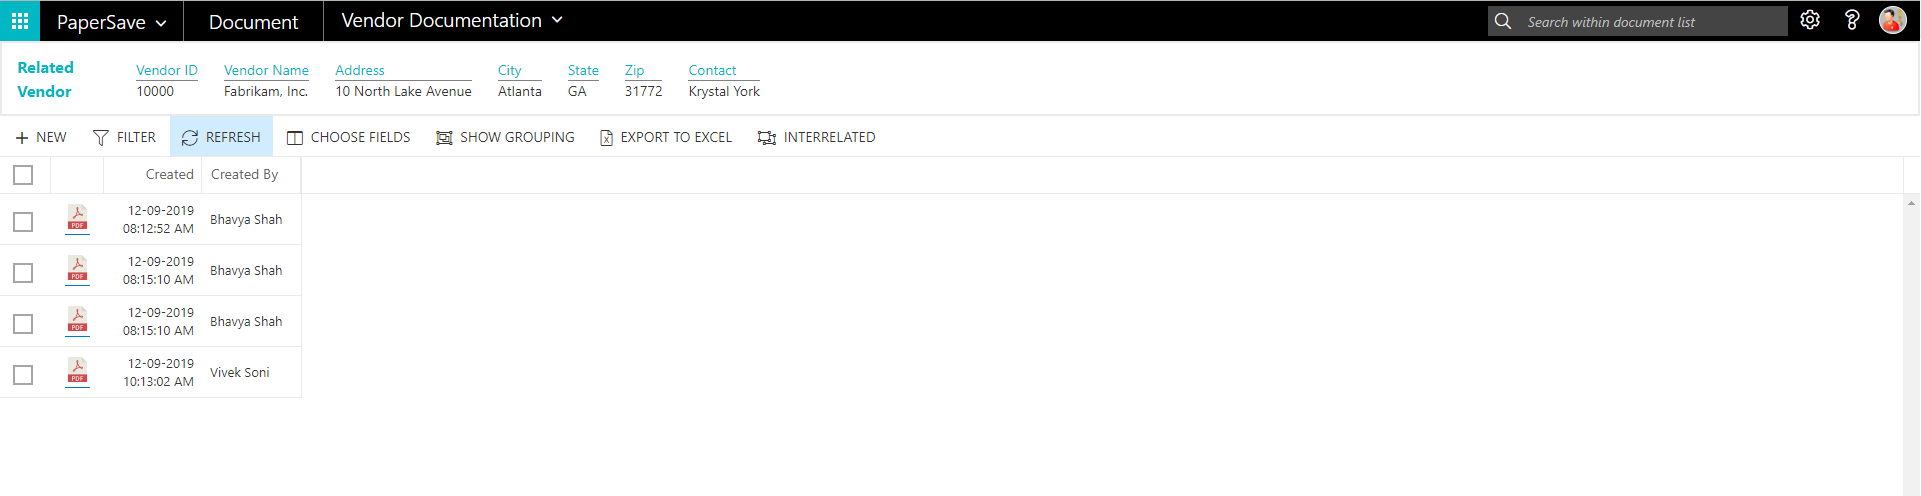
show documents from vendor card
Follow the below steps to test the PaperSave functionality “Show documents” from Vendor card:
1. On the Process tab of Vendor Card, click on “Show Documents”.
2. This will open PaperSave cloud login prompt (on the first login). Enter login credentials.
3. On login success, it will show the available document/s.
show interrelated documents from vendor card
Follow the below steps to test the PaperSave functionality “Show Interrelated Documents” from Vendor card:
1. On the Process tab of Vendor Card, click on “Show Interrelated Documents”.
2. This will open PaperSave cloud login prompt (on the first login). Enter login credentials.
3. On login success, it will show the available Interrelated documents to the record.

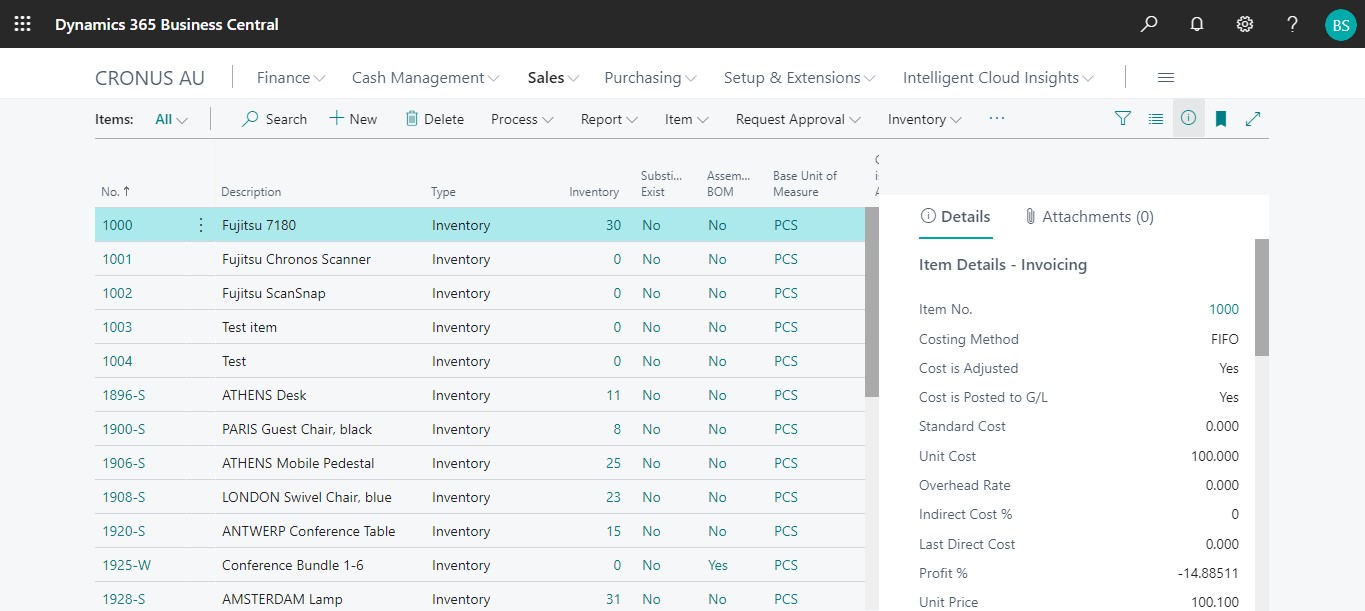
6.6 Sales Item
The following steps describe how to interact with PaperSave within the “Sales Item” record type’s main screen:
1. On the Dynamics 365 Business Central Home Page, click on the Sales dropdown.
2. Click on Items.

Sales Item List
Clicking on Sales Item List will display the list of all records for this record type. You can add documents to all the records in the list as well as view documents and Interrelated documents for all the records in the list.
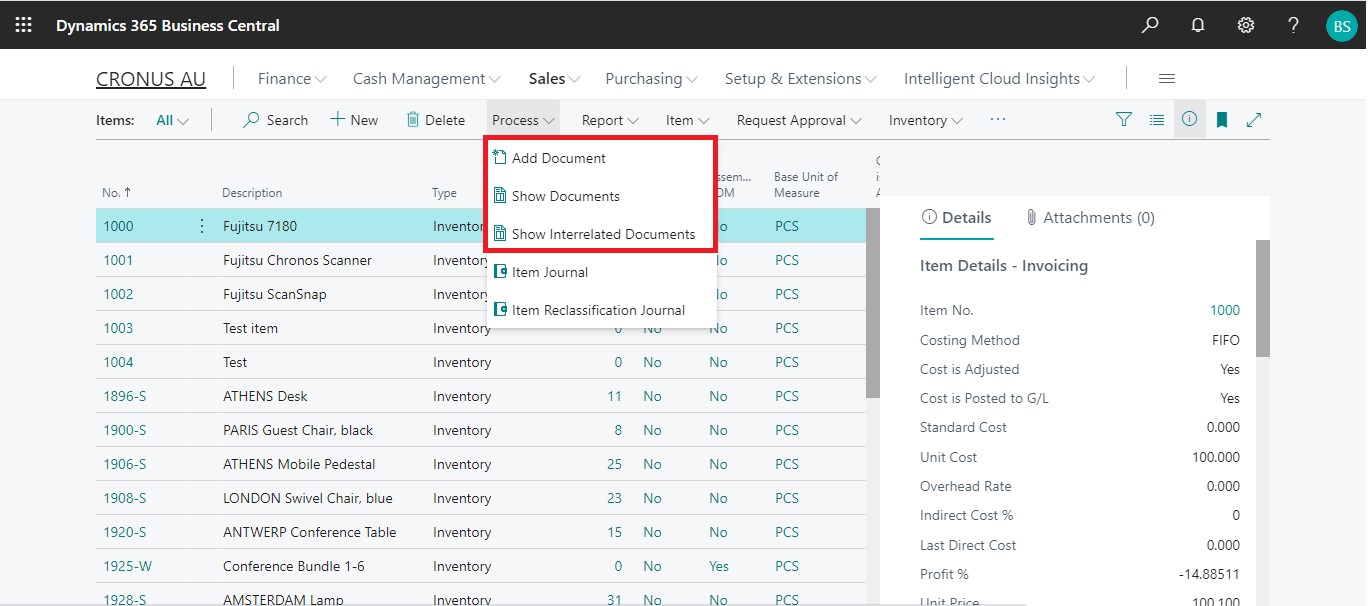
1. Click on “Process” Tab from Sales Item list.
2. You will see the PaperSave options such as “Add Document”, “Show Documents”, and “Show Interrelated Documents”.
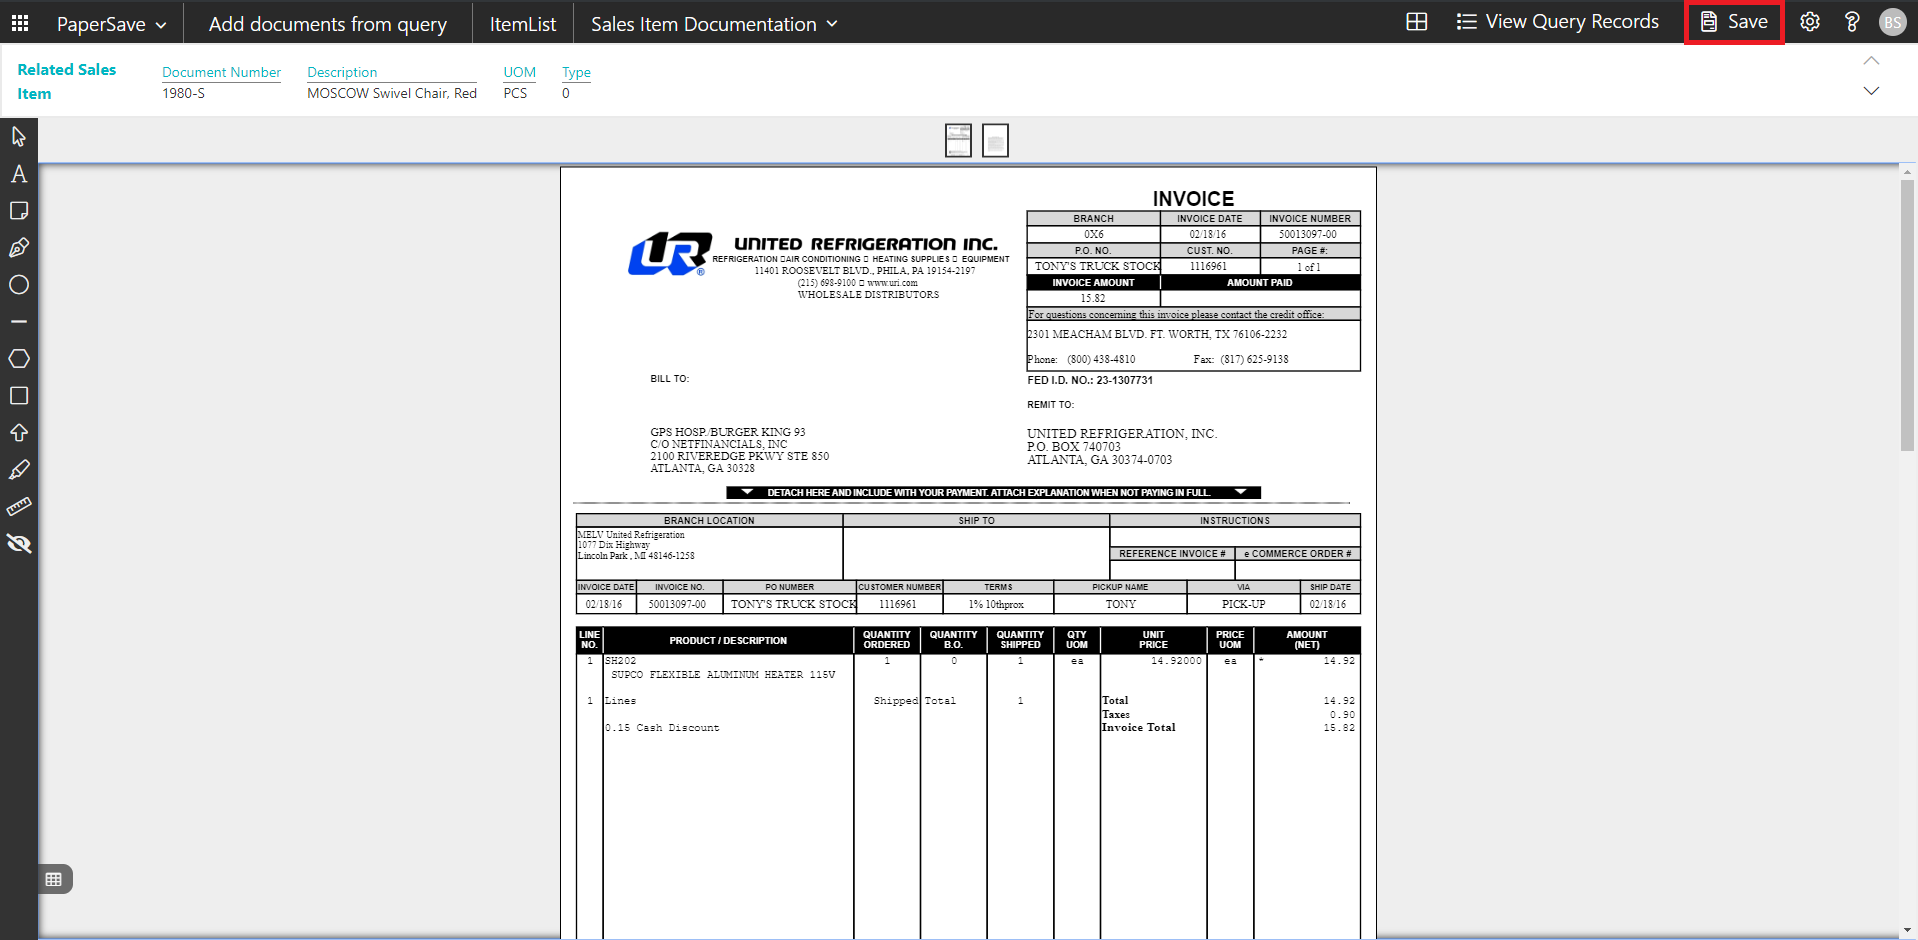
add documents from sales item list
Follow the below steps to test the PaperSave functionality “Add Document” from Sales Item list
1. On the Process Tab of Sales Item list, click on “Add Document”.
2. If you are not already logged in, then it will open PaperSave cloud login prompt (on the first login). Enter your login credentials.
3. Upon login success, the system will navigate you to the “Add Document page”.

4. Drag or select files to upload documents from your file explorer.
5. This will open the document preview screen.
6. Click on Save to add the document to all the records in the Sales Item list.
7. Upon successful submission, it will show the toast notification in the upper right corner “1 Document(s) successfully submitted.”
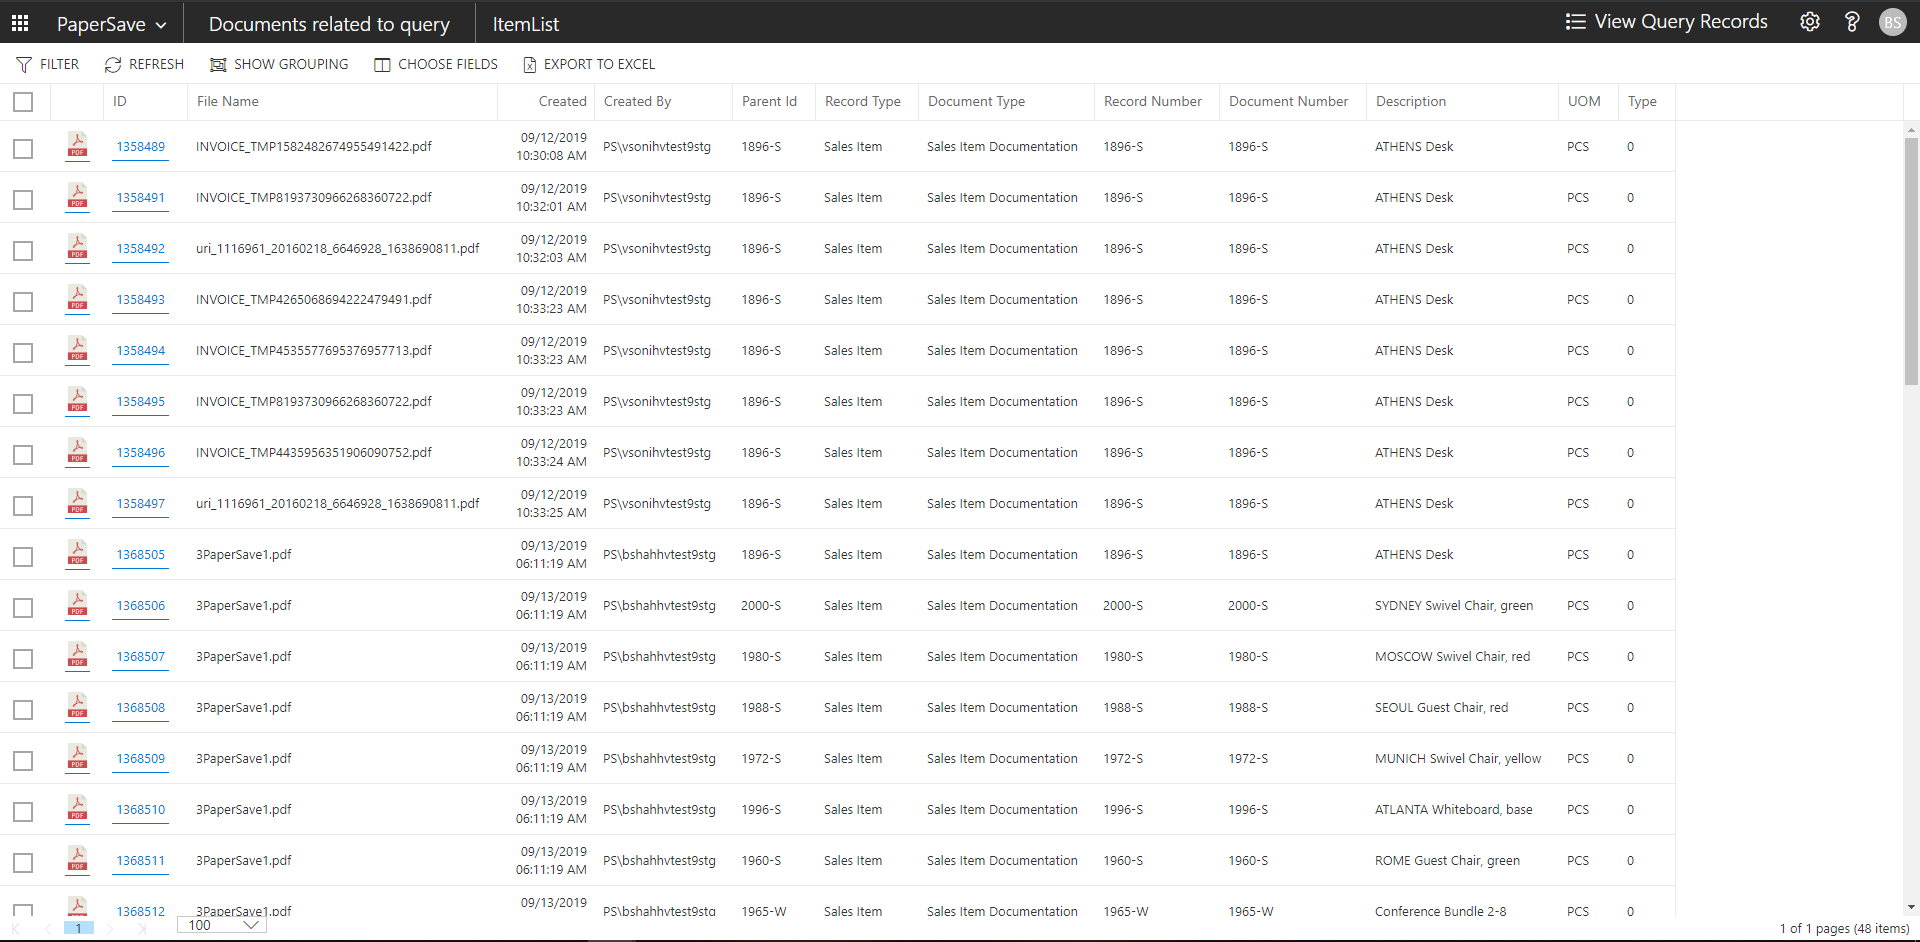
show documents from sales item list
Follow the below steps to test the PaperSave functionality “Show Document” from Sales Item list:
1. On the Process Tab of Sales Item list, click on “Show Documents”.
2. This will open PaperSave cloud login prompt (on the first login). Enter login credentials.
3. On login success, it will show the available documents for all the records in Sales Item list.
show interrelated documents from sales item list
Follow the below steps to test the PaperSave functionality “Show Interrelated Documents” from Sales Item list:
1. Select the desired record from the list. On the Process Tab of Sales Item list, click on “Show Interrelated Documents”.
2. This will open PaperSave cloud login prompt (on the first login). Enter login credentials.
3. On login success, it will show the Interrelated documents for the selected record in Sales Item list.
Sales Item Card
Clicking on the Sales Item card opens the selected record in card view with all the record details:
1. Click on the number field of desired record in the Sales Item list.
2. This will launch the Sales Item record.
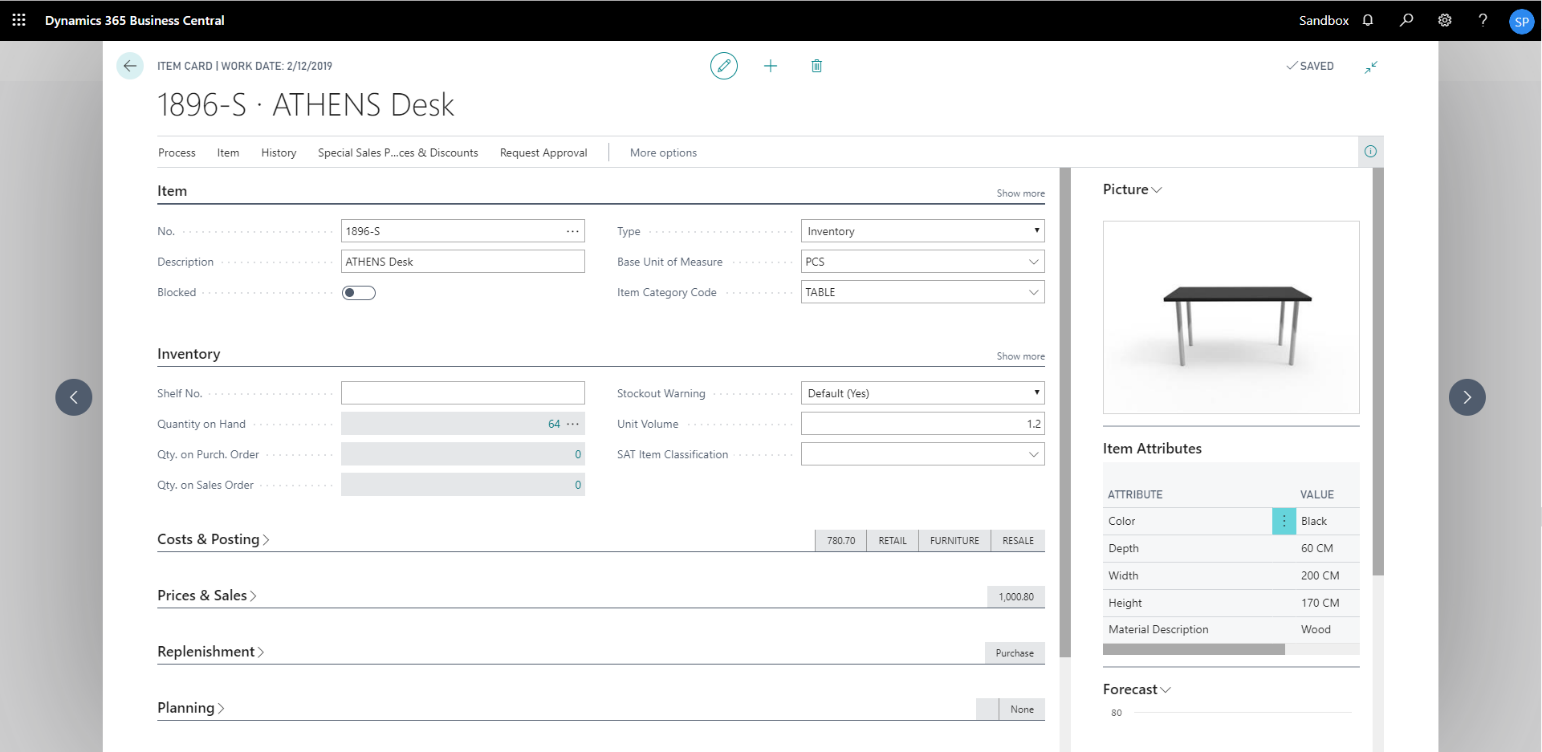
3. Click on “Process” to access the PaperSave functionalities such as “Add Document”, “Show Documents” and “Show Interrelated Documents”.

add documents from sales item card
Follow the below steps to test the PaperSave functionality “Add Document” from Sales Item card:
1. On the Process tab of Purchase Invoice Card, click on “Add Document”.
2. This will open PaperSave cloud login prompt (on the first login). Enter login credentials.
3. On login success, it will open the “Add Document” page.

4. Drag or select files to upload the desired document.
5. This will open the document preview screen.
6. Click “Save” to add the document to the selected record.

7. Upon successful submission, it will show the toast notification in the upper right corner “1 Document(s) successfully submitted.”
show documents from sales item card
Follow the below steps to test the PaperSave functionality “Show Documents” from Sales Item card:
1. On the Invoice tab of Sales Item Card, click on “Show Documents”.
2. This will open PaperSave cloud login prompt (on the first login). Enter login credentials.
3. On login success, it will show the available document/s.

show interrelated documents from sales item card
Follow the below steps to test the PaperSave functionality “Show Interrelated Documents” from Sales Item card:
1. On the Process tab of Sales Item Card, click on “Show Interrelated Documents”.
2. This will open PaperSave cloud login prompt (on the first login). Enter login credentials.
3. On login success, it will show the available Interrelated documents to the record.

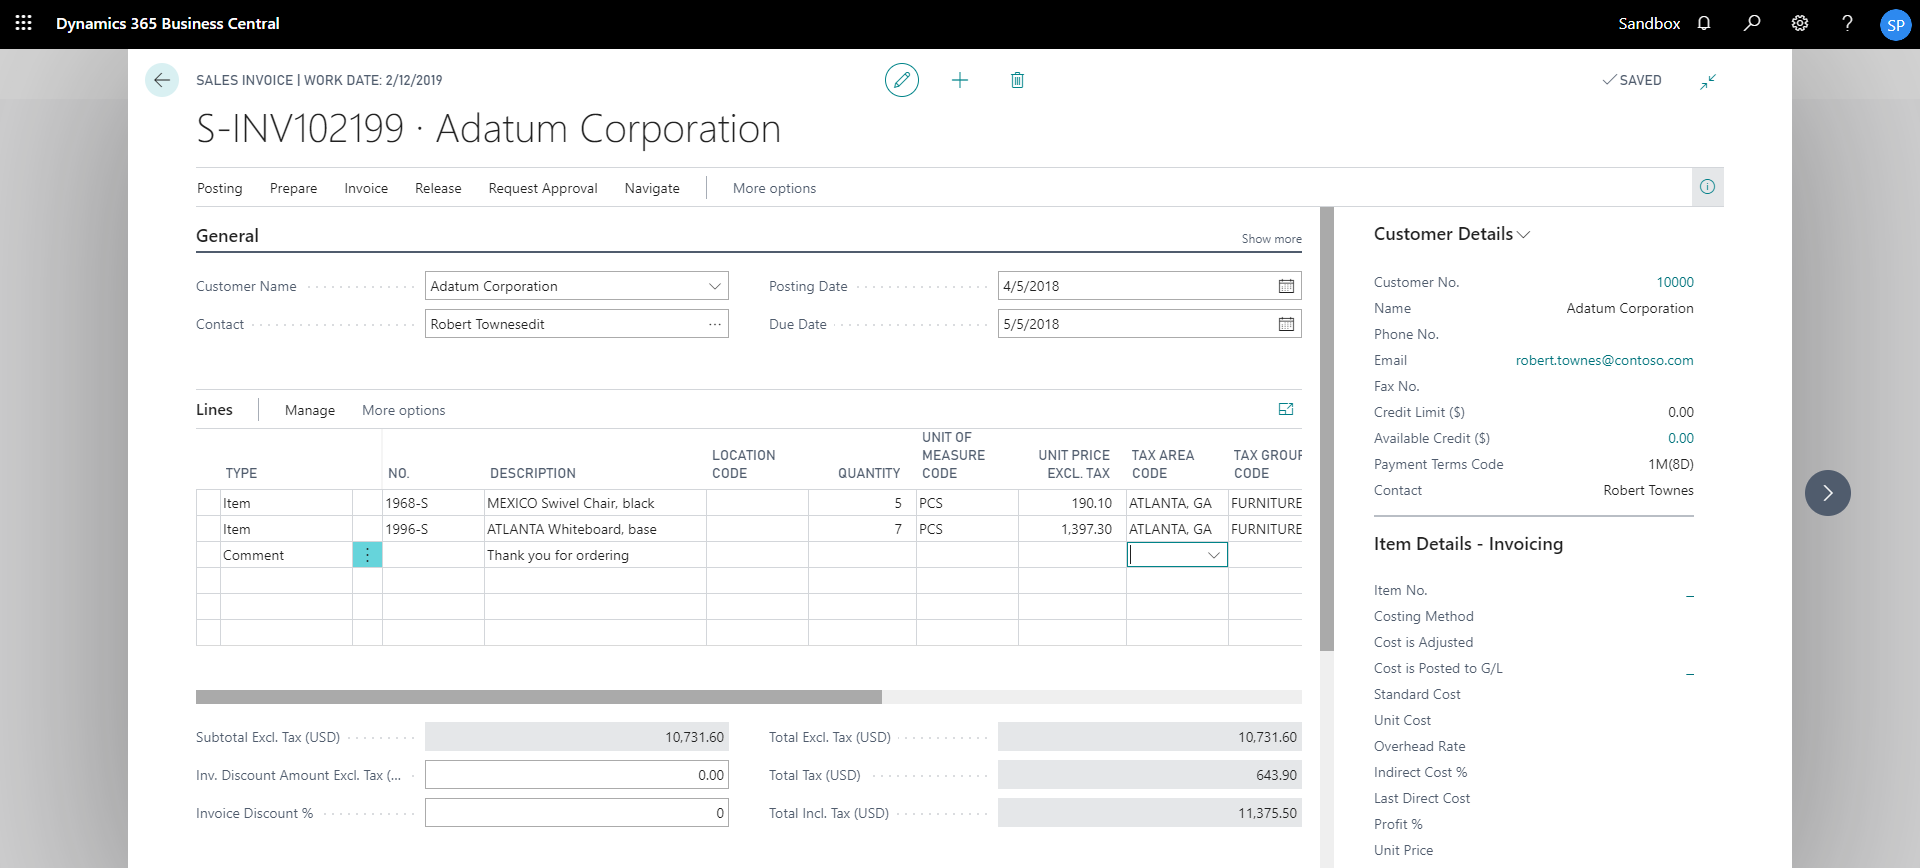
6.7 Sales Invoice
The following steps describe how to interact with PaperSave within the “Sales Invoice” record type’s main screen:
1. On the Dynamics 365 Business Central Home Page, click on the Sales dropdown.
2. Click on Sales Invoices.

Sales Invoice List
Clicking on Sales Invoices will display the list of all records for this record type. You can add documents to all the records in the list as well as view documents and Interrelated documents for all the records in the list.
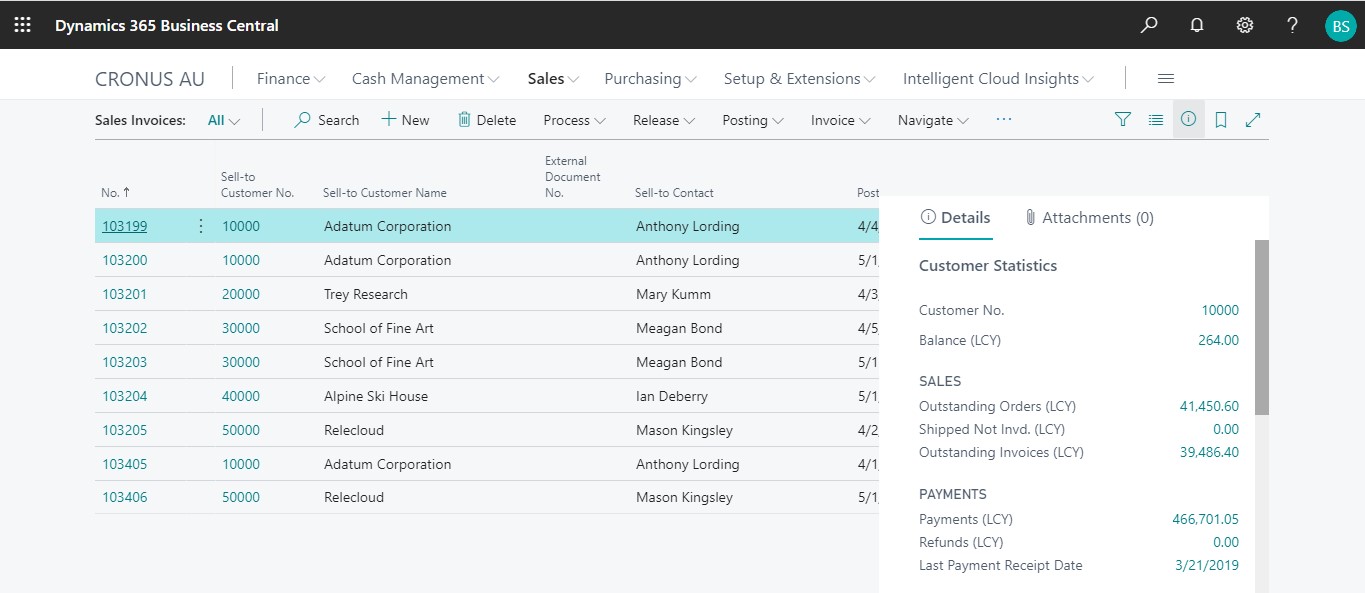
1. Click on “Process” Tab from Sales Invoices list.
2. You will see the PaperSave options such as “Add Document”, “Show Documents”, and “Show Interrelated Documents”.
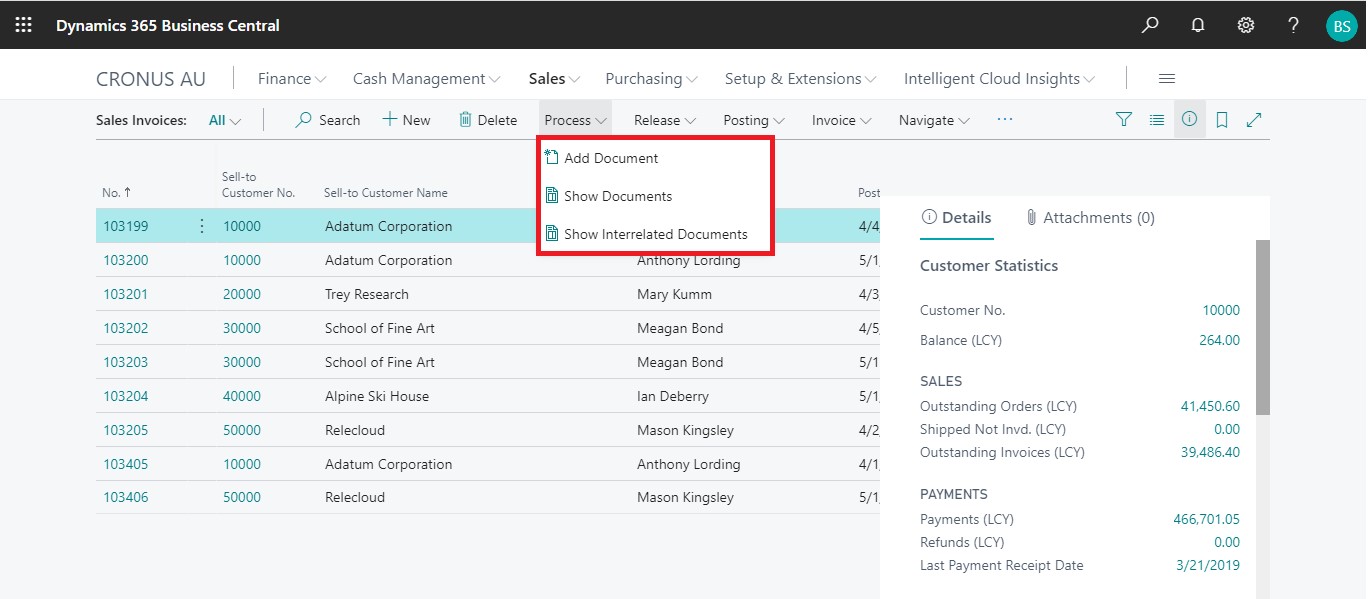
add documents from sales invoice list
Follow the below steps to test the PaperSave functionality “Add Document” from Sales Invoices list
1. On the Process Tab of Sales invoice list, click on “Add Document”.
2. If you are not already logged in, then it will open PaperSave cloud login prompt (on the first login). Enter your login credentials.
3. Upon login success, the system will navigate you to the “Add Document page”.
4. Drag or select files to upload documents from your file explorer.
5. This will open the document preview screen.
6. Click Save to add the document to all the records in the Sales Invoices list.
7. Upon successful submission, it will show the toast notification in the upper right corner “1 Document(s) successfully submitted.”
show documents from sales invoice list
Follow the below steps to test the PaperSave functionality “Show Document” from Sales Invoices list:
1. On the Process Tab of Sales invoices list, click on “Show Documents”.
2. This will open PaperSave cloud login prompt (on the first login). Enter login credentials.
3. On login success, it will show the available documents for all the records in Sales Invoice list.
show interrelated documents from sales invoice list
Follow the below steps to test the PaperSave functionality “Show Interrelated Documents” from Sales Invoices list:
1. Select the desired record from the list. On the Process Tab of Sales invoices list, click on “Show Interrelated Documents”.
2. This will open PaperSave cloud login prompt (on the first login). Enter login credentials.
3. On login success, it will show the available documents for the selected record in Sales Invoice list.

Sales Invoice Card
Clicking on the Sales Invoice card opens the selected record in card view with all the record details:
1. Click on the number field of desired record in the Sales Invoices list.
2. This will launch the Sales Invoice record.
3. Click on “Prepare” to access the PaperSave functionalities such as “Add Document”, “Show Documents” and “Show Interrelated Documents”.
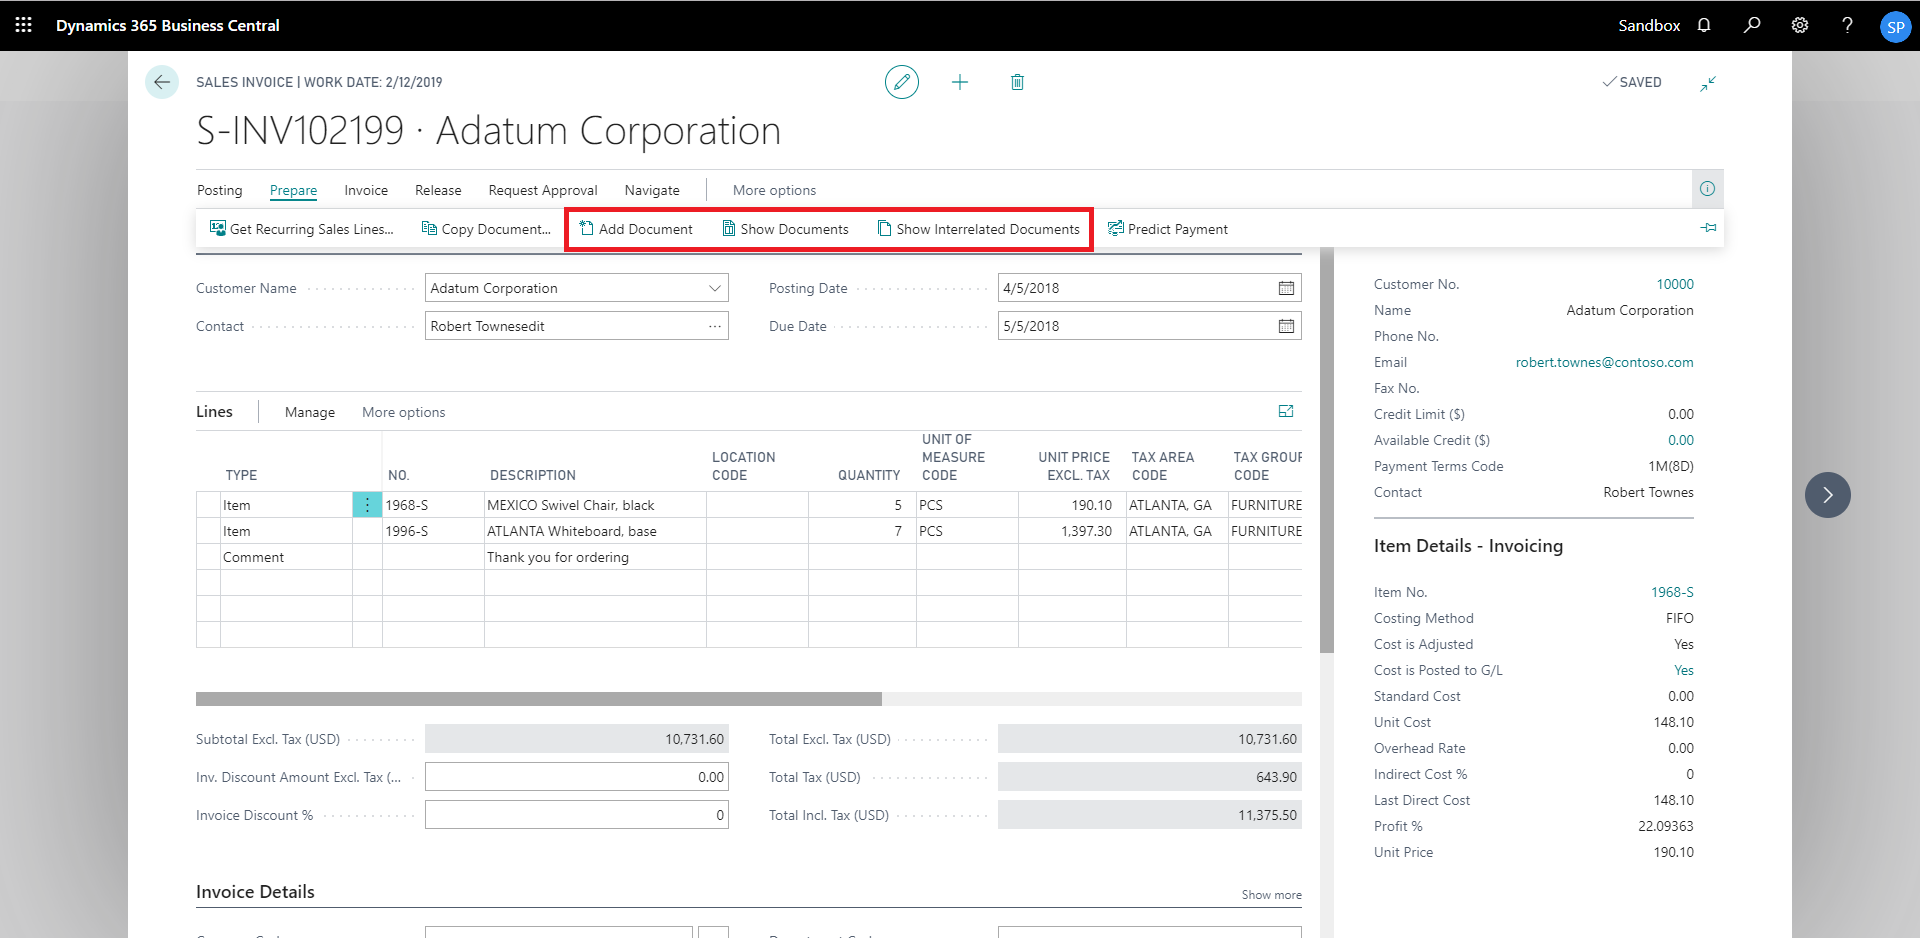
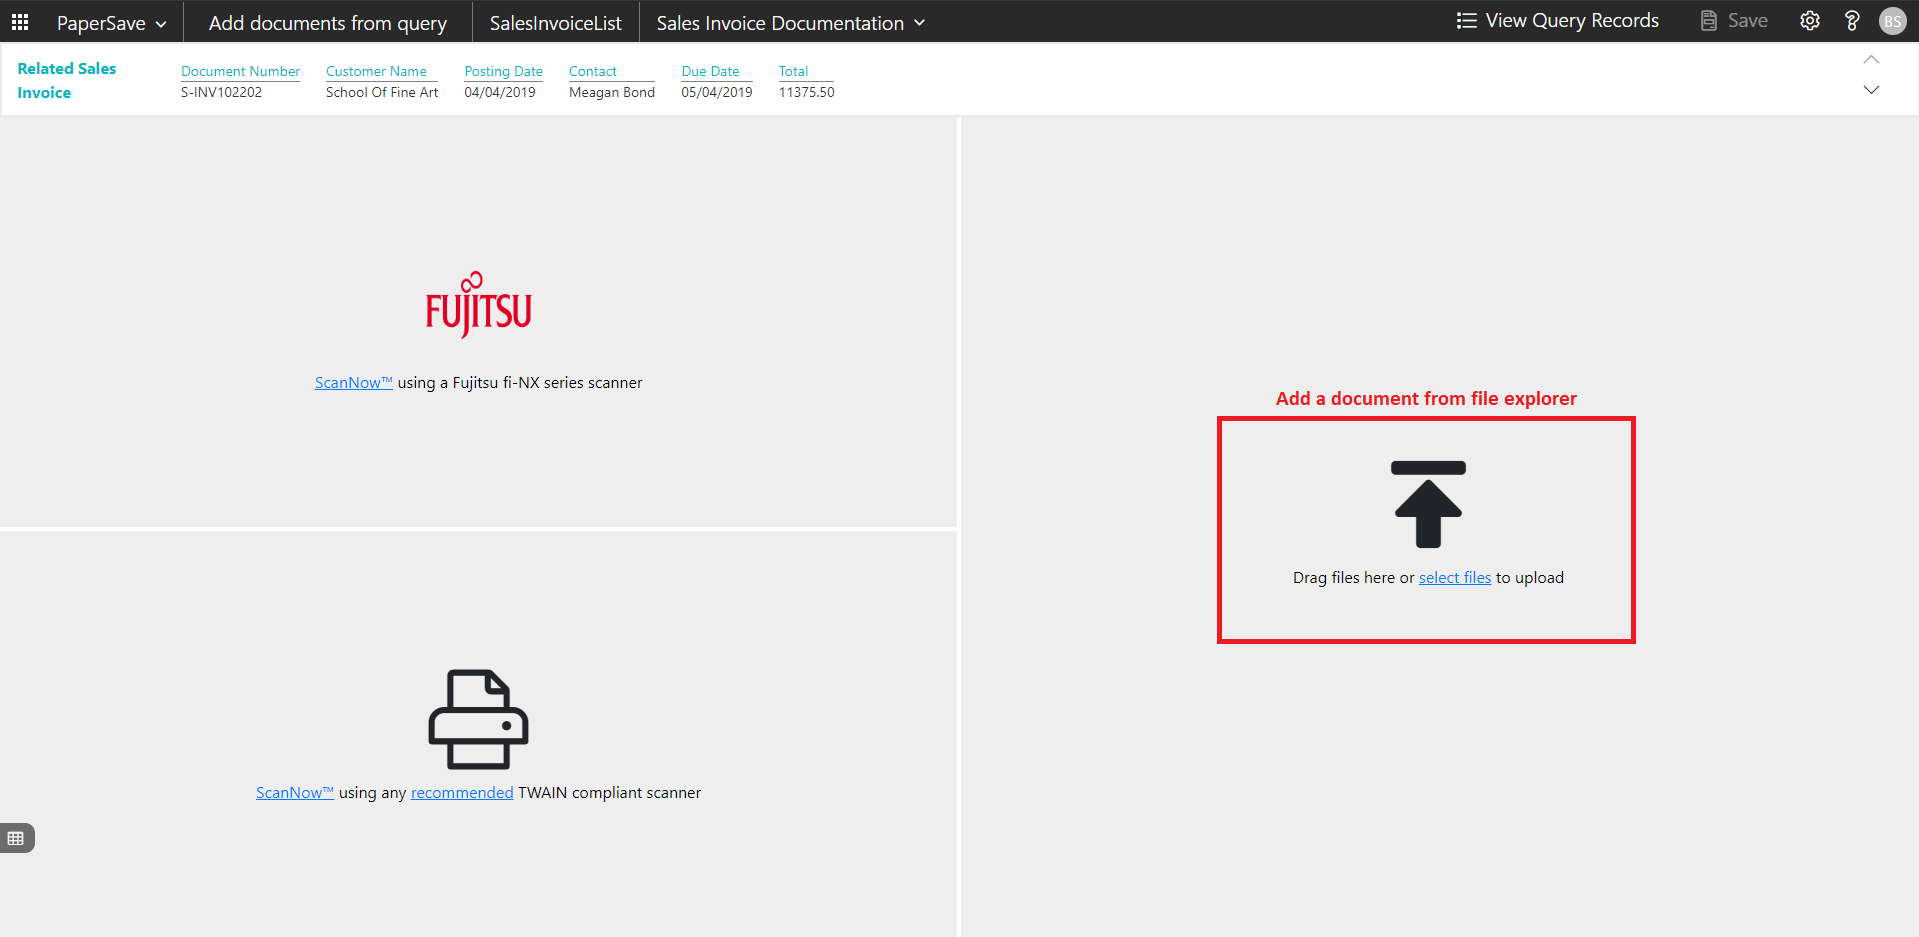
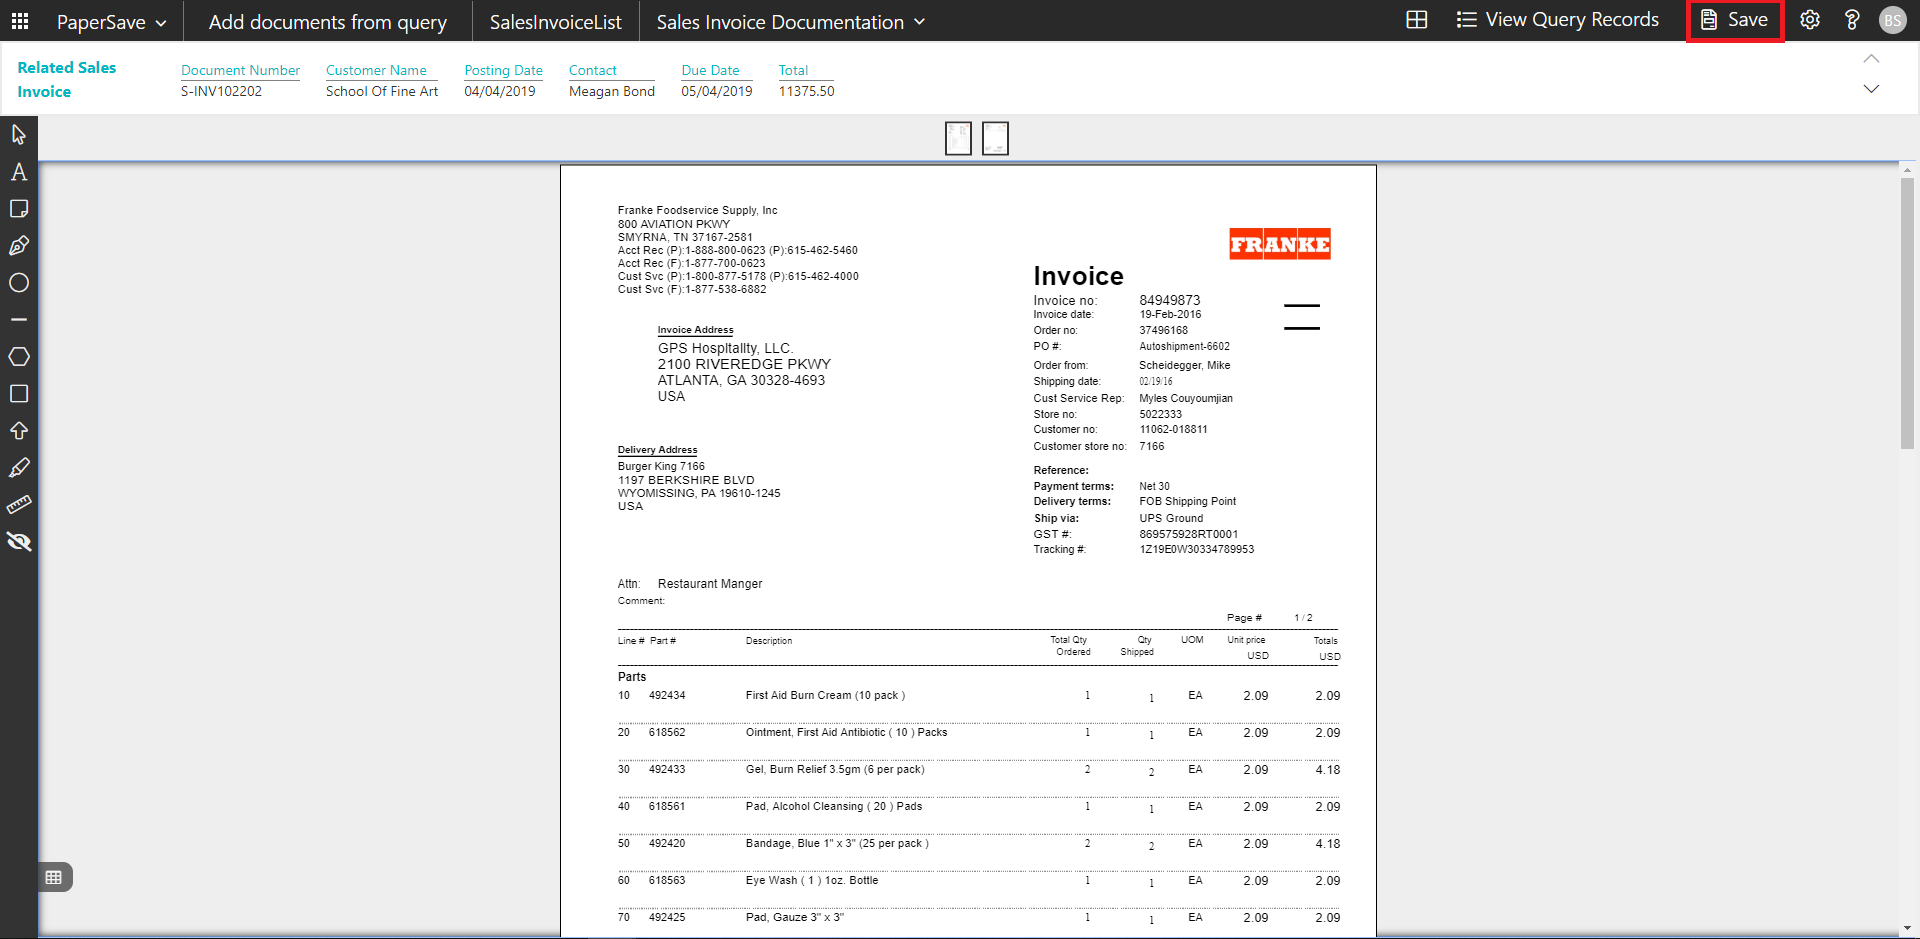
add documents from sales invoice card
Follow the below steps to test the PaperSave functionality “Add Document” from Sales Invoice card:
1. On the Prepare tab of Purchase Invoice Card, click on “Add Document”.
2. This will open PaperSave cloud login prompt (on the first login). Enter login credentials.
3. On login success, it will open the “Add Document” page.
4. Drag or select files to upload the desired document.
5. This will open the document preview screen. You can select the relevant “document type” in the checkbox and add a comment for the document.
6. Click “Save” to add the document to the selected record.
7. Upon successful submission, it will show the toast notification in the upper right corner “1 Document(s) successfully submitted.”
show documents from sales invoice card
Follow the below steps to test the PaperSave functionality “Show Documents” from Sales Invoice card:
1. On the Prepare tab of Sales Invoice Card, click on “Show Documents”.
2. This will open PaperSave cloud login prompt (on the first login). Enter login credentials.
3. On login success, it will show the available document/s.

show interrelated documents from sales invoice card
Follow the below steps to test the PaperSave functionality “Show Interrelated Documents” from Sales Invoice card:
1. On the Prepare tab of Sales Invoice Card, click on “Show Interrelated Documents”.
2. This will open PaperSave cloud login prompt (on the first login). Enter login credentials.
3. On login success, it will show the available Interrelated documents to the record.

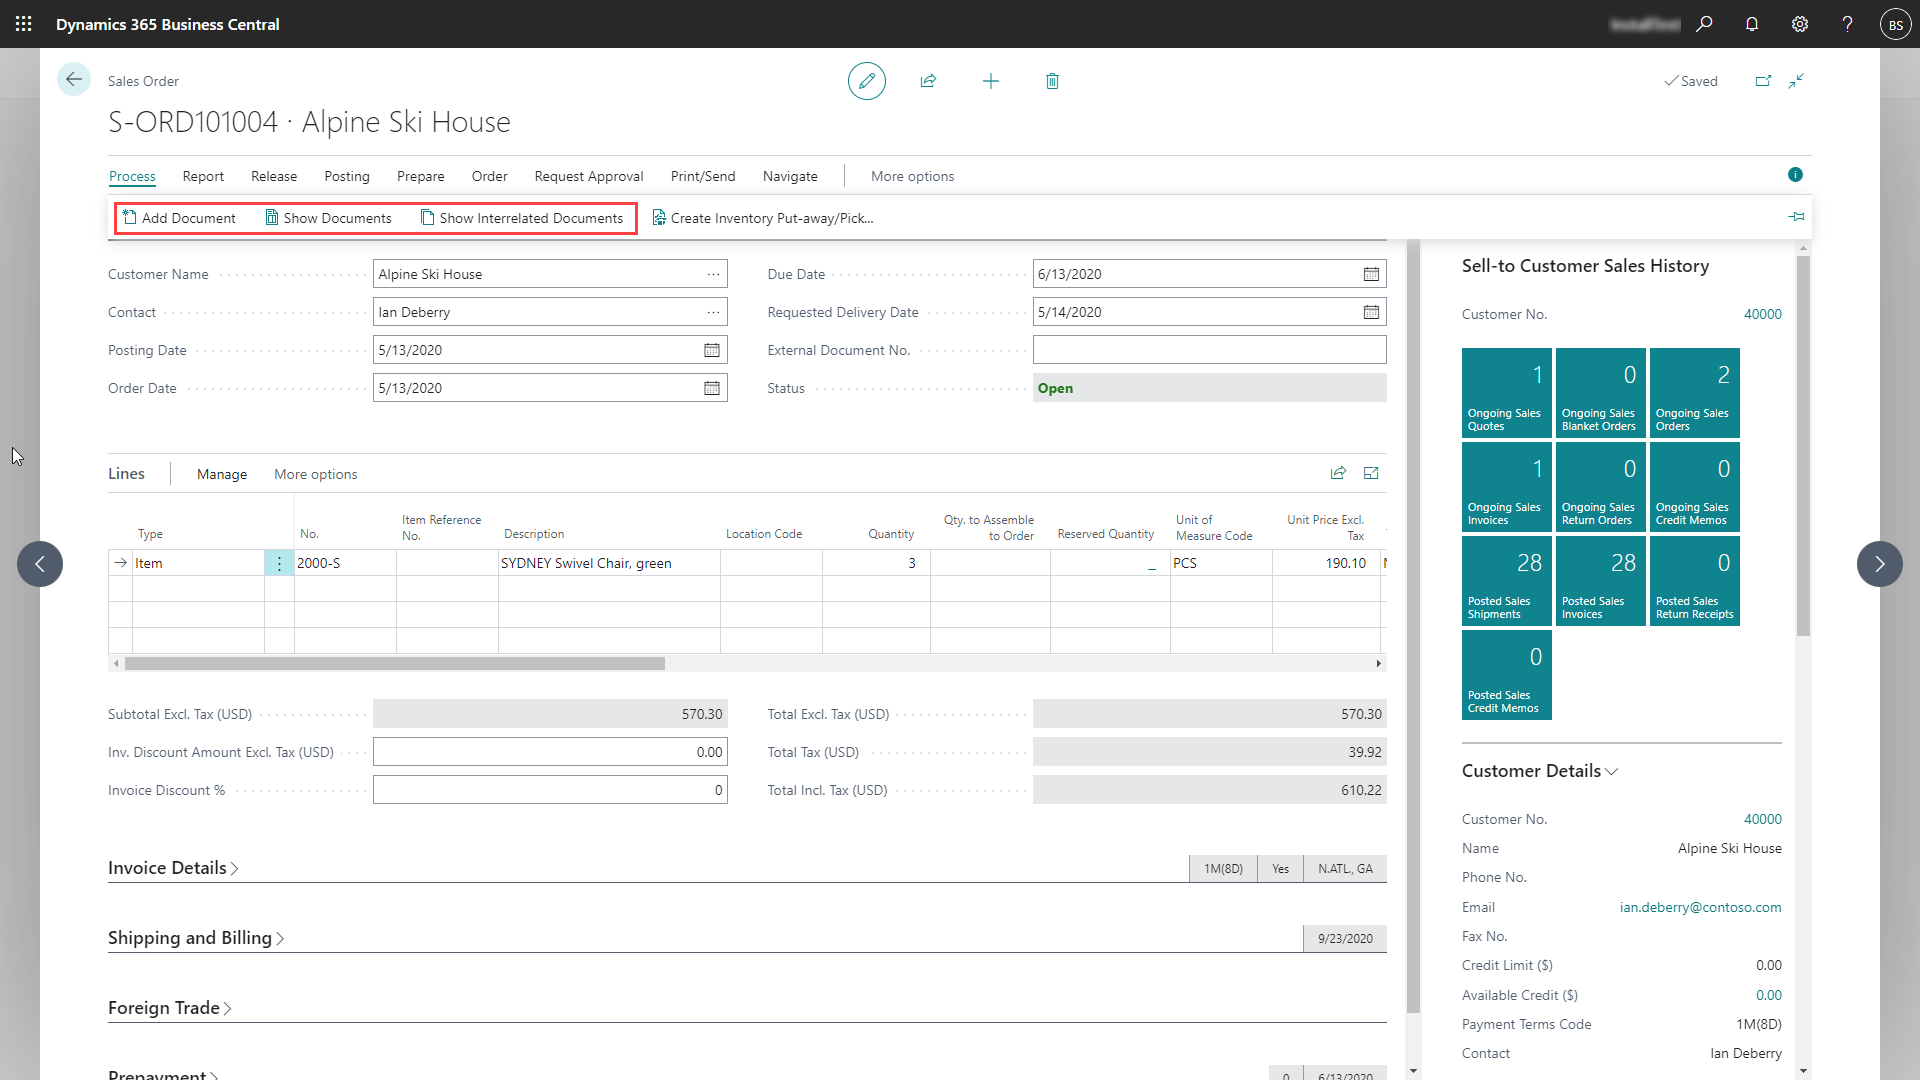
6.8 Sales Order
The following steps describe how to interact with PaperSave within the “Sales Order” record type’s main screen:
1. On the Dynamics 365 Business Central Home Page, click on the Sales dropdown.
2. Click on Sales Orders.

Sales Order List
Clicking on Sales Order will display the list of all records for this record type. You can add documents to all the records in the list as well as view documents and Interrelated documents for all the records in the list.
1. Click “Process” Tab from Sales Order list.
2. You will see the PaperSave options such as “Add Document”, “Show Documents”, and “Show Interrelated Documents”.
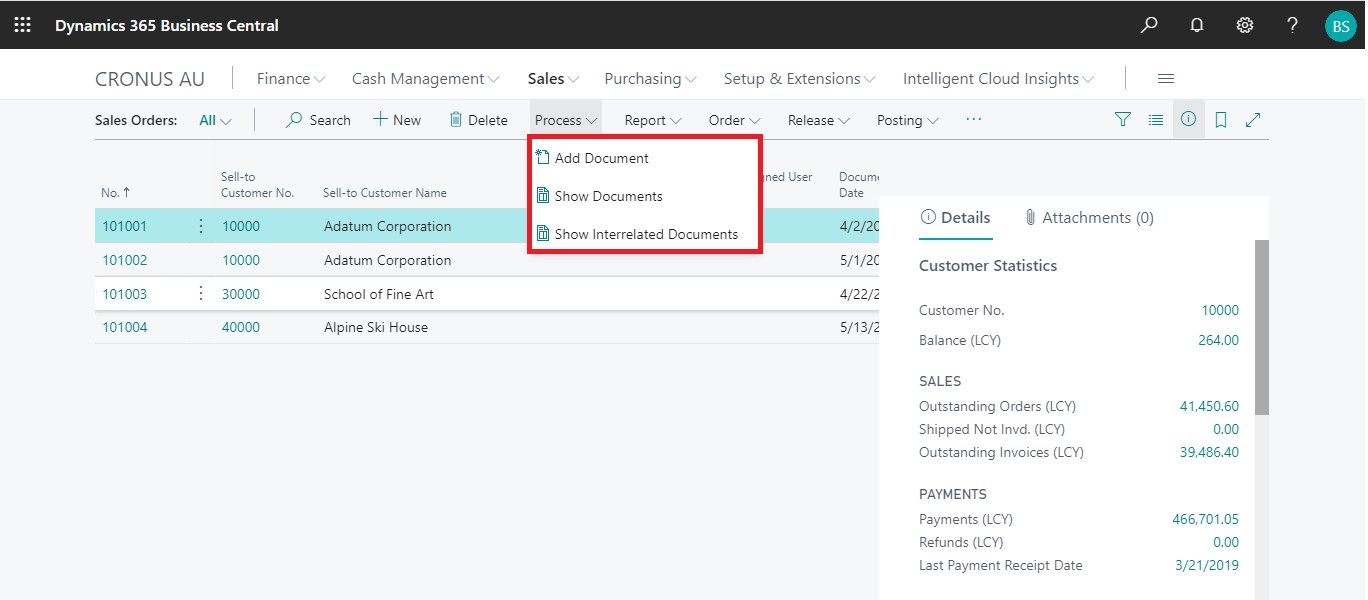
add documents in sales order list
Follow the below steps to test the PaperSave functionality “Add Document” from Sales Orders list
1. On the Process Tab of Sales Order list, click on “Add Document”.
2. If you are not already logged in, then it will open PaperSave cloud login prompt (on the first login). Enter your login credentials.
3. Upon login success, the system will navigate you to the “Add Document page”.

4. Drag or select files to upload documents from your file explorer.
5. This will open the document preview screen.
6. Click Save to add the document to all the records in the Sales Orders list.
7. Upon successful submission, it will show the toast notification in the upper right corner “1 Document(s) successfully submitted.”
show documents in sales order list
Follow the below steps to test the PaperSave functionality “Show Documents” from Sales Orders list:
1. On the Process Tab of Sales Order list, click on “Show Documents”.
2. This will open PaperSave cloud login prompt (on the first login). Enter login credentials.
3. On login success, it will show the available documents for the selected record in Sales Order list.
show interrelated documents in sales order list
Follow the below steps to test the PaperSave functionality “Show Interrelated Documents” from Sales Orders list:
1. Select the desired record from the list. On the Process Tab of Sales Order list, click on “Show Interrelated Documents”.
2. This will open PaperSave cloud login prompt (on the first login). Enter login credentials.
3. On login success, it will show the available Interrelated documents for the selected record in Sales Order list.
Sales Order Card
Clicking on the Sales Order card opens the selected record in card view with all the record details:
1. Click on the number field of desired record in the Purchase Invoices list.
2. This will launch the Sales Order record.

3. Click on “Process” to access the PaperSave functionalities such as “Add Document”, “Show Documents” and “Show Interrelated Documents”.
add documents in sales order card
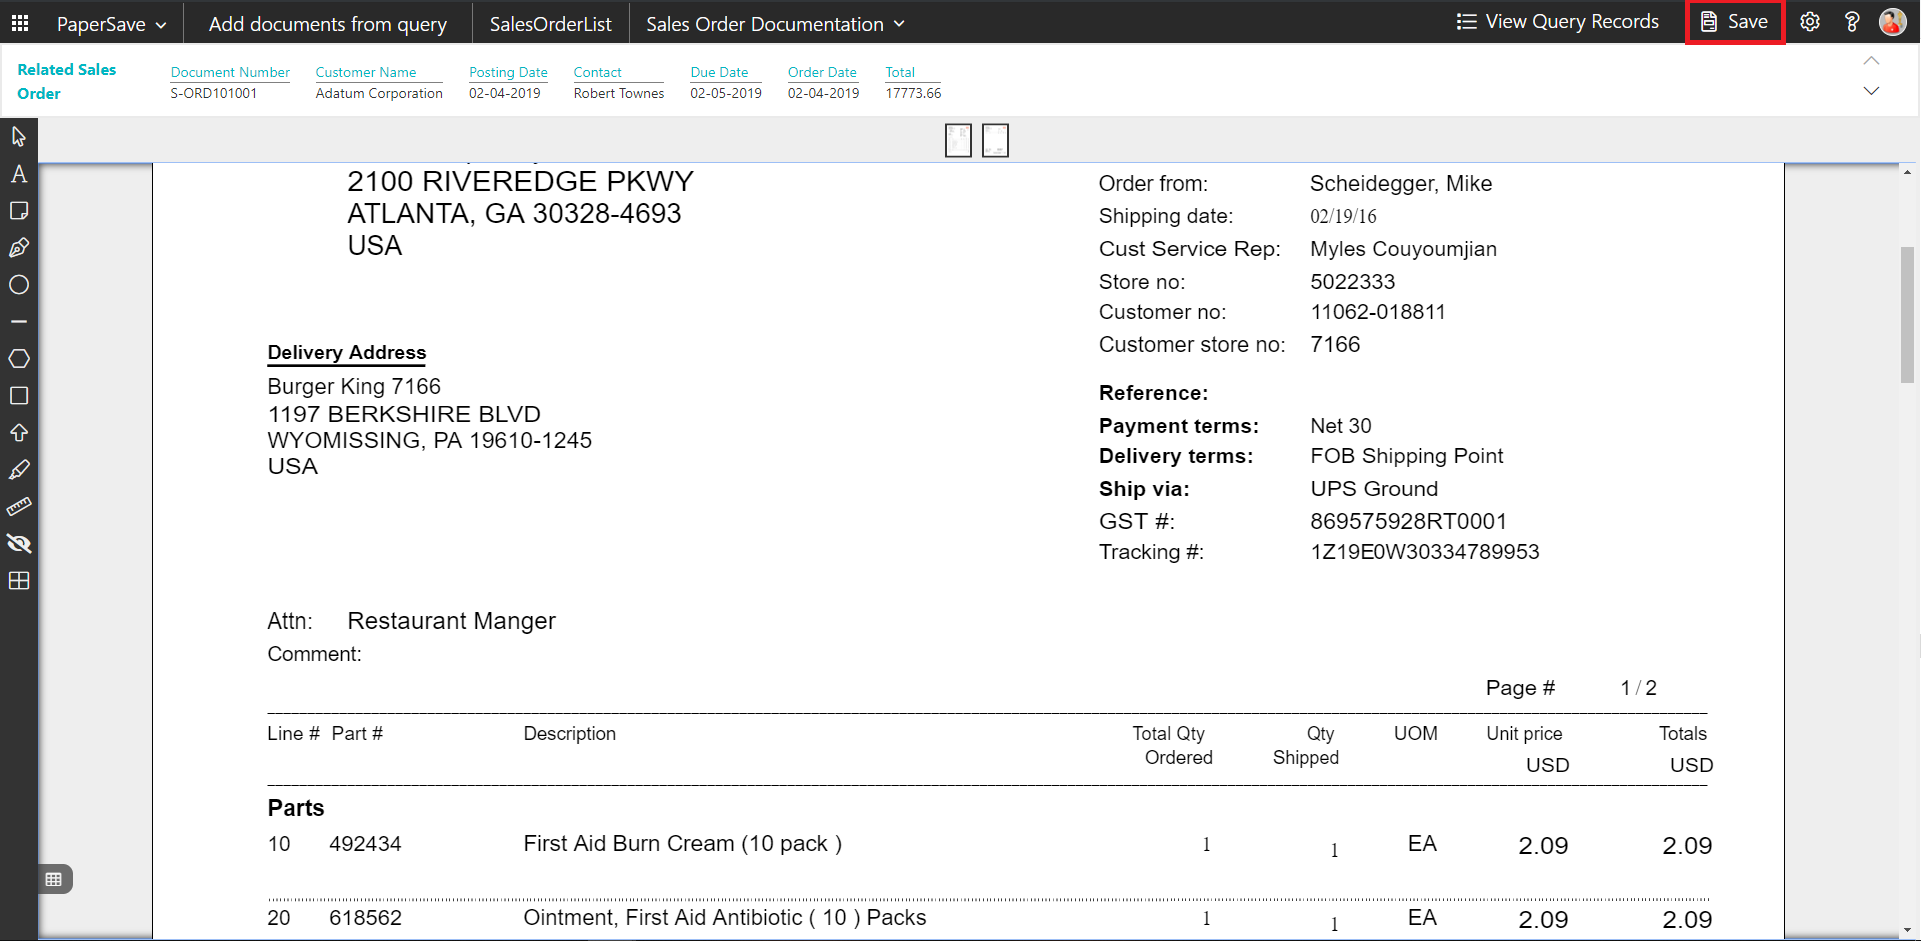
Follow the below steps to test the PaperSave functionality “Add Document” from Sales Order card:
1. On the Process tab of Sales Order Card, click on “Add Document”.
2. This will open PaperSave cloud login prompt (on the first login). Enter login credentials.
3. On login success, it will open the “Add Document” page.
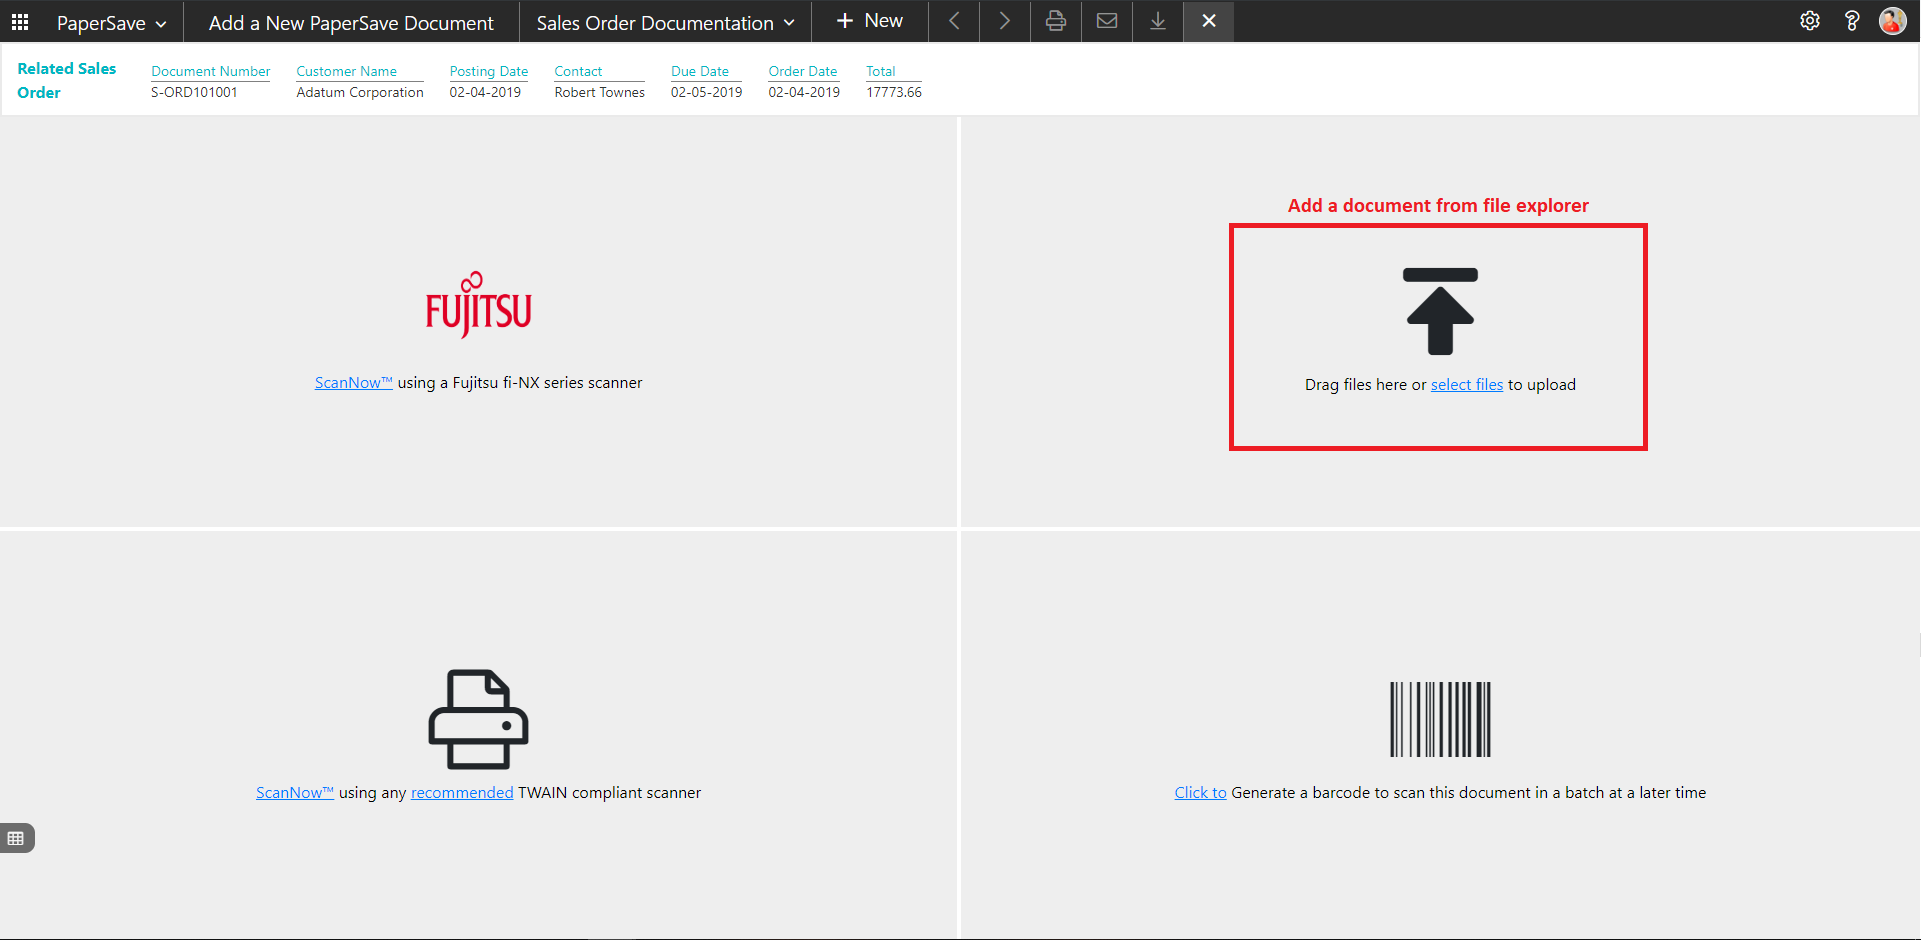
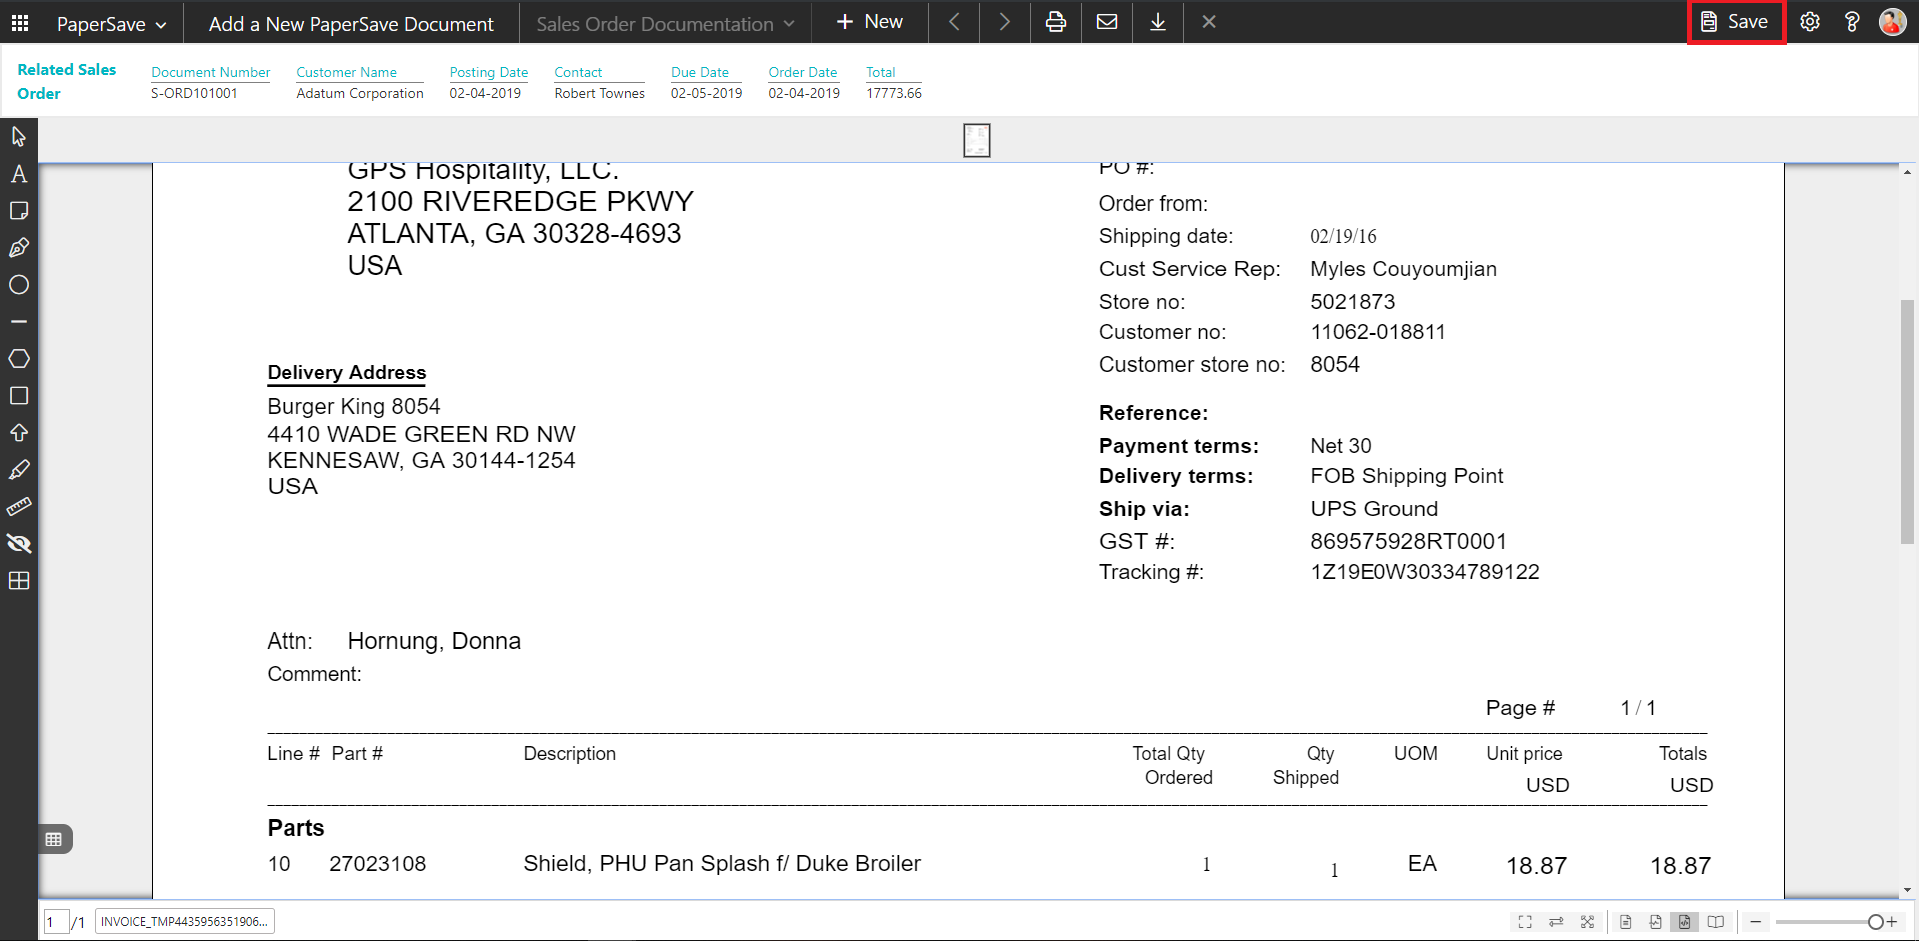
4. Drag or select files to upload the desired document.
5. This will open the document preview screen.
6. Click “Save” to add the document to the selected record.
7. Upon successful submission, it will show the toast notification in the upper right corner “1 Document(s) successfully submitted.”
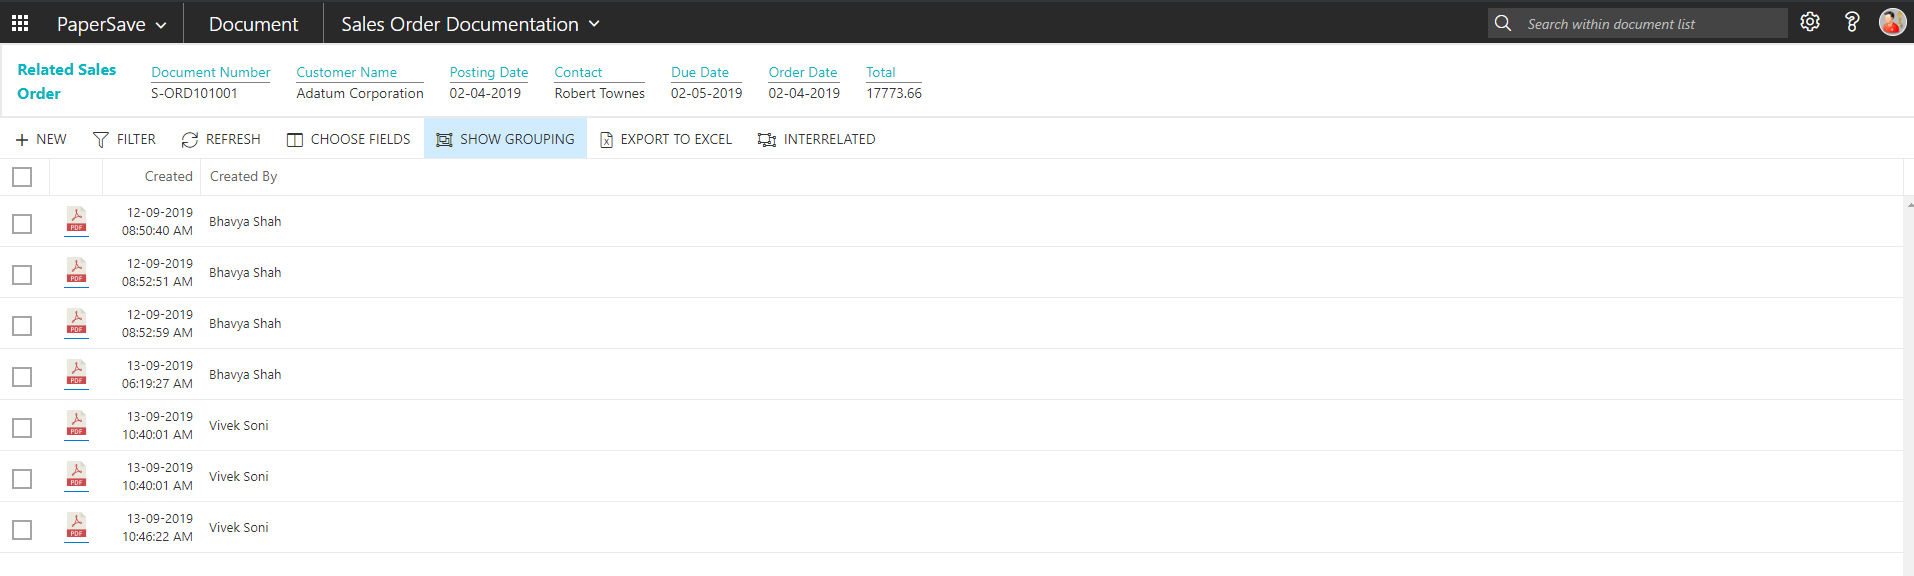
show documents in sales order card
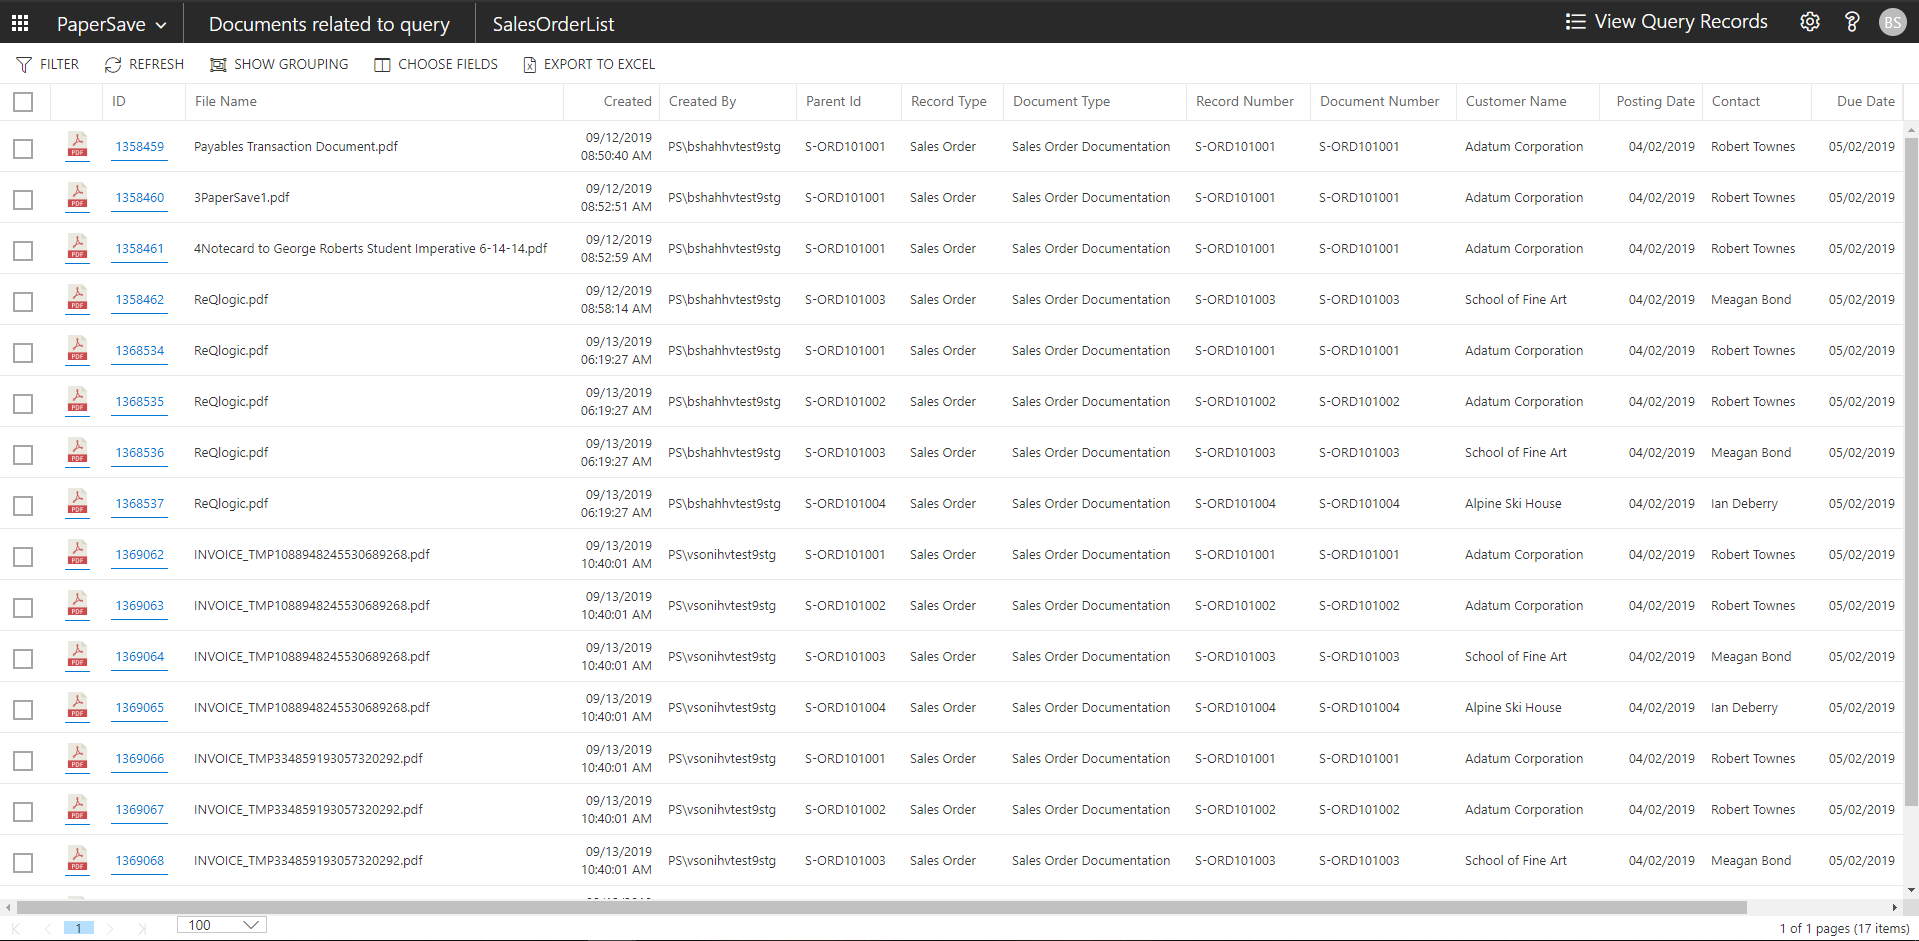
Follow the below steps to test the PaperSave functionality “Show Documents” from Sales Order card:
1. On the Process tab of Sales Order Card, click on “Show Documents”.
2. This will open PaperSave cloud login prompt (on the first login). Enter login credentials.
3. On login success, it will show the available document/s.
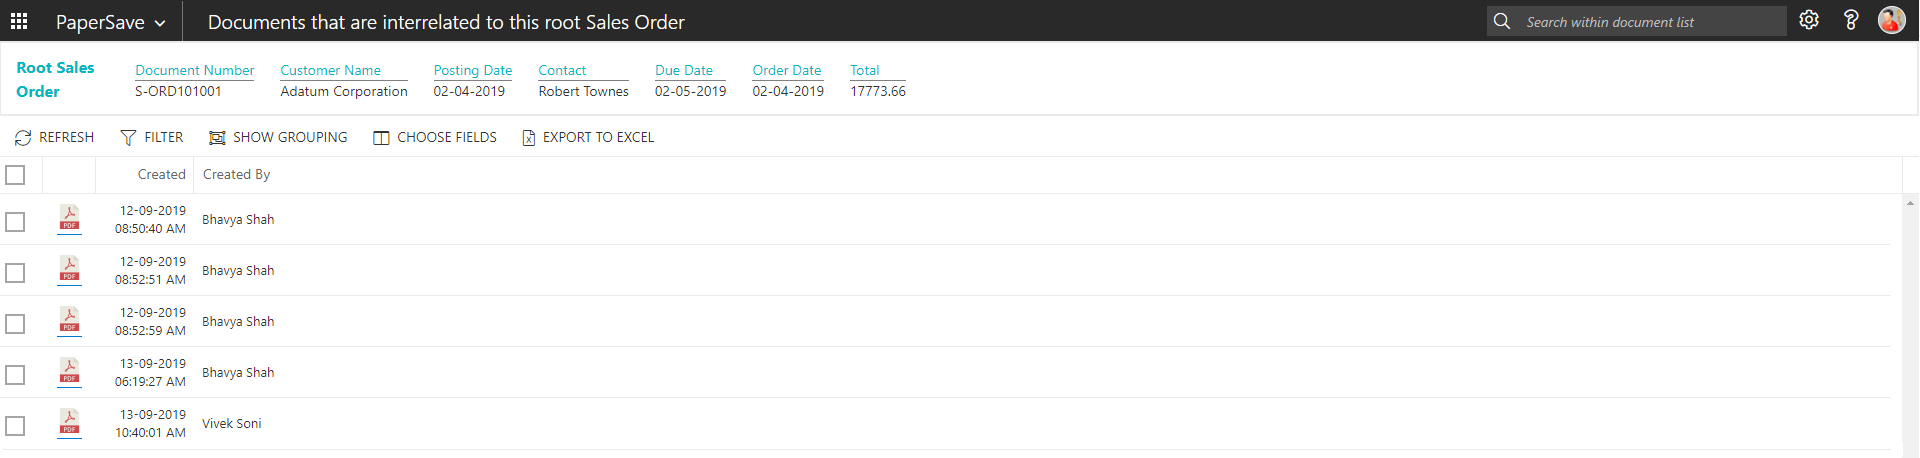
show interrelated documents in sales order card
Follow the below steps to test the PaperSave functionality “Show Interrelated Documents” from Sales Order card:
1. On the Process tab of Sales Order Card, click on “Show Interrelated Documents”.
2. This will open PaperSave cloud login prompt (on the first login). Enter login credentials.
3. On login success, it will show the available Interrelated documents to the record.

6.9 Sales Quote
The following steps describe how to interact with PaperSave within the “Sales Quote” record type’s main screen:
1. On the Dynamics 365 Business Central Home Page, click on the Sales dropdown.
2. Click on Sales Quotes.

Sales Quote List
Clicking on Sales Quotes will display the list of all records for this record type. You can add documents to all the records in the list as well as view documents and Interrelated documents for all the records in the list.
1. Click on “Process” Tab from Sales Quotes list.
2. You will see the PaperSave options such as “Add Document”, “Show Documents”, and “Show Interrelated Documents”.
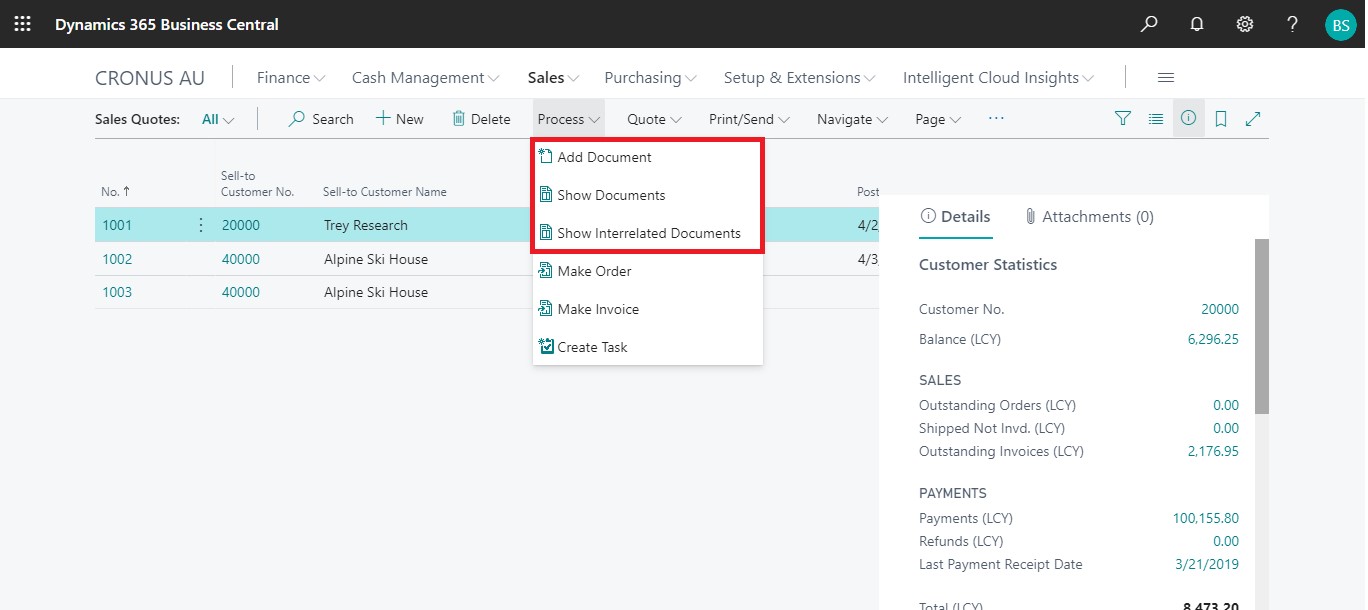
add documents from sales quote list
Follow the below steps to test the PaperSave functionality “Add Document” from Sales Quotes list
1. On the Process Tab of Sales Quotes list, click on “Add Document”.
2. If you are not already logged in, then it will open PaperSave cloud login prompt (on the first login). Enter your login credentials.
3. Upon login success, the system will navigate you to the “Add Document page”.
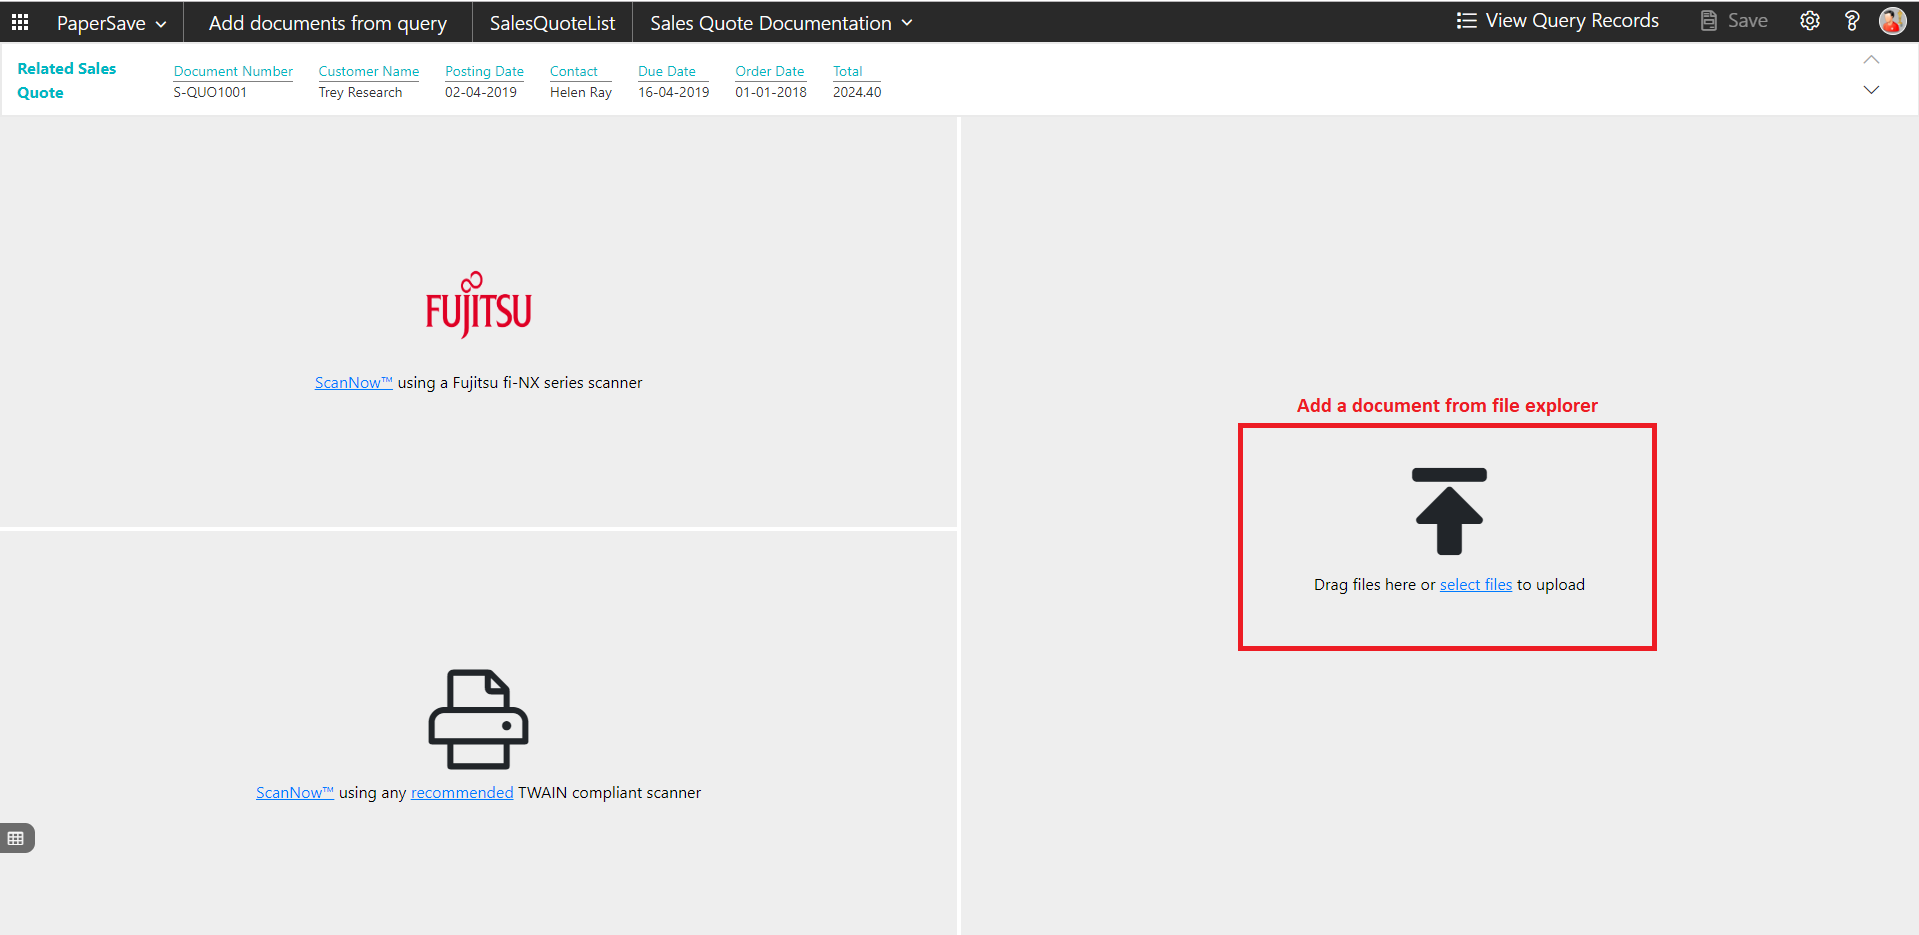
4. Drag or select files to upload documents from your file explorer.
5. This will open the document preview screen.
6. Click Save to add the document to all the records in the Sales Quotes list.
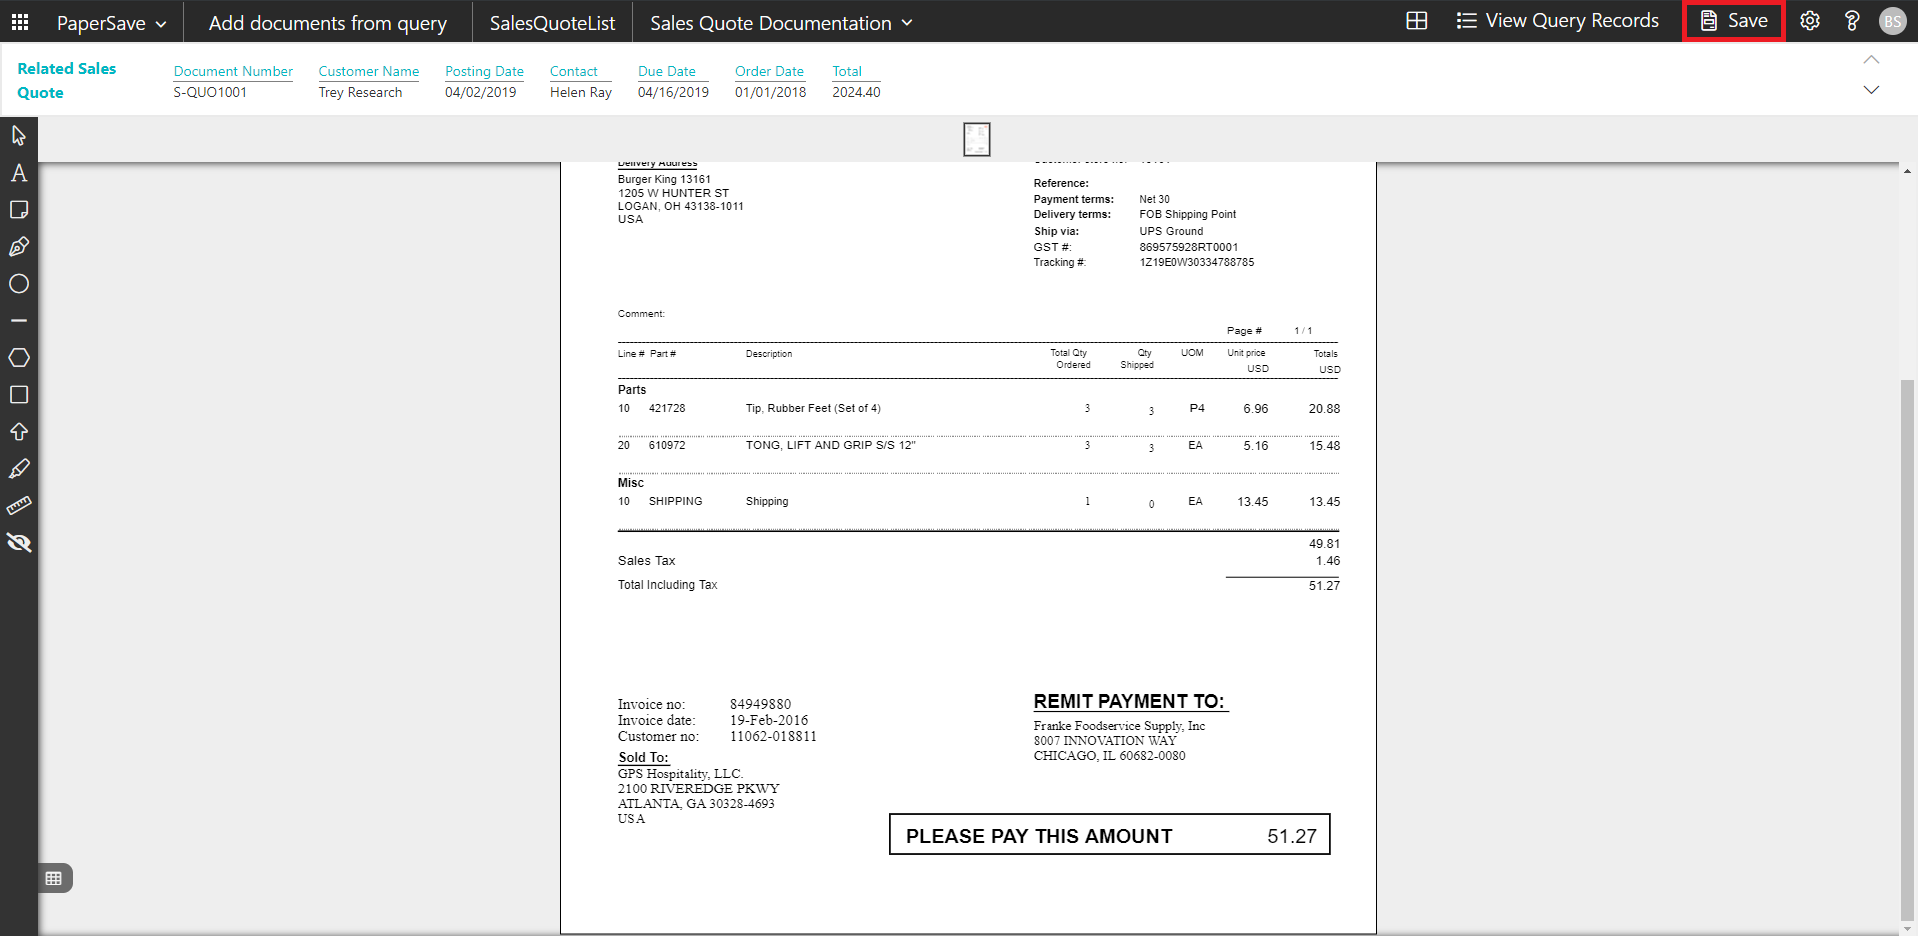
7. Upon successful submission, it will show the toast notification in the upper right corner “1 Document(s) successfully submitted.”
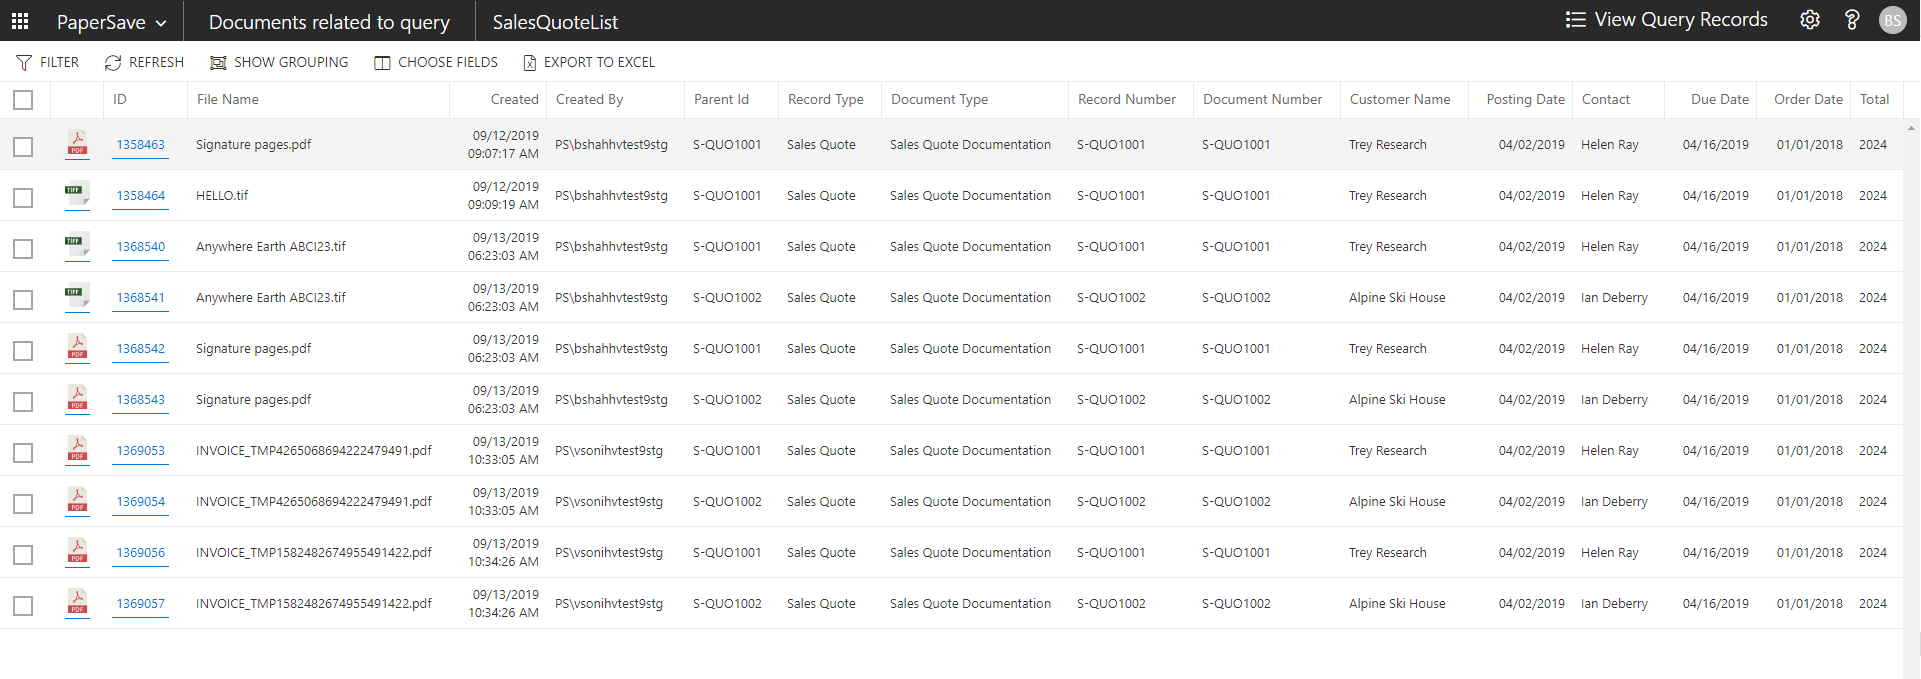
show documents from sales quote list
Follow the below steps to test the PaperSave functionality “Show Documents” from Sales Quotes list:
1. On the Process Tab of Sales Quotes list, click on “Show Documents”.
2. This will open PaperSave cloud login prompt (on the first login). Enter login credentials.
3. On login success, it will show the available documents for all the records in Sales Quotes list.
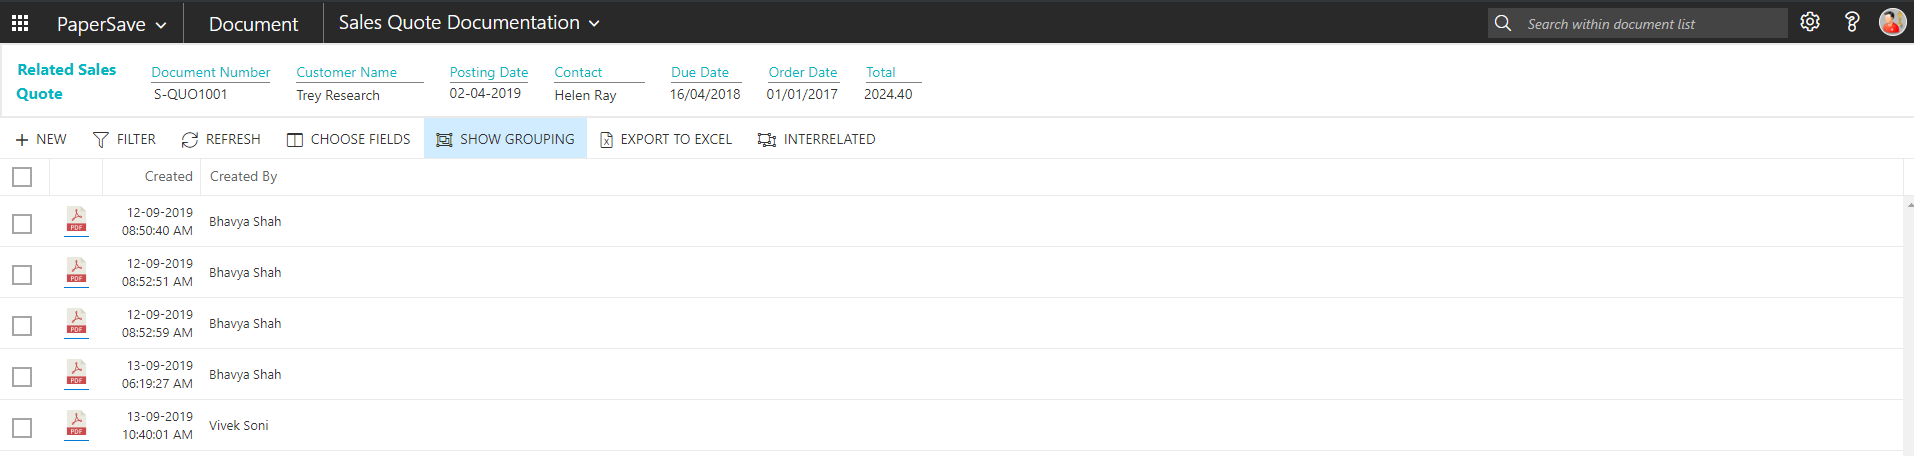
show interrelated documents from sales quote list
Follow the below steps to test the PaperSave functionality “Show Interrelated Documents” from Sales Quote list:
1. Select the desired record from the list. On the Process Tab of Sales Quote list, click on “Show Interrelated Documents”.
2. This will open PaperSave cloud login prompt (on the first login). Enter login credentials.
3. On login success, it will show the available Interrelated documents for the selected record in Sales Quote list.

Sales Quote Card
Clicking on the Sales Quotes card opens the selected record in card view with all the record details:
1. Click the number field of desired record in the Sales Quotes list.
2. This will launch the Sales Quotes record.
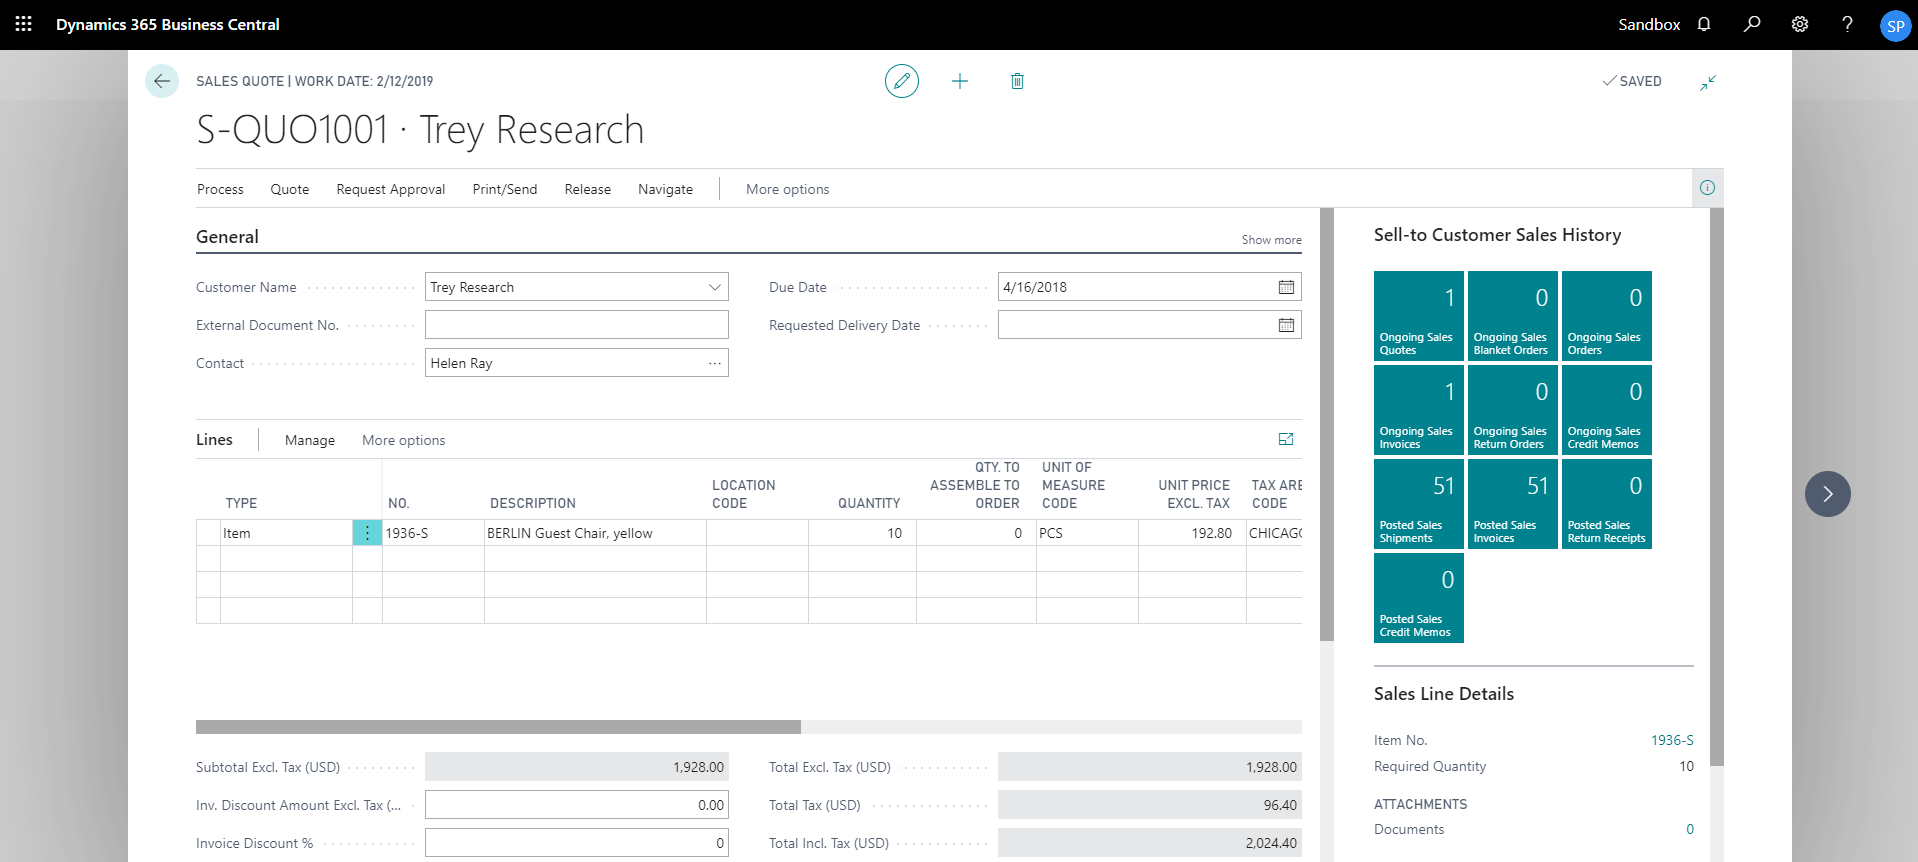
3. Click on “Process” to access the PaperSave functionalities such as “Add Document”, “Show Documents” and “Show Interrelated Documents”.
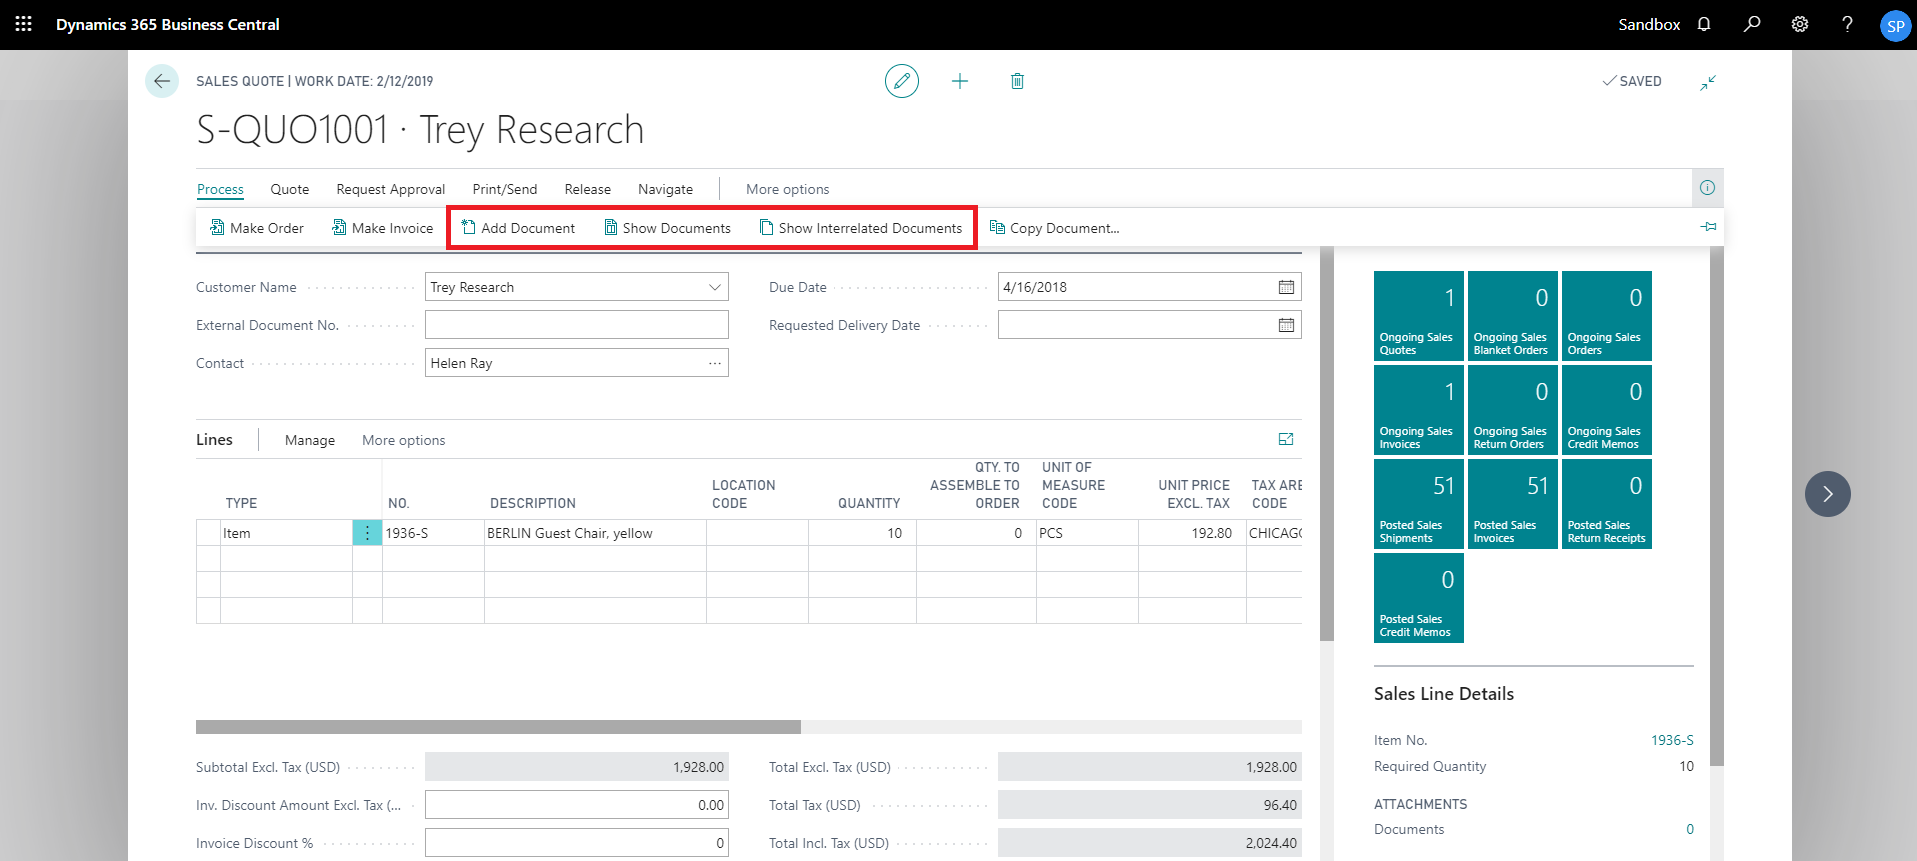
add documents from sales quote card
Follow the below steps to test the PaperSave functionality “Add Document” from Sales Quotes card:
1. On the Process tab of Sales Quotes Card, click on “Add Document”.
2. This will open PaperSave cloud login prompt (on the first login). Enter login credentials.
3. On login success, it will open the “Add Document” page.
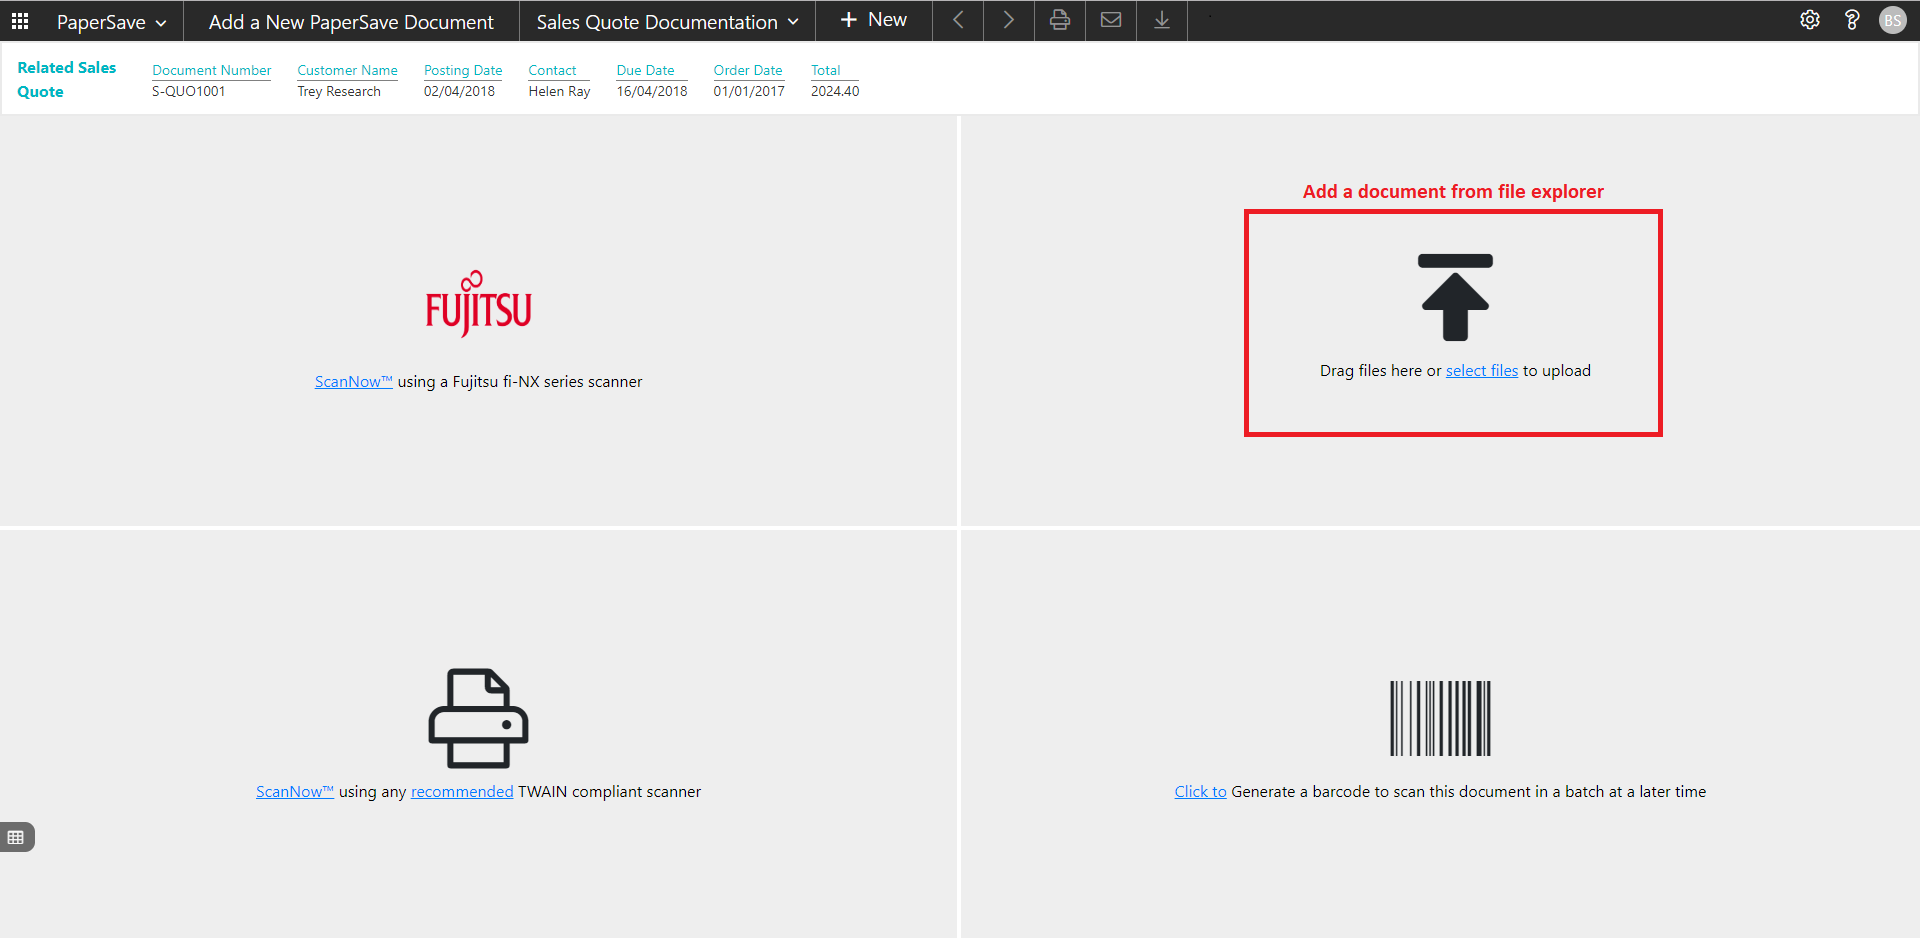
4. Drag or select files to upload the desired document.
5. This will open the document preview screen. You can select the relevant “document type” in the checkbox and add a comment for the document.
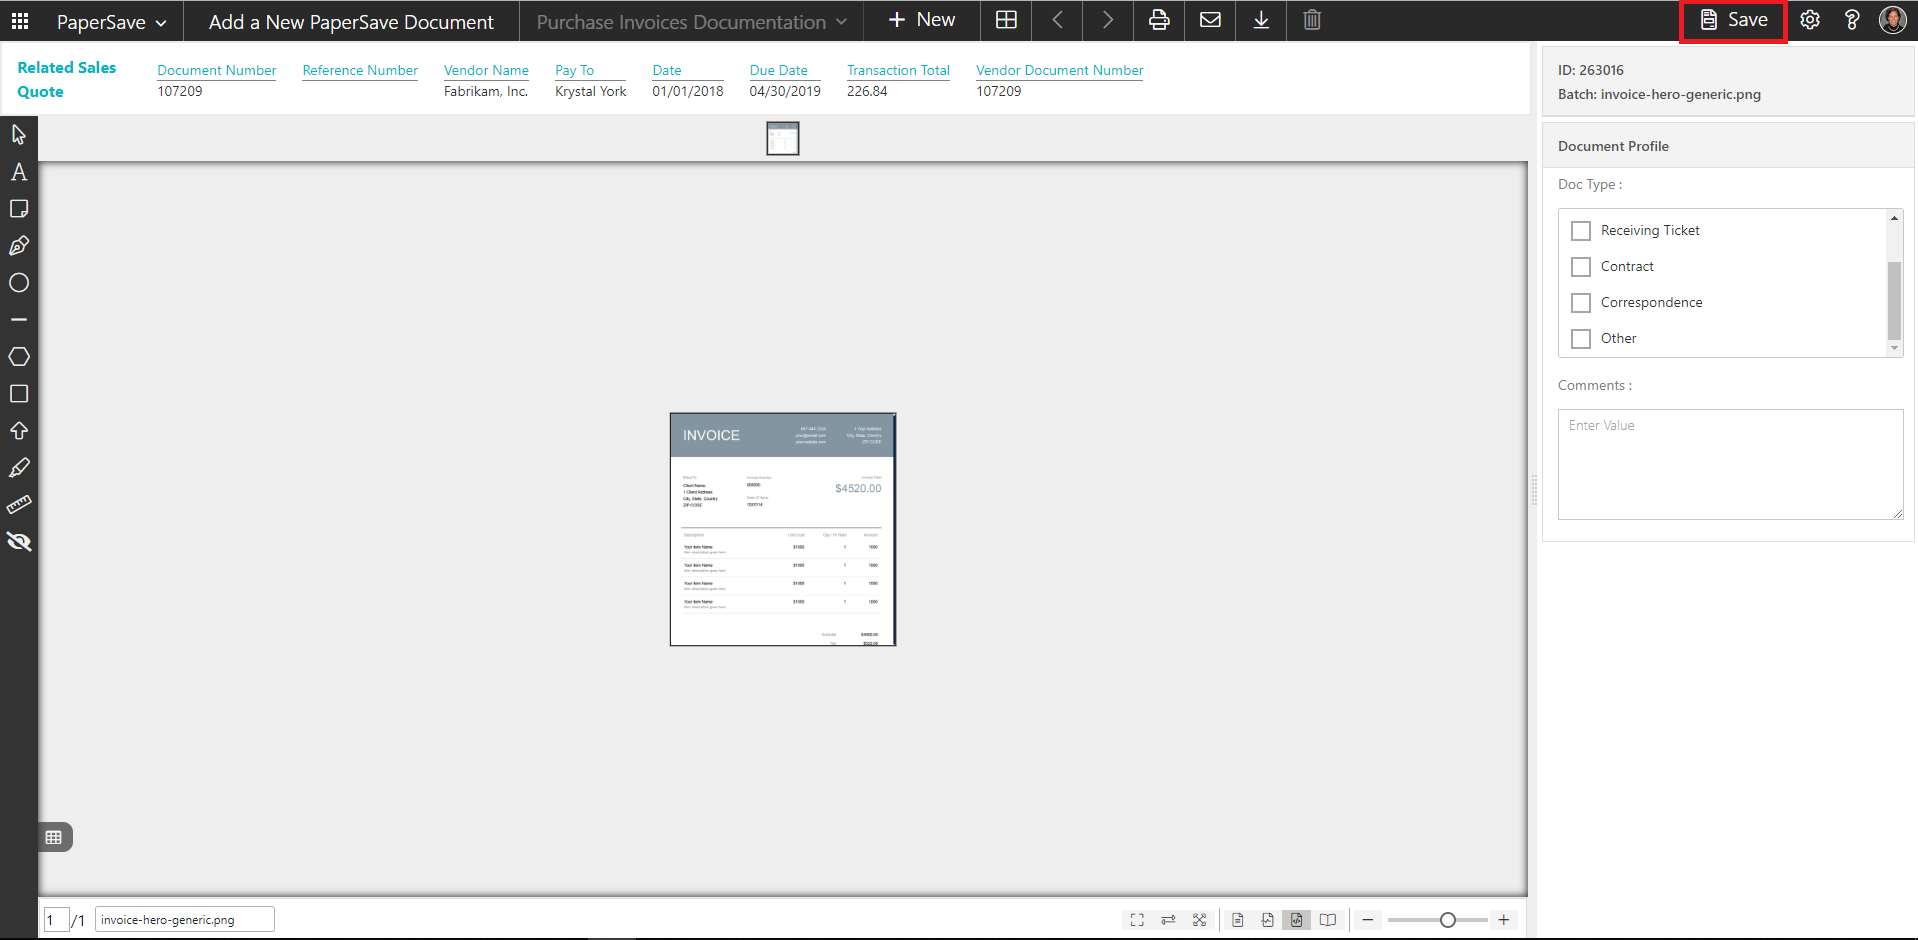
6. Click “Save” to add the document to the selected record.
7. Upon successful submission, it will show the toast notification in the upper right corner “1 Document(s) successfully submitted.”
show documents from sales quote card
Follow the below steps to test the PaperSave functionality “Show Documents” from Sales Quotes card:
1. On the Process tab of Sales Quotes Card, click on “Show Documents”.
2. This will open PaperSave cloud login prompt (on the first login). Enter login credentials.
3. On login success, it will show the available document/s.
show interrelated documents from sales quote card
Follow the below steps to test the PaperSave functionality “Show Interrelated Documents” from Sales Quotes card:
1. On the Process tab of Sales Quotes Card, click on “Show Interrelated Documents”.
2. This will open PaperSave cloud login prompt (on the first login). Enter login credentials.
3. On login success, it will show the available interrelated documents to the record.

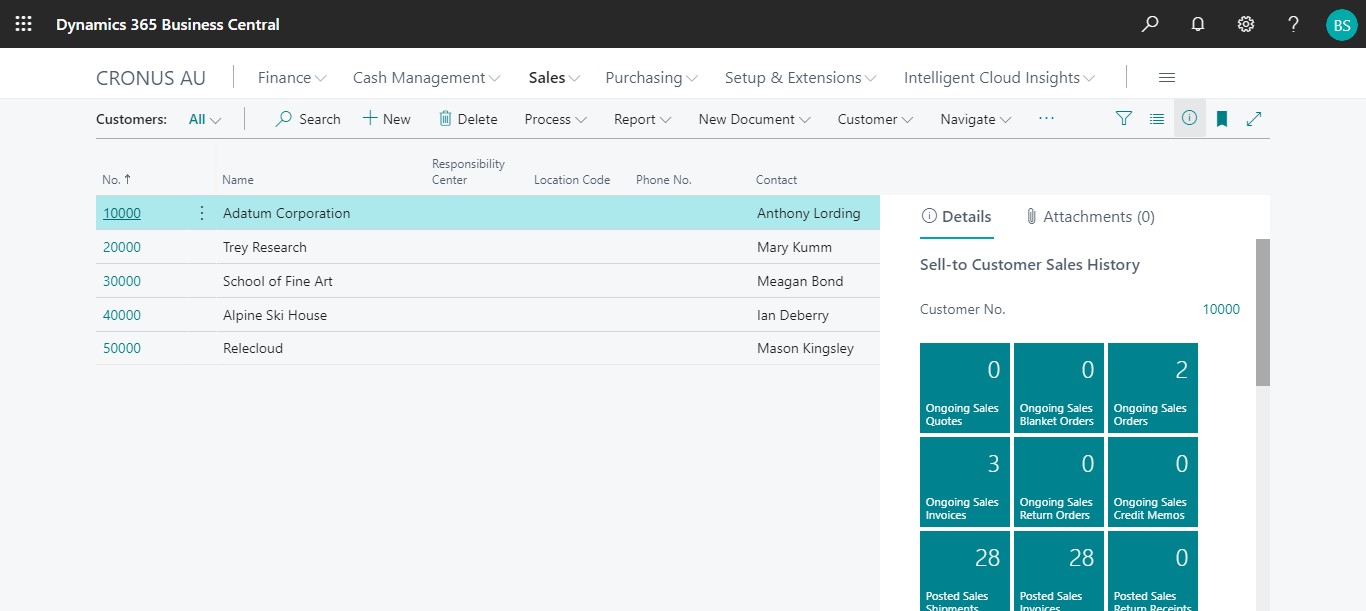
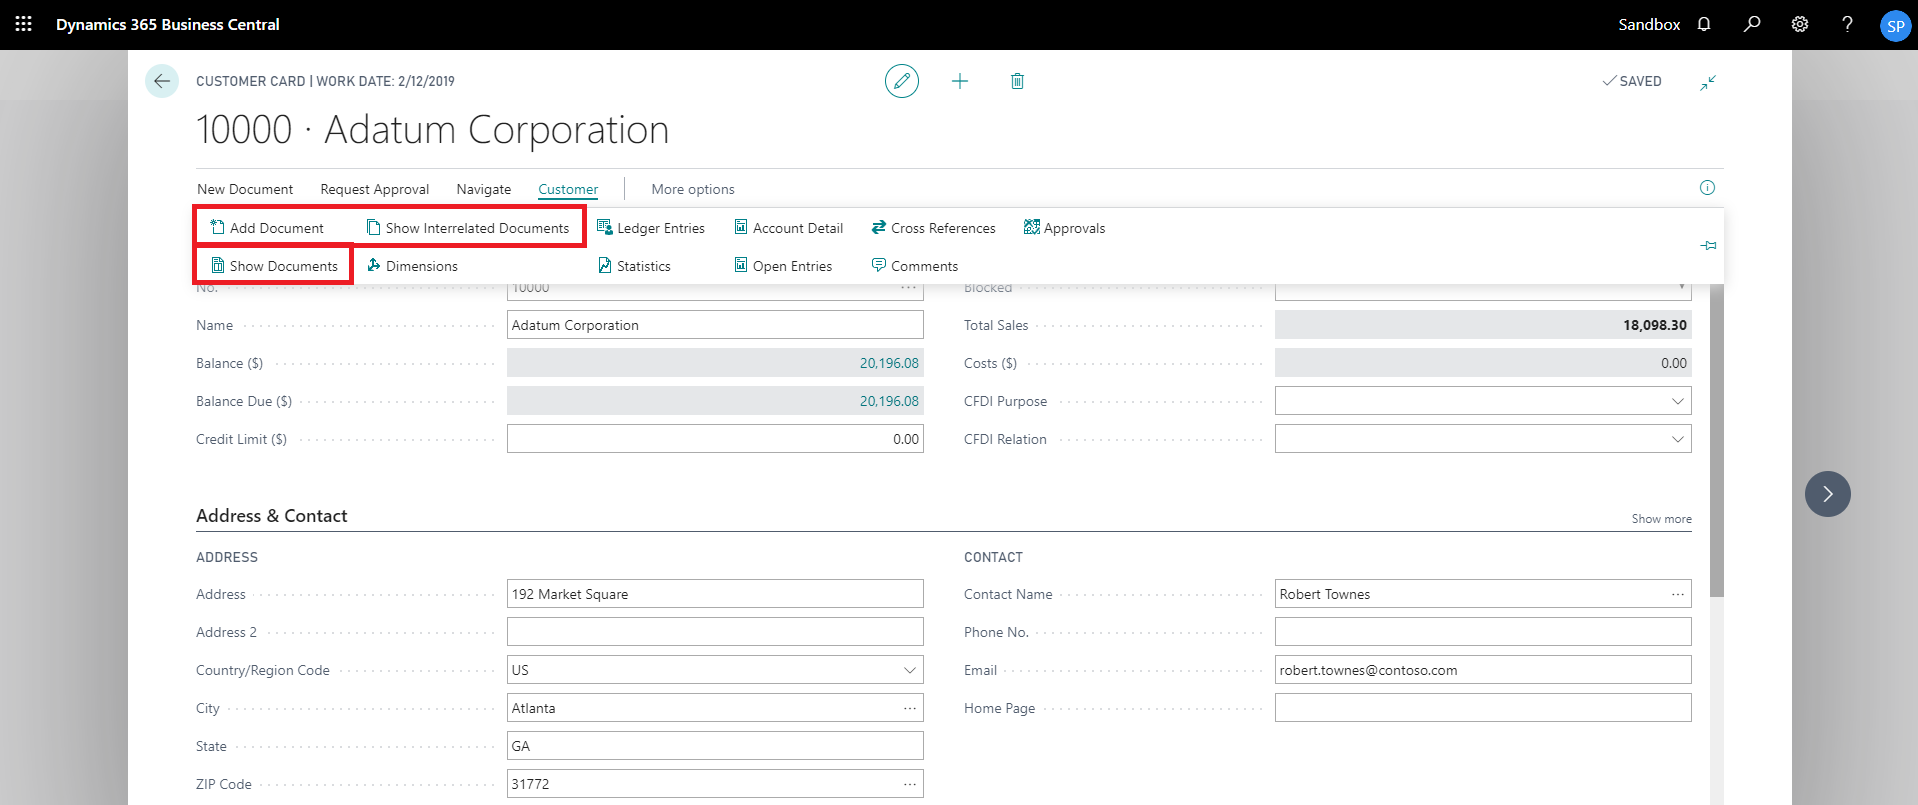
6.10 Customer
The following steps describe how to interact with PaperSave within the “Customer” record type’s main screen:
1. On the Dynamics 365 Business Central Home Page, click on the Sales dropdown.
2. Click on Customer.

>
Customer List
Clicking on Customer will display the list of all records for this record type. You can add documents to all the records in the list as well as view documents and Interrelated documents for all the records in the list.
1. Click on “Process” Tab from Customer list.
2. You will see the PaperSave options such as “Add Document”, “Show Documents”, and “Show Interrelated Documents”.
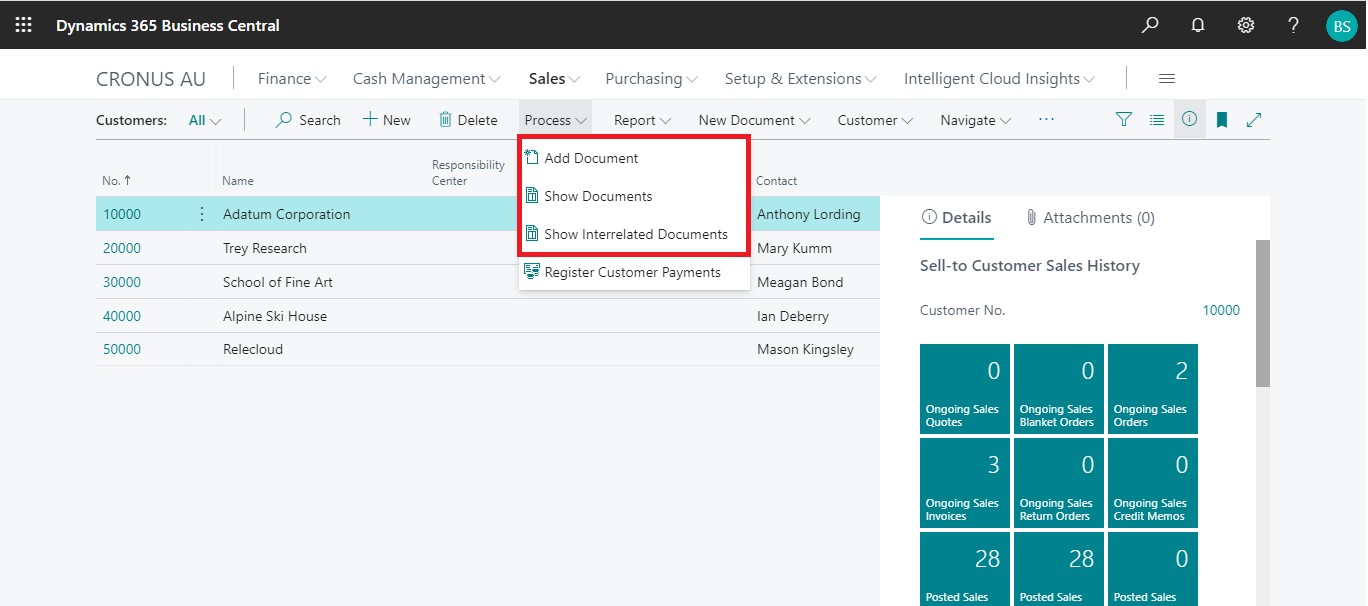
add documents from customer list
Follow the below steps to test the PaperSave functionality “Add Document” from Customer list:
1. On the Process Tab of Customer list, click on “Add Document”.
2. If you are not already logged in, then it will open PaperSave cloud login prompt (on the first login). Enter your login credentials.
3. Upon login success, the system will navigate you to the “Add Document page”.
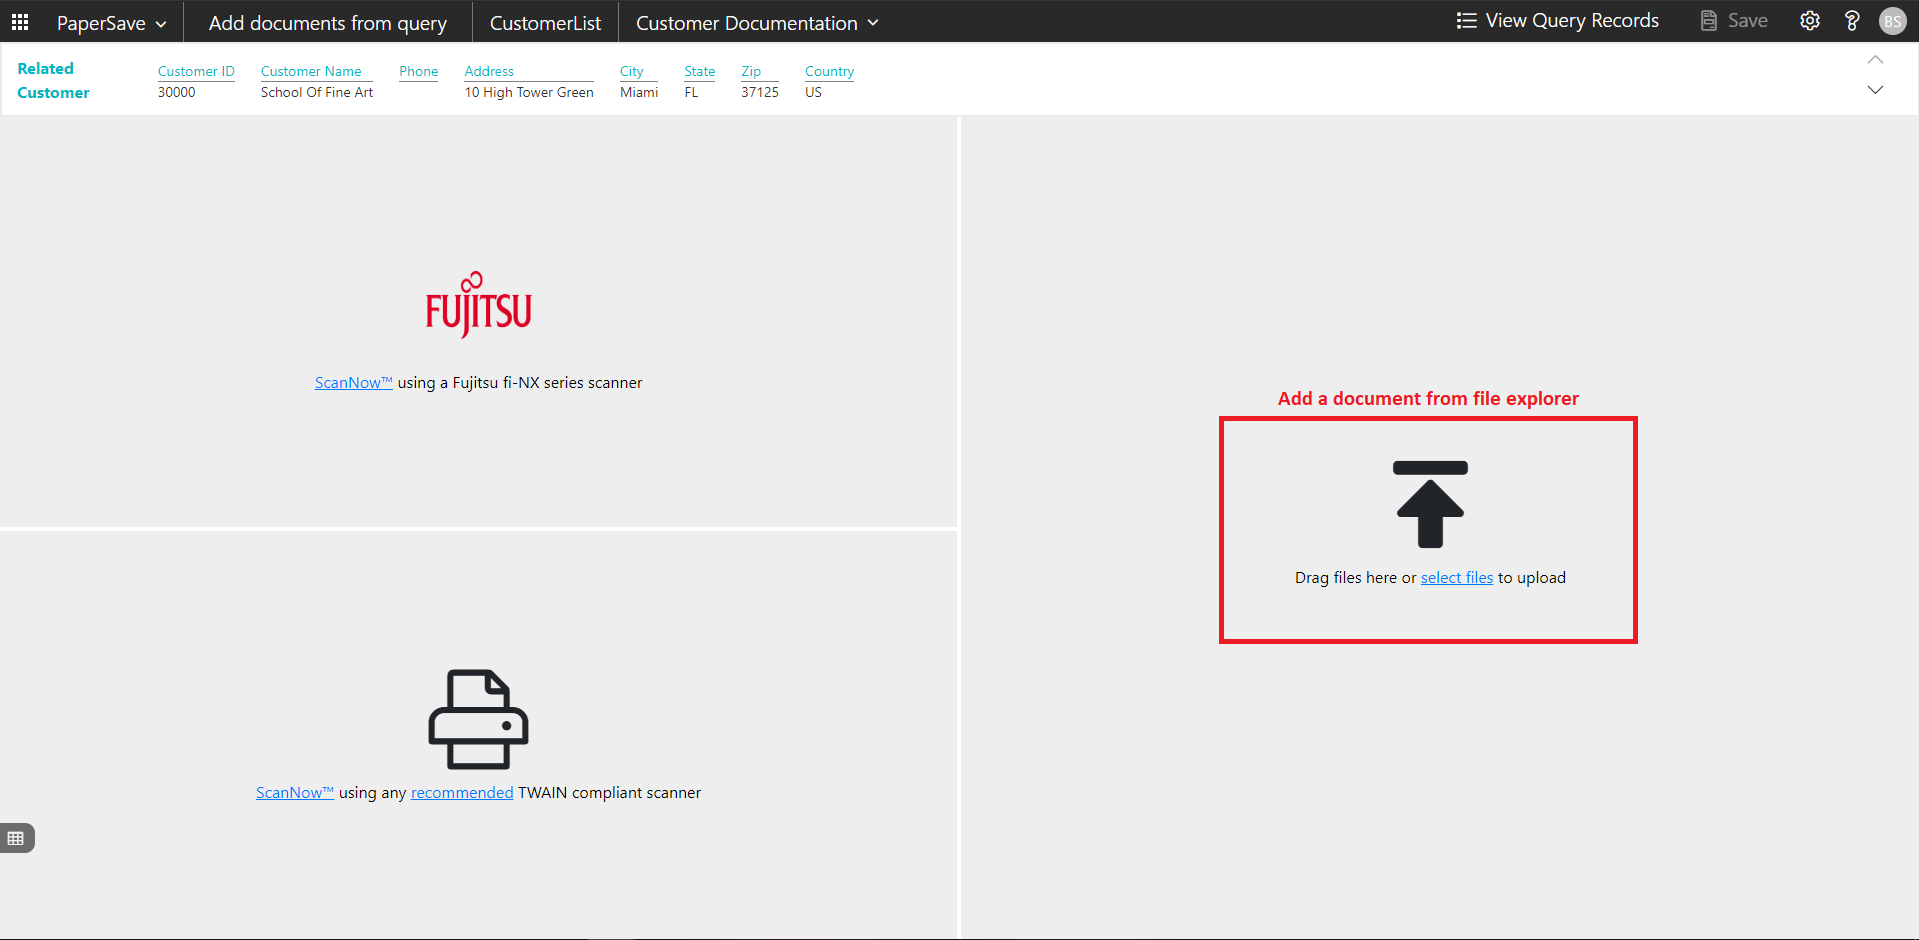
4. Drag or select files to upload documents from your file explorer.
5. This will open the document preview screen.
6. Click Save to add the document to all the records in the Customer list.
7. Upon successful submission, it will show the toast notification in the upper right corner “1 Document(s) successfully submitted.”
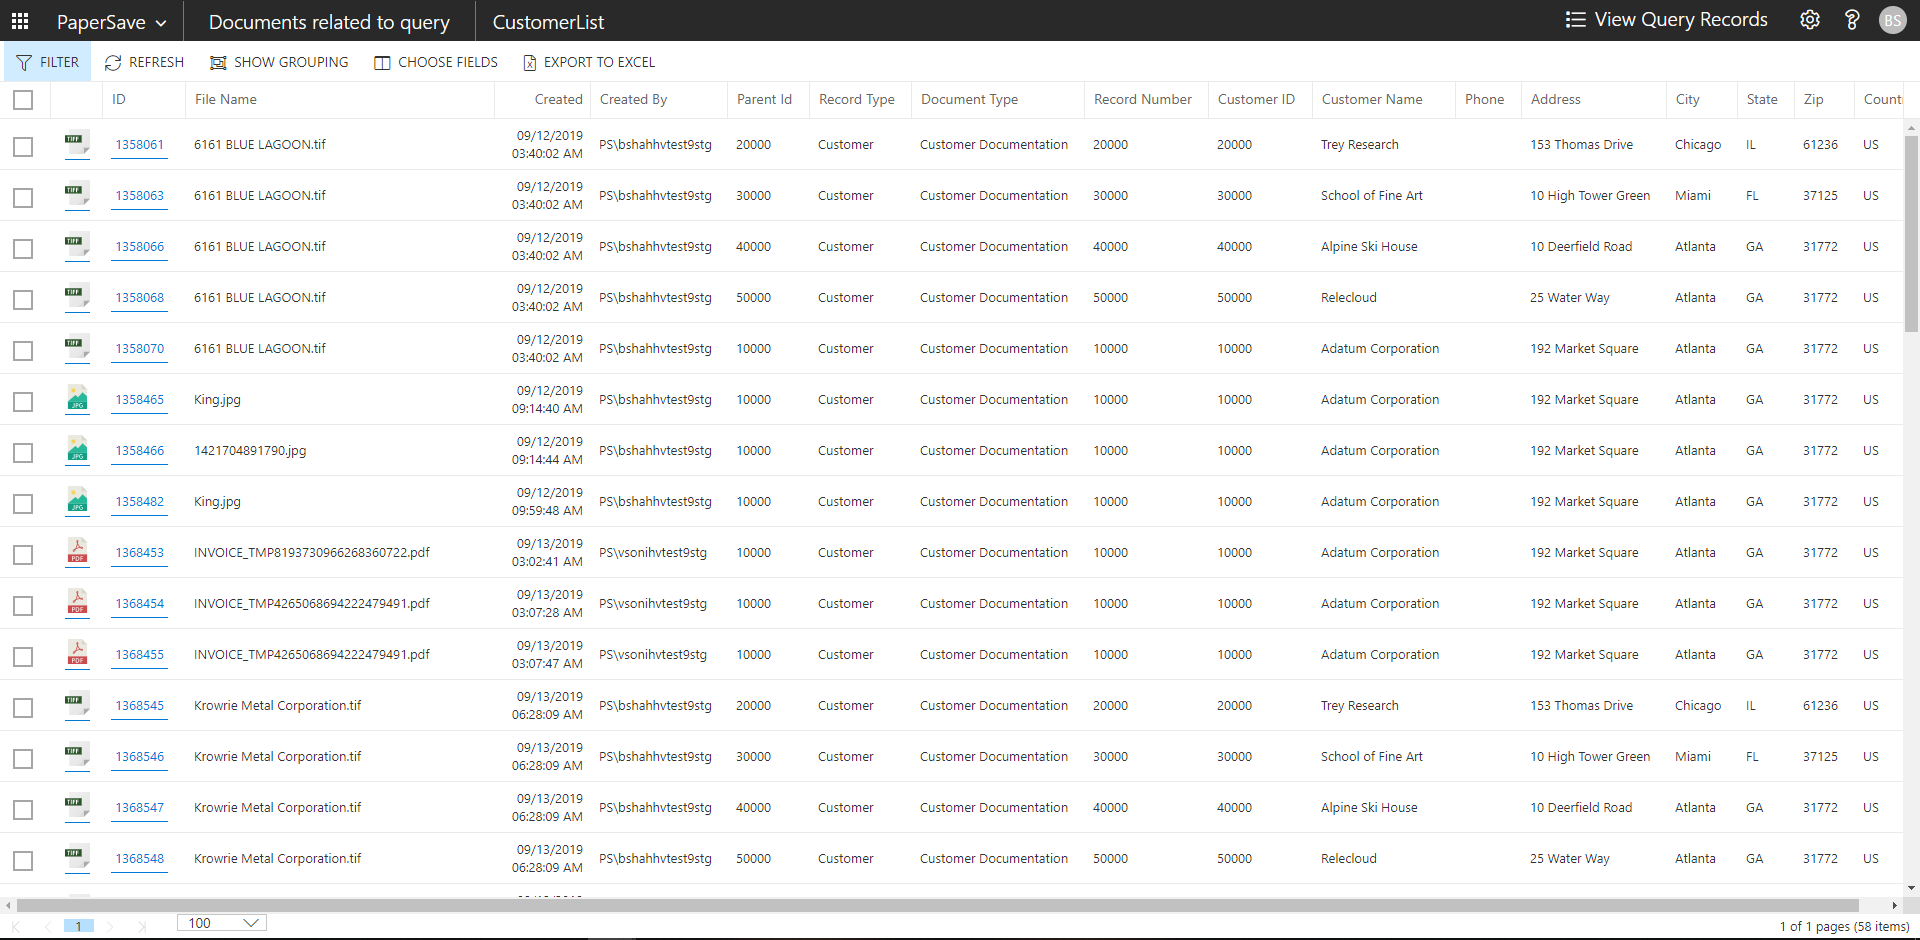
show documents from customer list
Follow the below steps to test the PaperSave functionality “Show Documents” from Customer list:
1. On the Process Tab of Customer list, click on “Show Documents”.
2. This will open PaperSave cloud login prompt (on the first login). Enter login credentials.
3. On login success, it will show the available documents for all the records in Customer list.
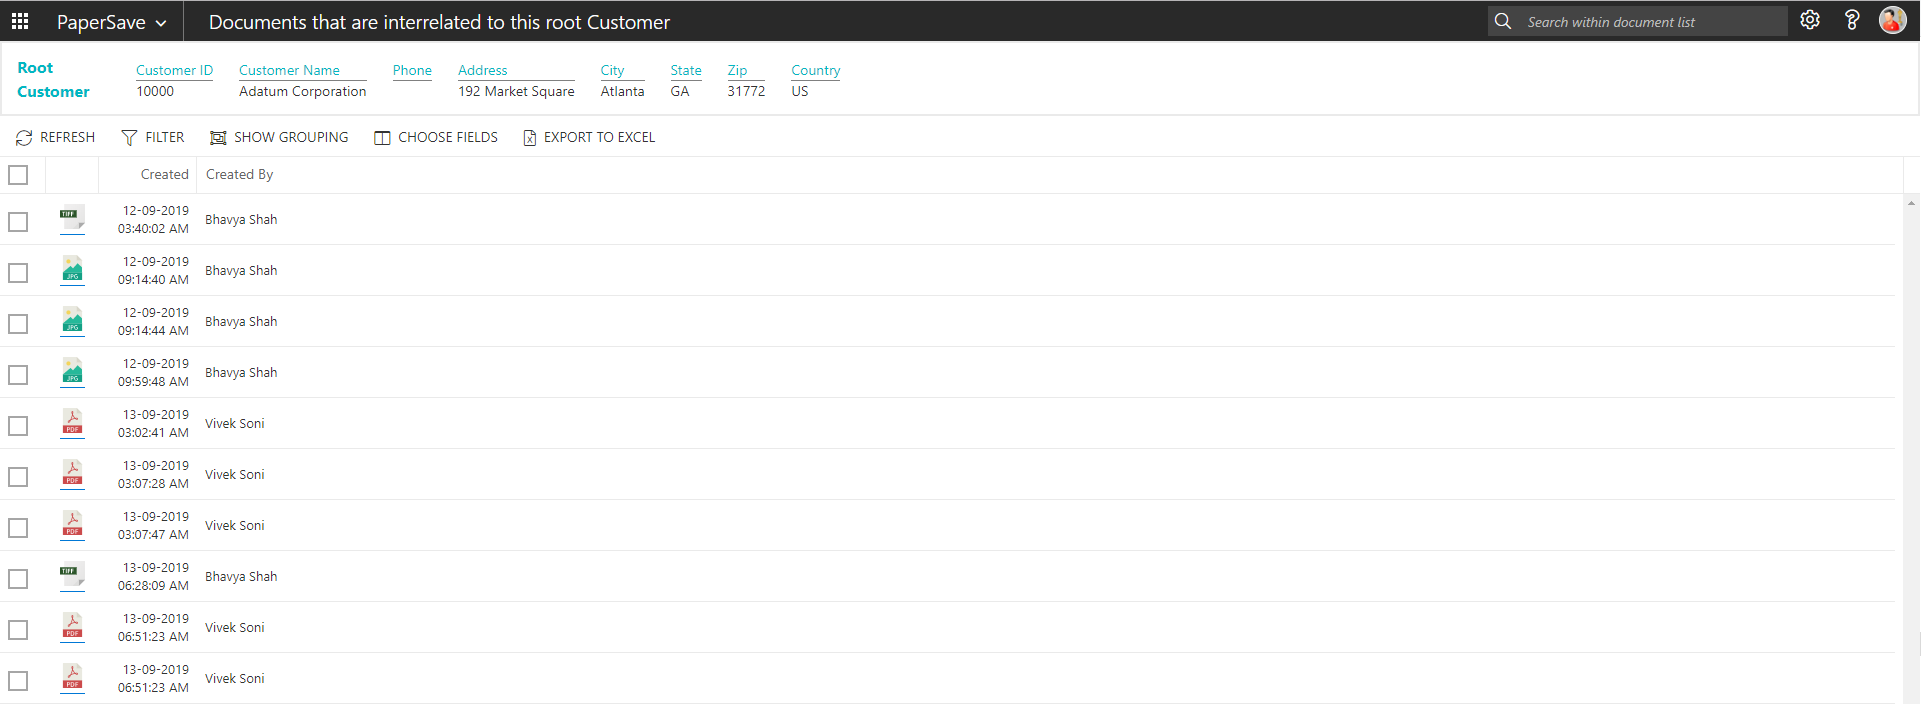
show interrelated documents from customer list
Follow the below steps to test the PaperSave functionality “Show Interrelated Documents” from Customer list:
1. Select the desired record from the list. On the Process Tab of Customer list, click on “Show Interrelated Documents”.
2. This will open PaperSave cloud login prompt (on the first login). Enter login credentials.
3. On login success, it will show the available Interrelated documents for the selected record in Customer list.
Customer Card
Clicking on the Customer Card opens the selected record in card view with all the record details:
1. Click the number field of desired record in the Customer list.
2. This will launch the Customer record.
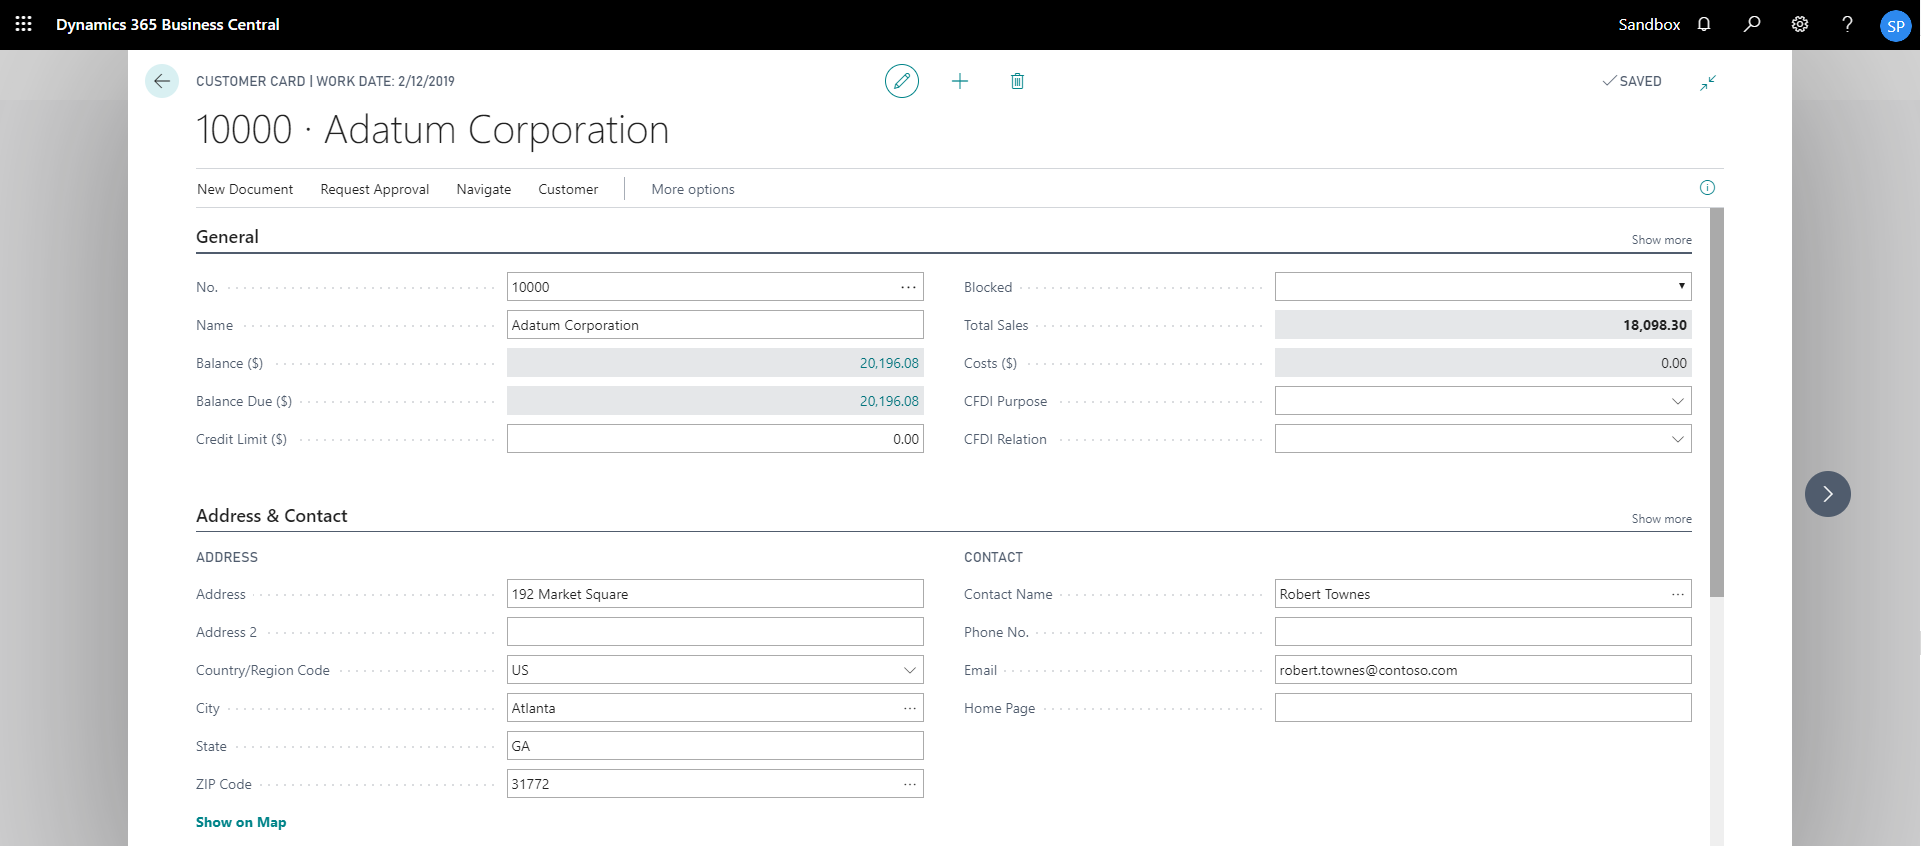
3. Click “Customer” to access the PaperSave functionalities such as “Add Document”, “Show Documents” and “Show Interrelated Documents”.
add documents from customer card
Follow the below steps to test the PaperSave functionality “Add Document” from Customer card:
1. On the Customer tab of Customer Card, click on “Add Document”.
2. This will open PaperSave cloud login prompt (on the first login). Enter login credentials.
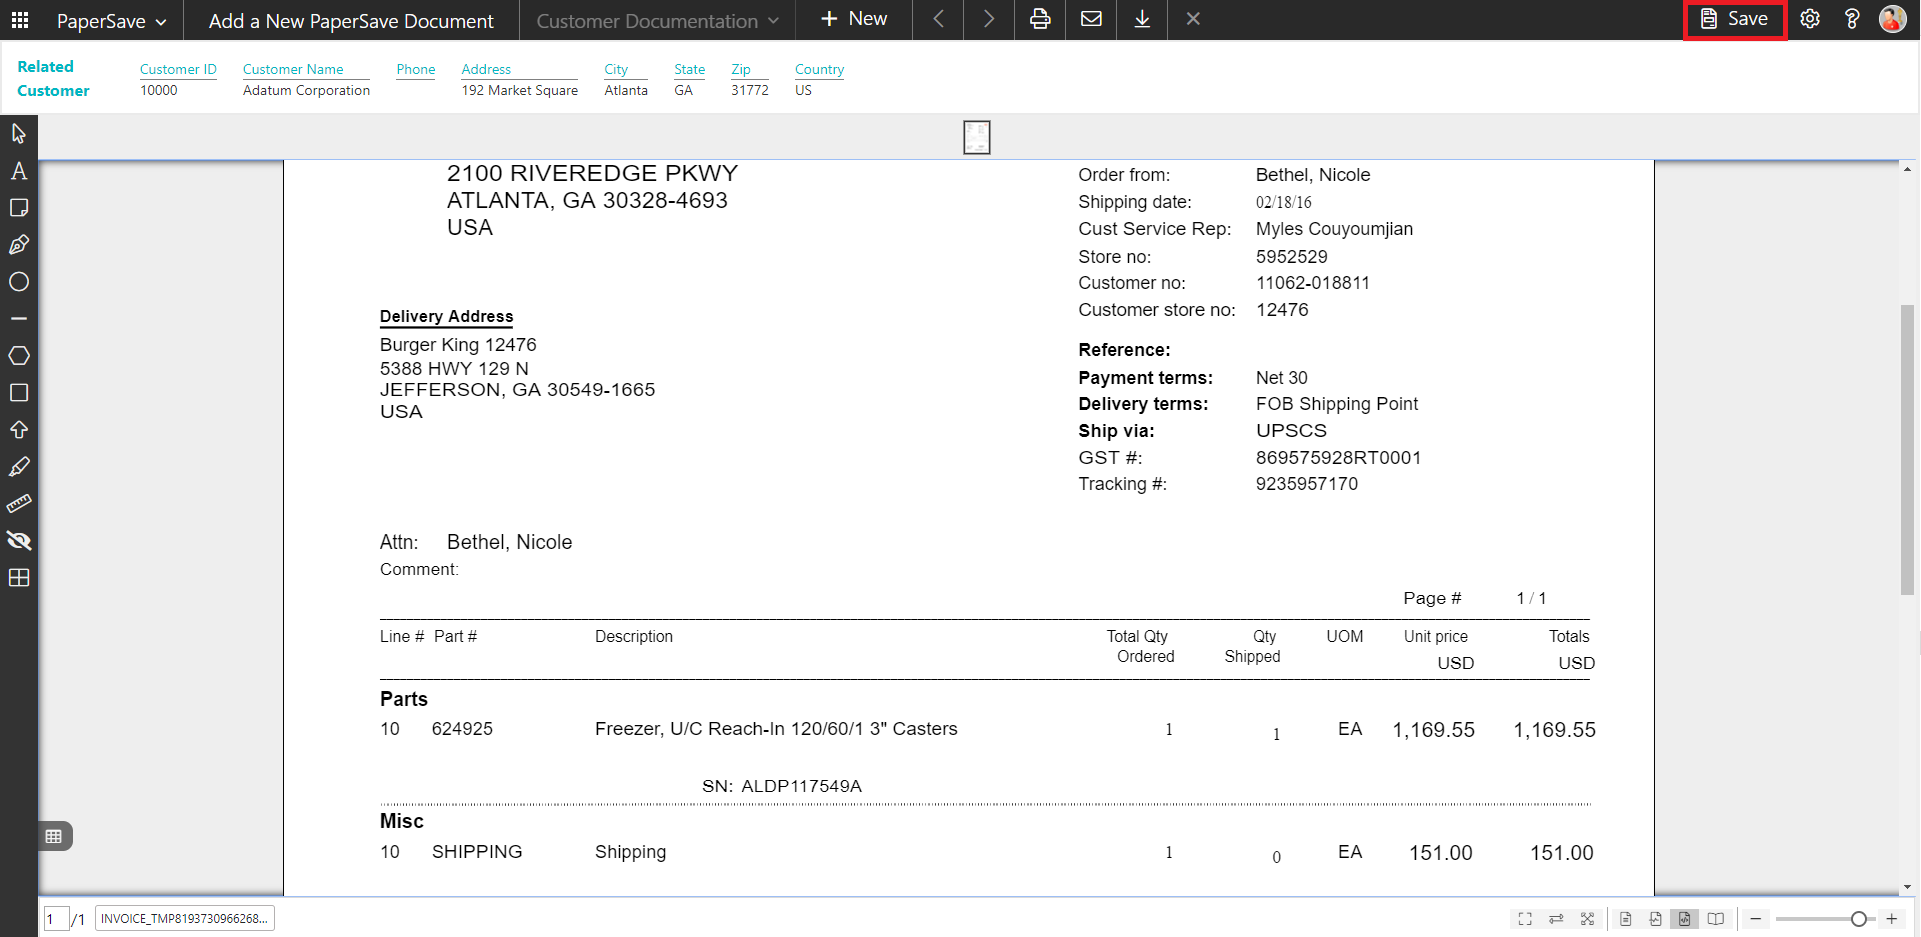
3. On login success, it will open the “Add Document” page.
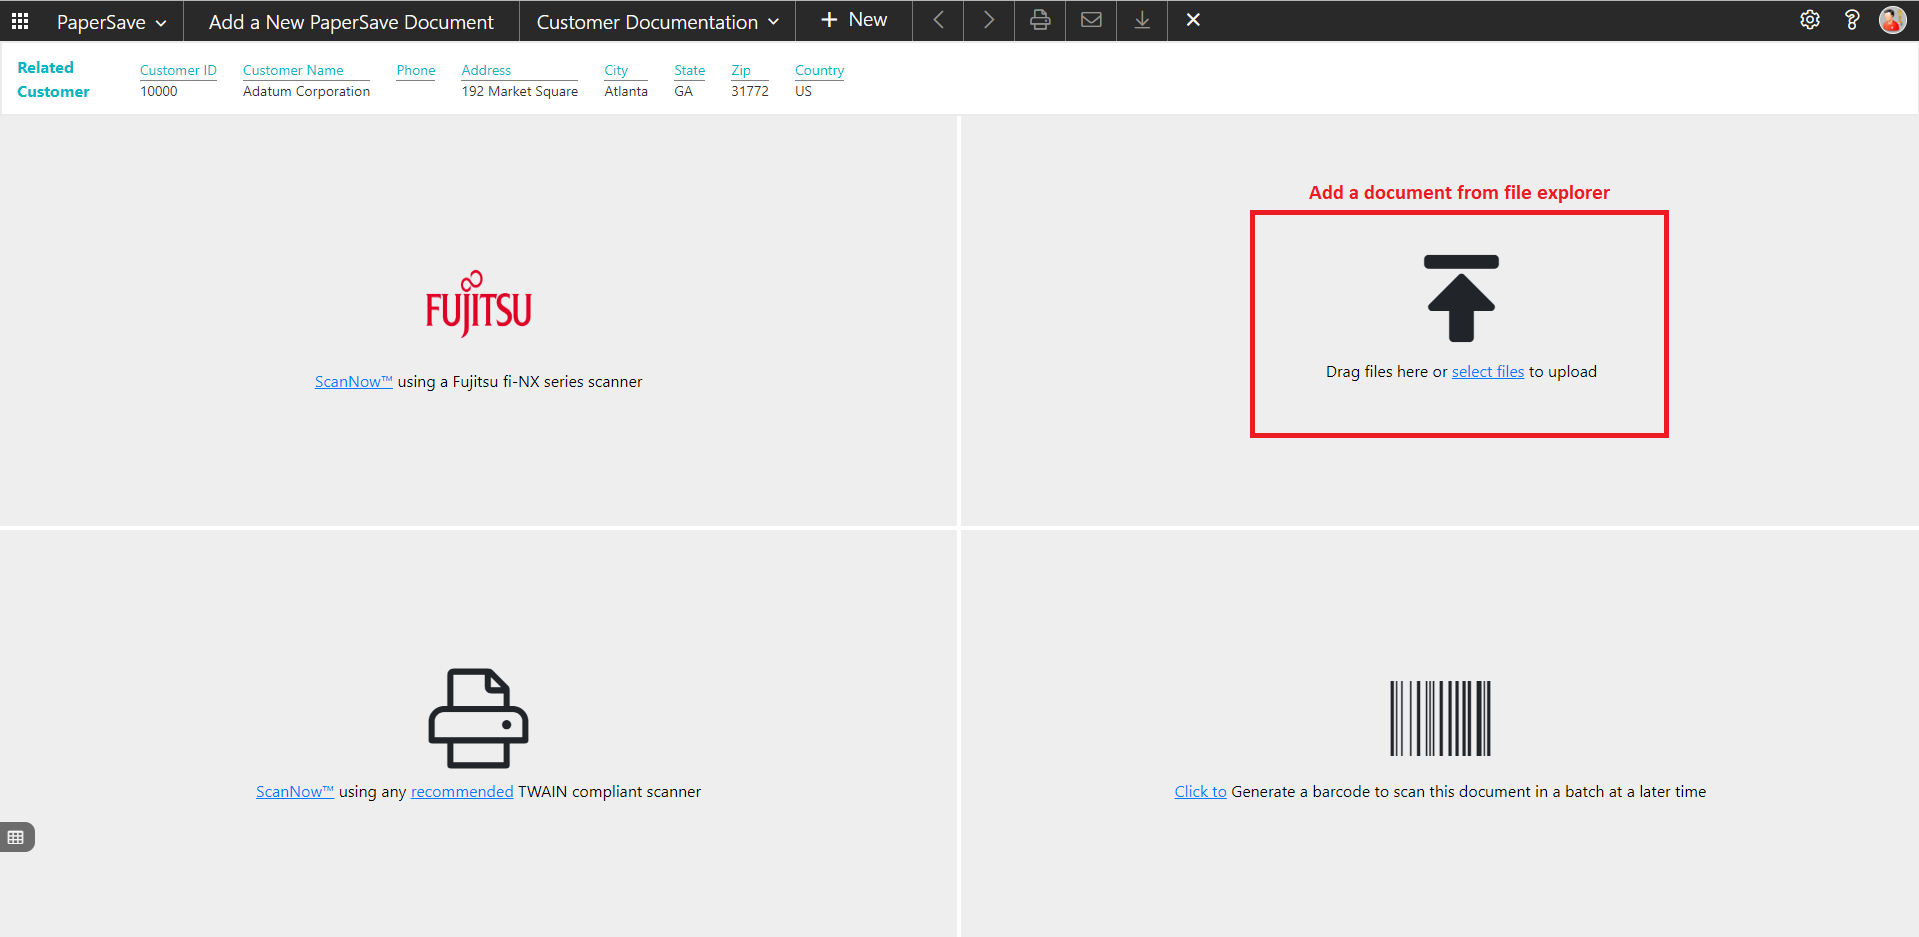
4. Drag or select files to upload the desired document.
5. This will open the document preview screen.
6. Click “Save” to add the document to the selected record.
7. Upon successful submission, it will show the toast notification in the upper right corner “1 Document(s) successfully submitted.”
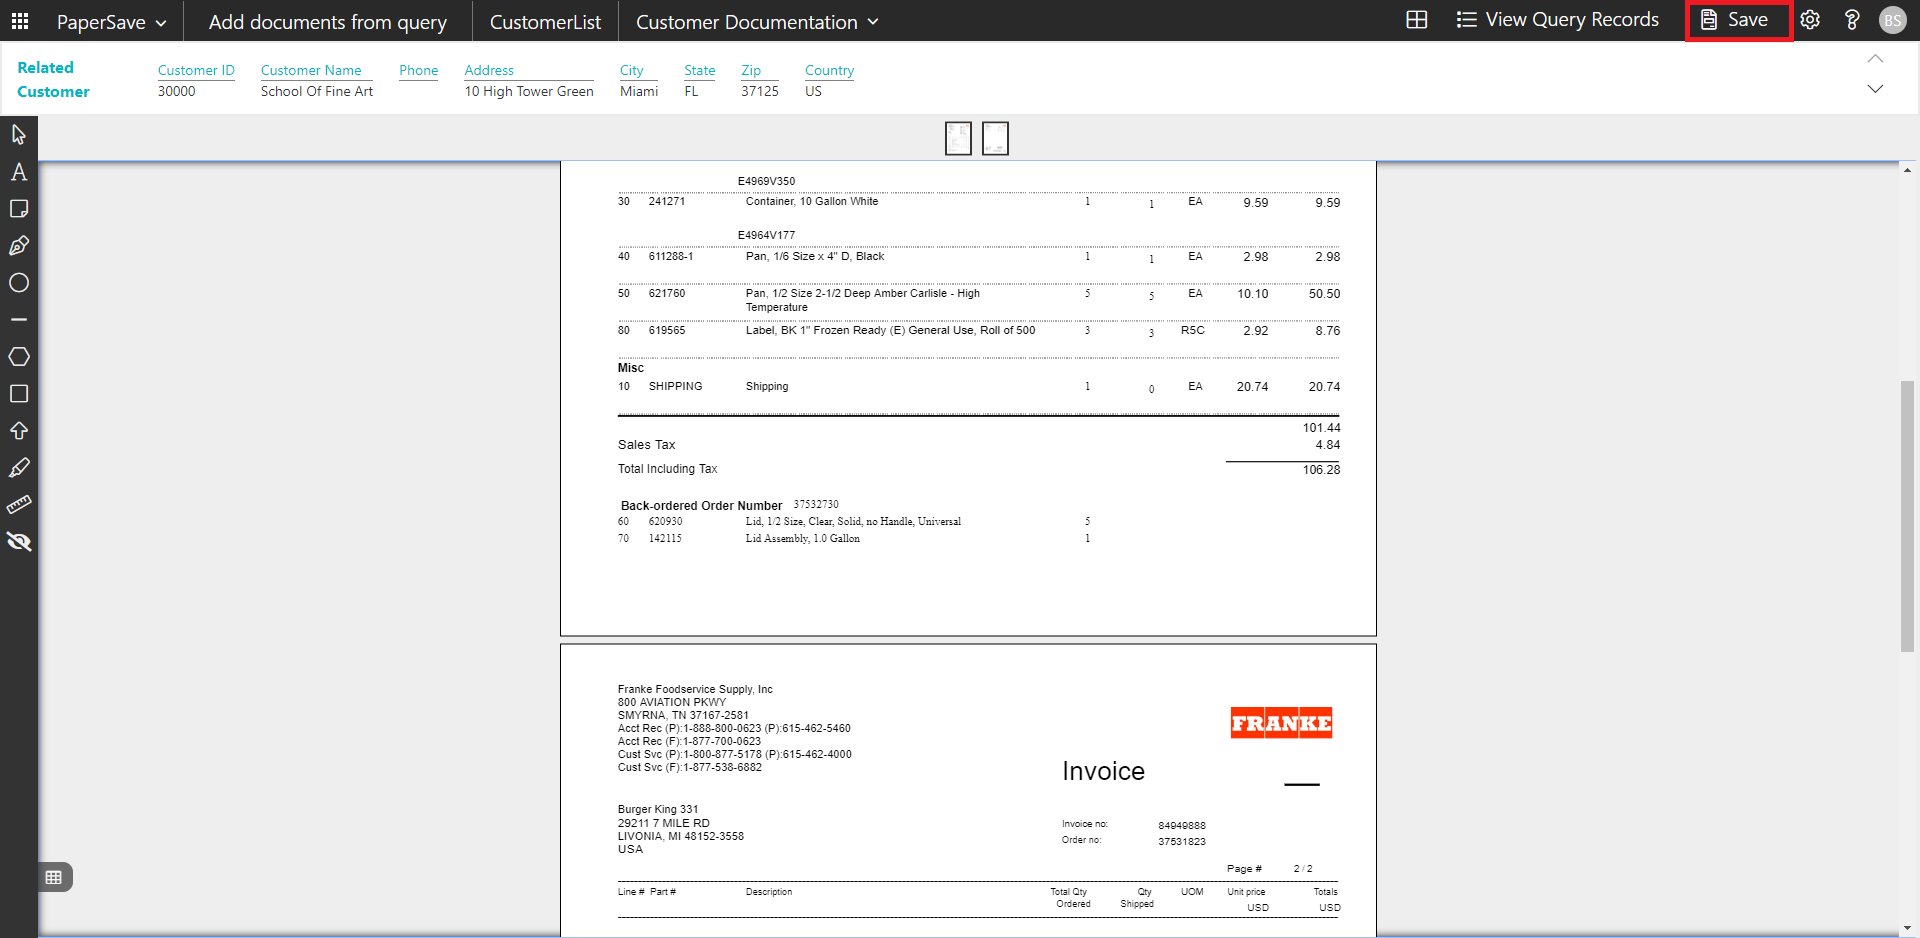
show documents from customer card
Follow the below steps to test the PaperSave functionality “Show Documents” from Customer card:
1. On the Customer tab of Customer Card, click on “Show Documents”.
2. This will open PaperSave cloud login prompt (on the first login). Enter login credentials.
3. On login success, it will show the available document/s.

show interrelated documents from customer card
Follow the below steps to test the PaperSave functionality “Show Interrelated Documents” from Customer card:
1. On the Customer tab of Customer Card, click on “Show Interrelated Documents”.
2. This will open PaperSave cloud login prompt (on the first login). Enter login credentials.
3. On login success, it will show the available Interrelated documents to the record.

6.11 General Journals
1. On the Dynamics 365 Business Central Home Page, click on the Finance dropdown.
2. Click on General Journals.

General Journal batch
Clicking on the General Journal batch opens the selected journal batches:
1. Click the Name field of desired journal batch in the General journals batch list.
2. This will launch the General Journal batch.

3. Select the journal entry from the list.
4. Click on “Process” to access the PaperSave functionalities such as “Add Document”, “Show Documents” and “Show Interrelated Documents”.

add documents from general journal batch
Follow the below steps to test the PaperSave functionality “Add Document” from General Journal batch:
1. On the Process tab of General journals batch, click on “Add Document”.
2. This will open PaperSave cloud login prompt (on the first login). Enter login credentials.
3. On login success, it will open the “Add Document” page.
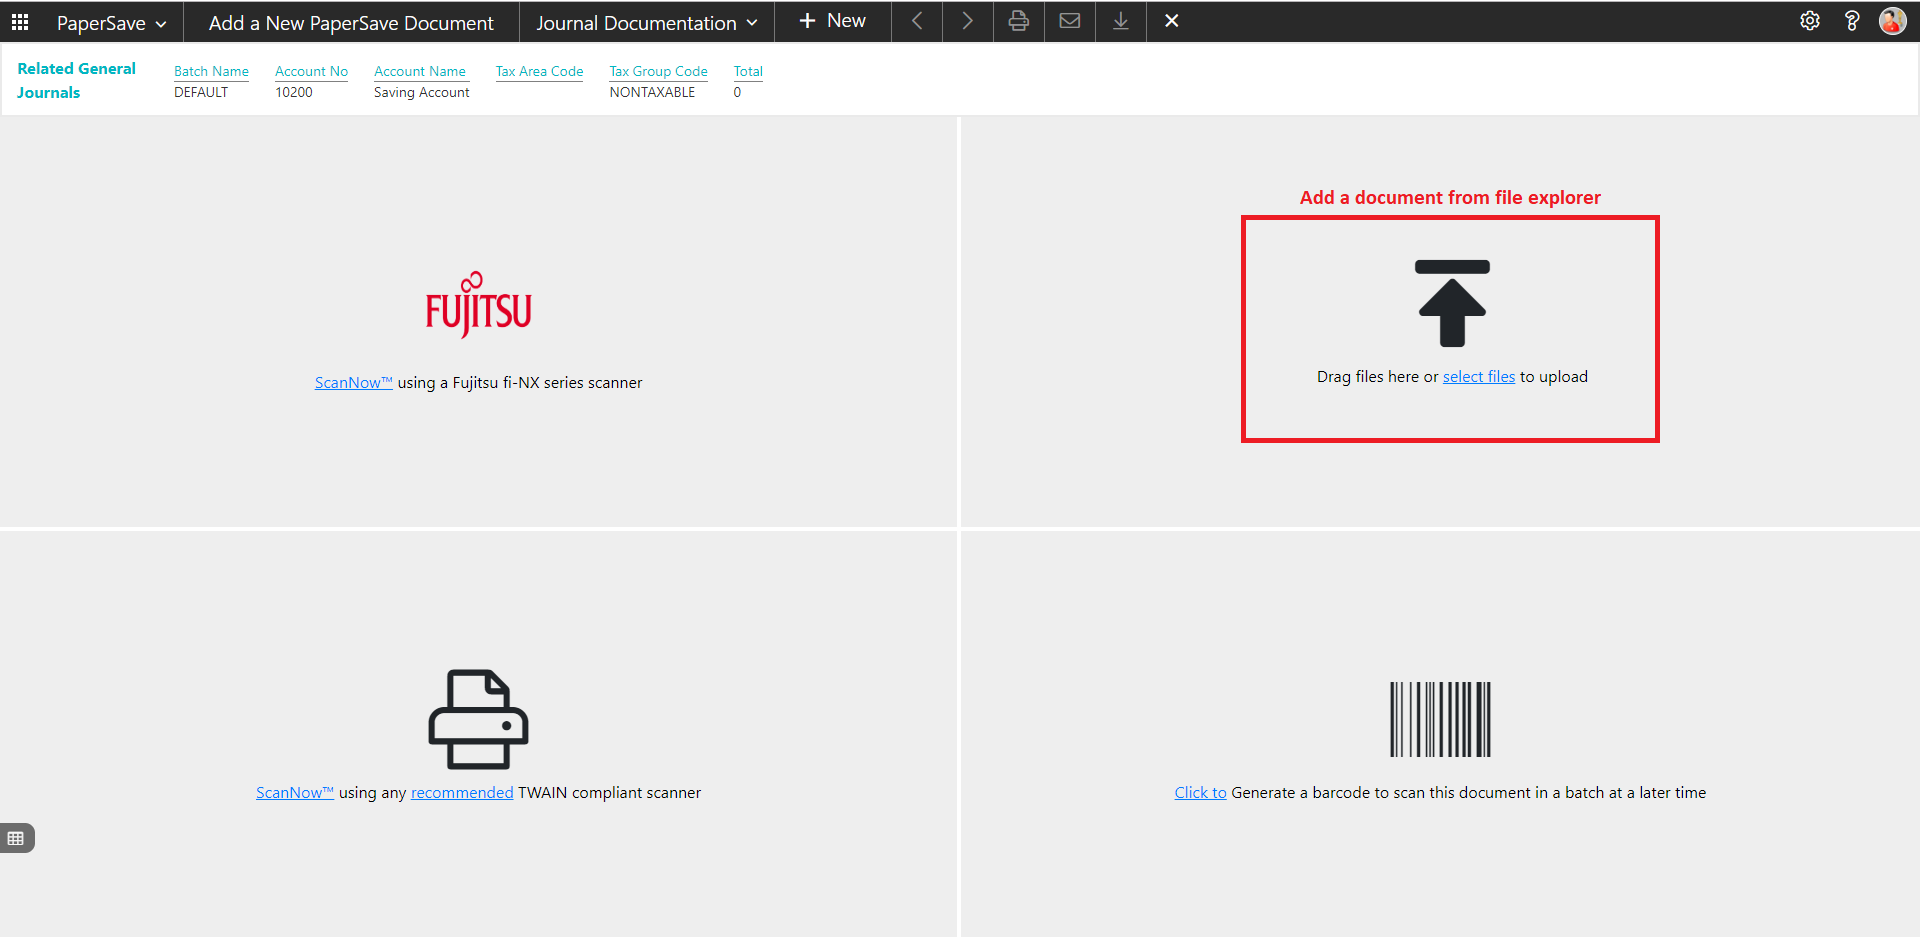
4. Drag or select files to upload the desired document.
5. This will open the document preview screen.
6. Click “Save” to add the document to the selected record.

7. Upon successful submission, it will show the toast notification in the upper right corner “1 Document(s) successfully submitted.”
show documents from general journal batch
Follow the below steps to test the PaperSave functionality “Show Documents” from General journals batch:
1. On the Process tab of General journals batch, click on “Show Documents”.
2. This will open PaperSave cloud login prompt (on the first login). Enter login credentials.
3. On login success, it will show the available document/s.

show interrelated documents from general journal batch
Follow the below steps to test the PaperSave functionality “Show Interrelated Documents” from General journals batch:
1. On the Process tab of General journals batch, click on “Show Interrelated Documents”.
2. This will open PaperSave cloud login prompt (on the first login). Enter login credentials.
3. On login success, it will show the available Interrelated documents to the record.
6.12 General Ledger Entries
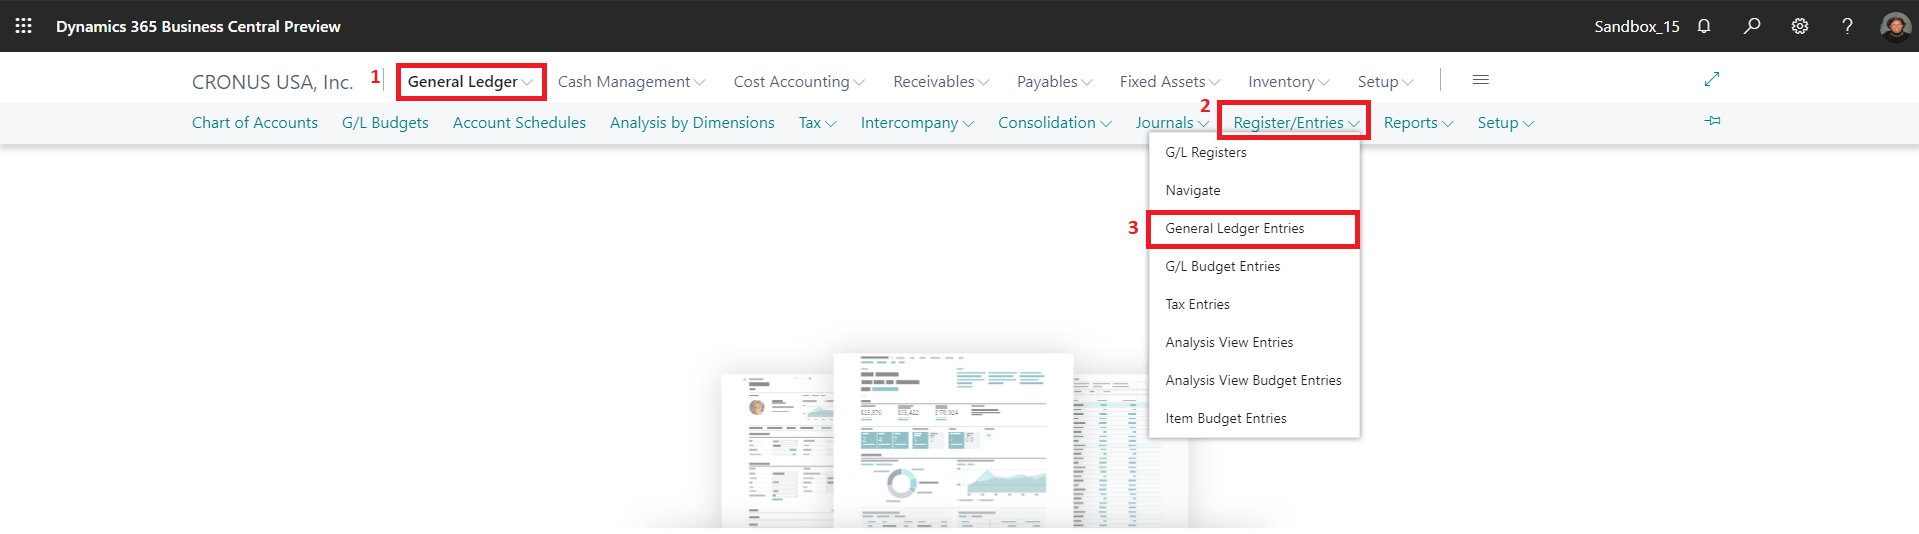
The following steps describe how to interact with PaperSave within the “General Ledger Entries” record type’s main screen:
1. On the Dynamics 365 Business Central Home Page, click on the “General Ledger” dropdown.
2. Click on Register/Entries dropdown.
3. Click on “General Ledger Entries”.
General ledger entries list
Clicking on the General Ledger Entries opens the General Ledger Entries list:
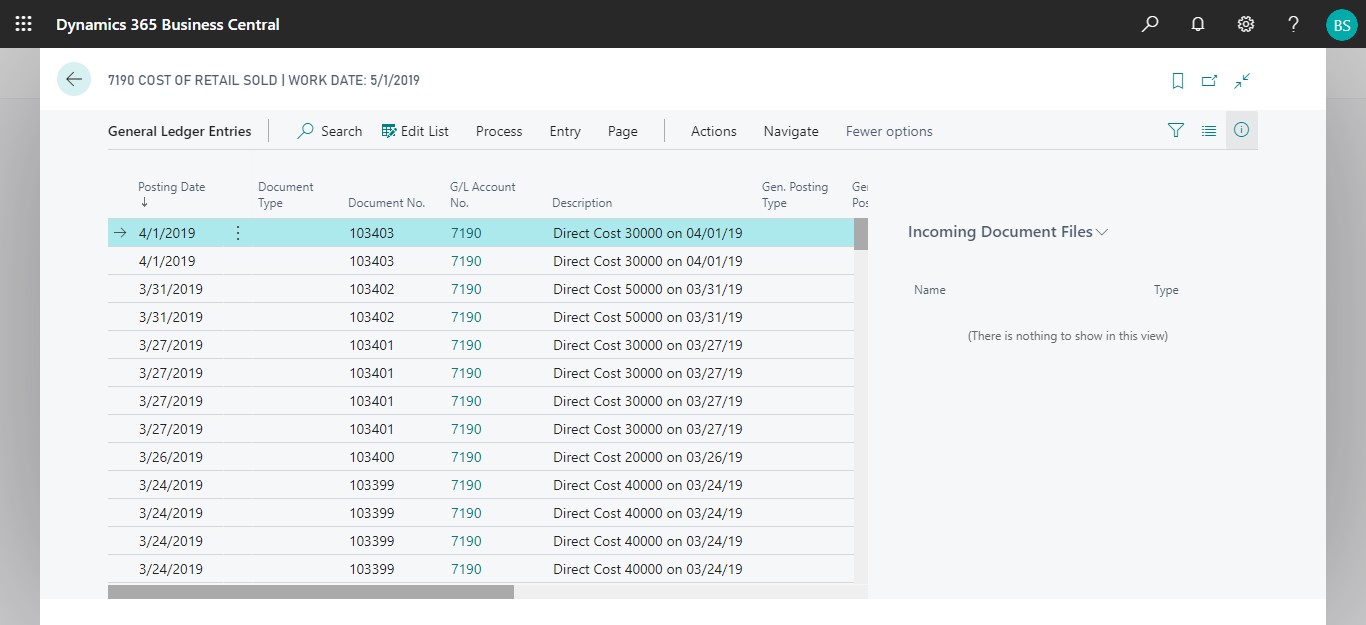
1. Select the desired General Ledger Entry from the list.
2. Click on “Process” to access the PaperSave functionalities such as “Add Document”, “Show Documents”, and “Show Interrelated Documents”.
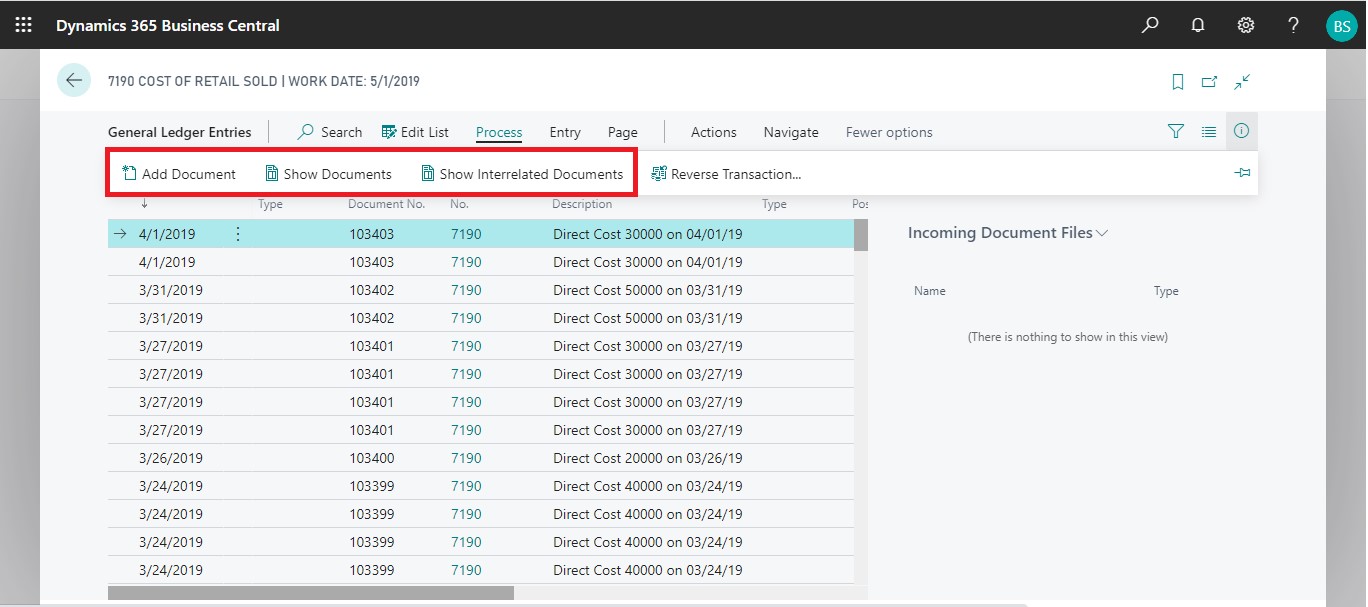
add documents from general ledger entries list
Follow the below steps to test the PaperSave functionality “Add Document” from General ledger entries list:
1. On the Process tab of General Ledger Entries list, click on “Add Document”.
2. This will open PaperSave cloud login prompt (on the first login). Enter login credentials.
3. On login success, it will open the “Add Document” page.
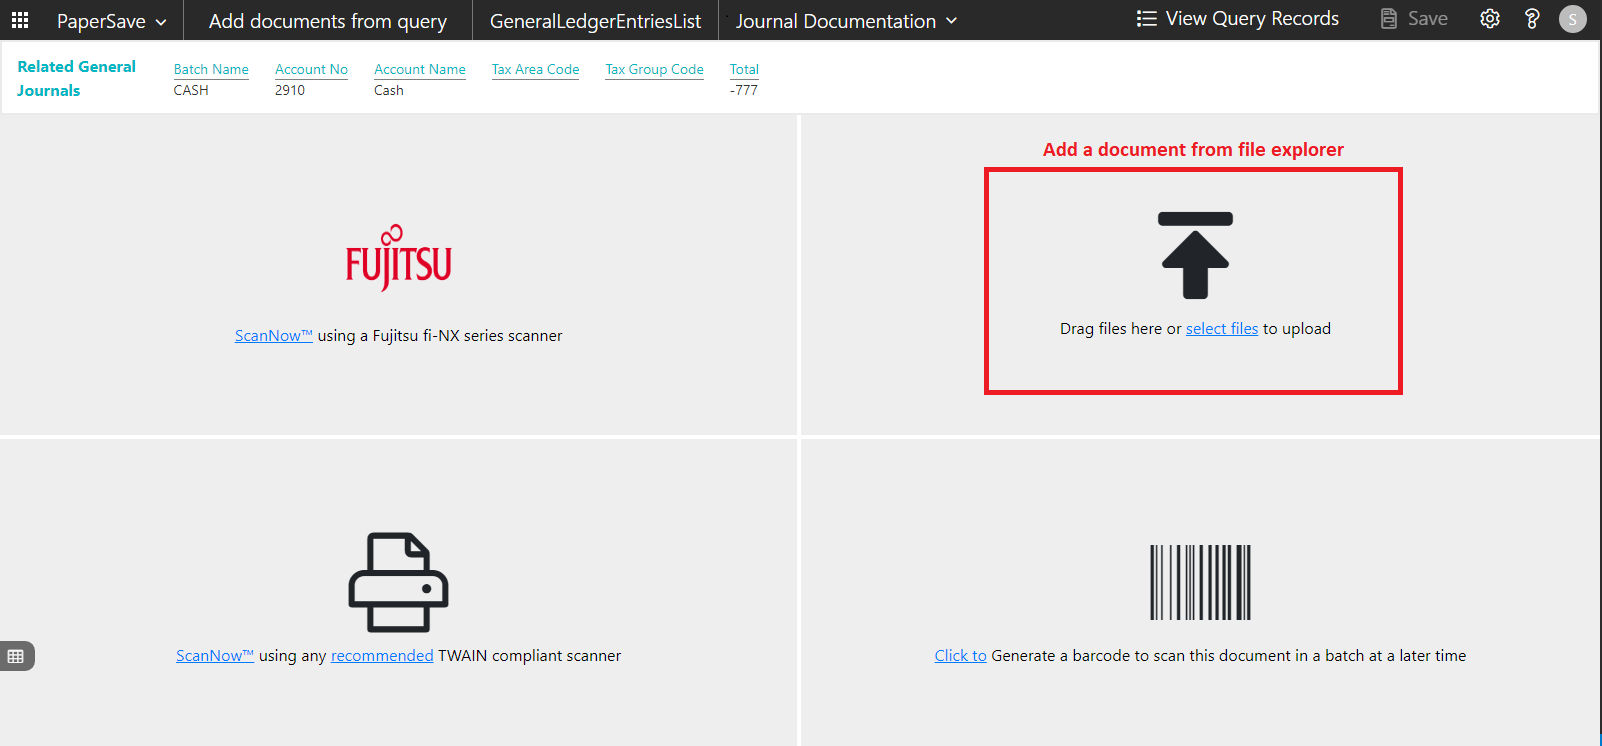
4. Drag or select files to upload the desired document.
5. This will open the document preview screen.
6. Click “Save” to add the document to the selected record.
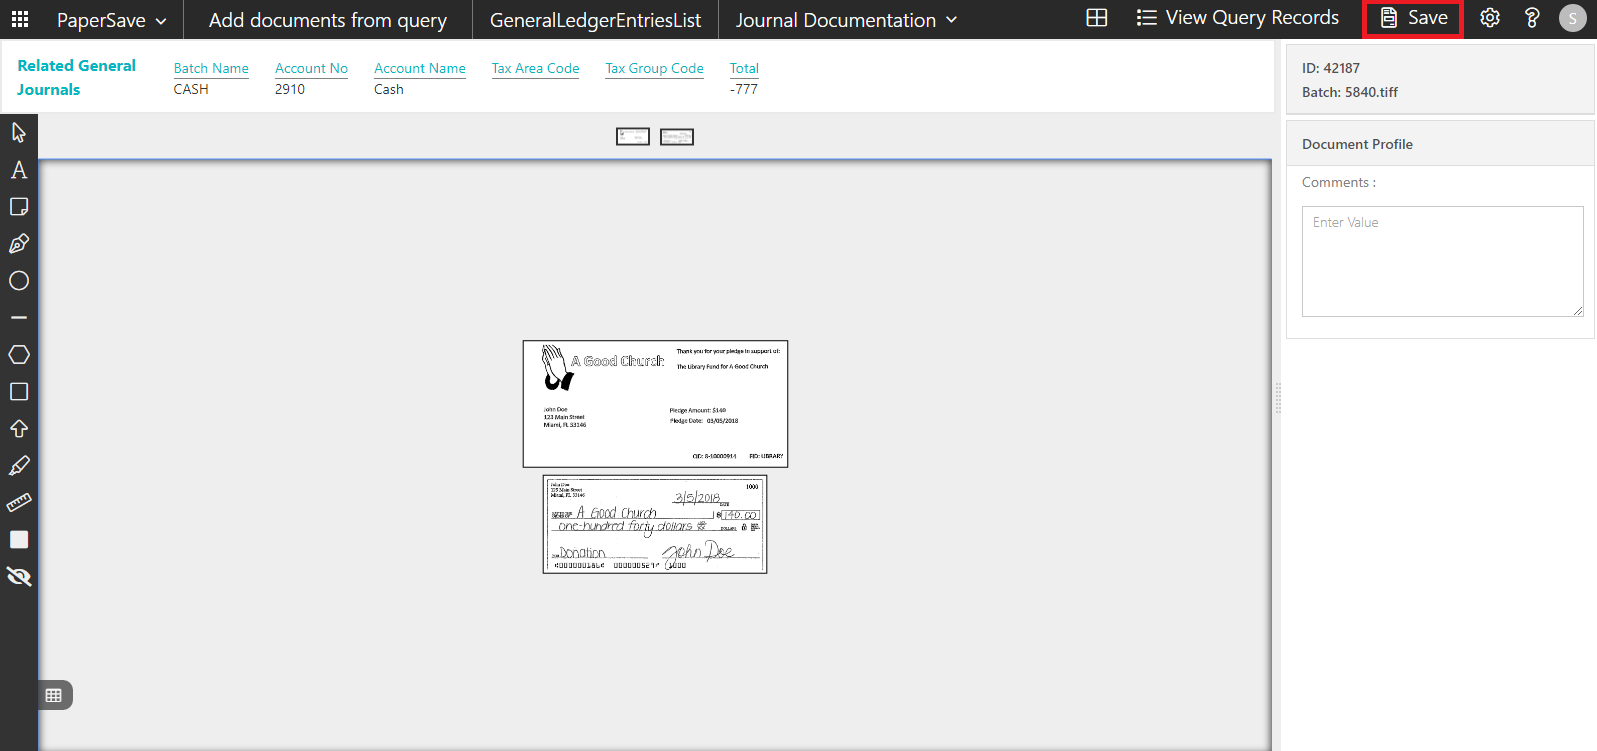
7. Upon successful submission, it will show the toast notification in the upper right corner “1 Document(s) successfully submitted.”
show documents from general ledger entries list
Follow the below steps to test the PaperSave functionality “Show Documents” from General ledger entries list:
1. On the Process tab of General ledger entries, click on “Show Documents”.
2. This will open PaperSave cloud login prompt (on the first login). Enter login credentials.
3. On login success, it will show the available document/s for General Ledger entries.

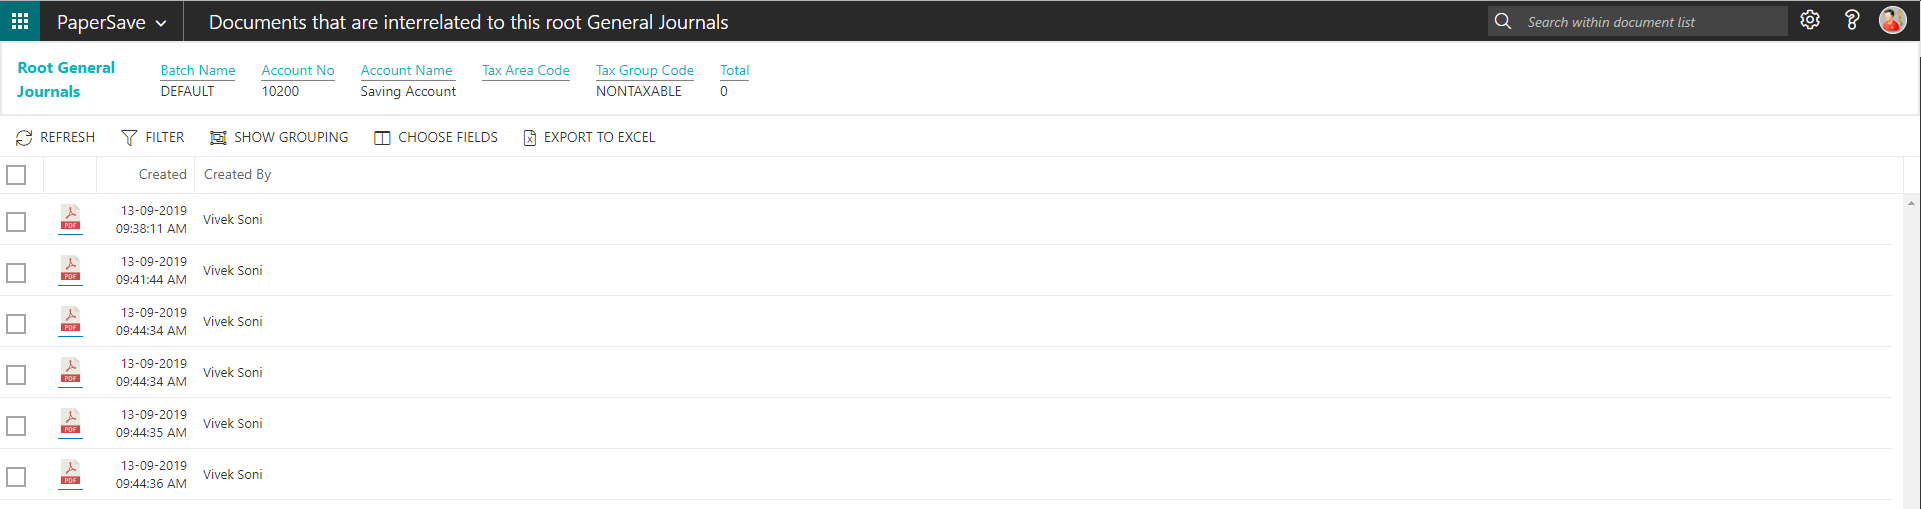
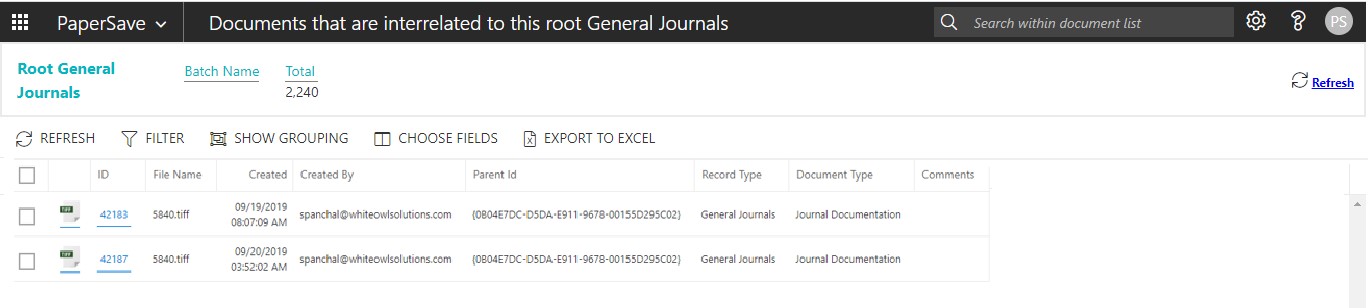
show interrelated documents from general ledger entries list
Follow the below steps to test the PaperSave functionality “Show Interrelated Documents” from General ledger entries list:
1. Select a general ledger entry from the list. On the Process tab of General ledger entries, click on “Show Interrelated Documents”.
2. This will open PaperSave cloud login prompt (on the first login). Enter login credentials.
3. On login success, it will show the available Interrelated document/s for selected General Ledger entry.
6.13 Associate Document from side by side entry viewer
PaperSave facilitates the user to associate the document which is in the side by side viewer to a specific record for a record type. Follow the below steps to associate a document with a desired record for a record type (For e.g. - Vendor)
1) On the Dynamics 365 Business Central Home Page, click on the Purchasing dropdown.
2) Click on Vendors.
3) Clicking on Vendors will display the list of all records for this record type.

4) Click on the number field of desired record in the Vendor list. This will launch the Vendor record.
5) Click on “Process” to access the PaperSave functionalities such as “Add Document”, “Show Documents” and “Show Interrelated Documents”.
6) Click on “Add Document”.
7) It will show the following prompt to associate the document with the current vendor record if side by side entry is enabled in PaperSave Workflow Area for the same record type. Click on “OK”.
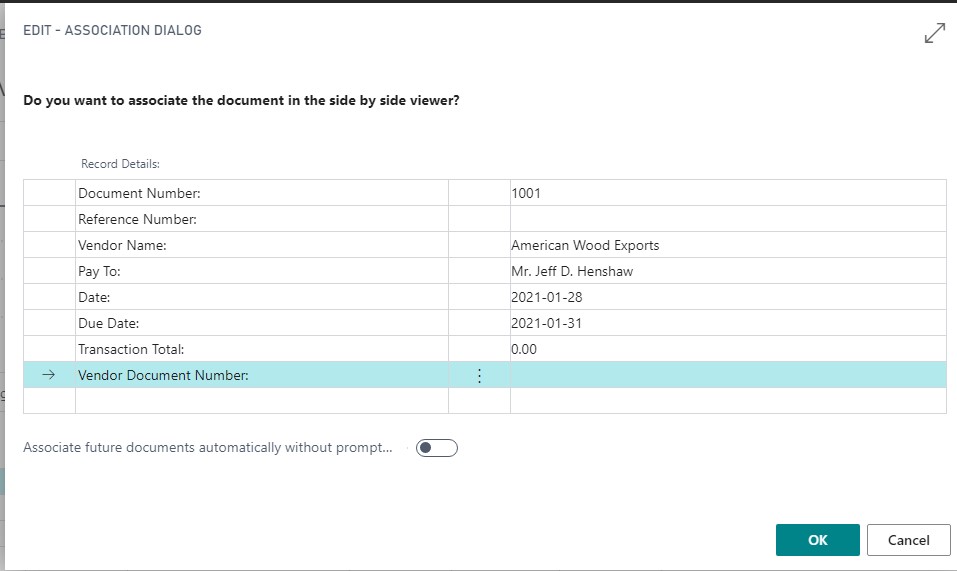
8) Now, the document (which is in side by side viewer) will be associated with the current vendor record in Dynamics 365 Business Central.
7 DYNAMICS 365 BUSINESS CENTRAL WEB SERVICES FOR PAPERSAVE
The main objective of the Web Services is to return the data of the record type and includes the columns defined for the record type in PaperSave.
7.1 HOW TO ACCESS THESE WEB SERVICES WITHIN DYNAMICS 365 BUSINESS CENTRAL
Follow the below steps to access Dynamics 365 Business Central Web Services for PaperSave:
1.
On the Dynamics 365 Business Central Home Page, click on the Search
button ![]() .
.
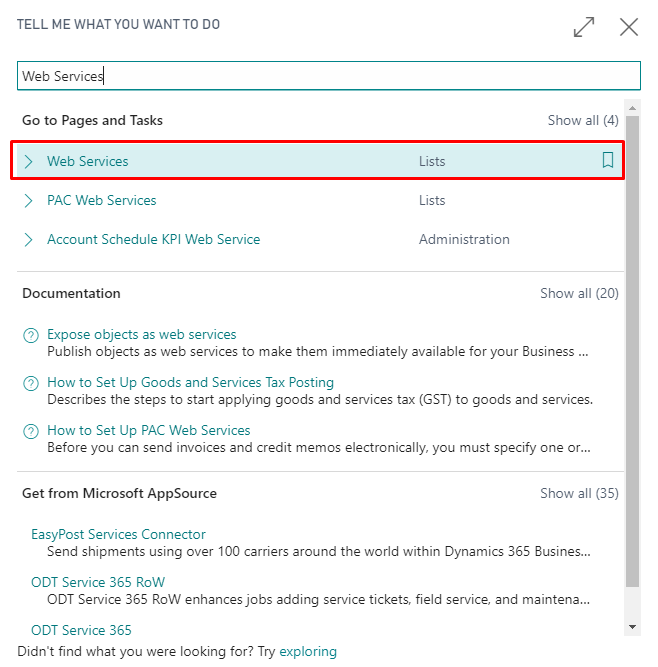
2. Enter “Web services” in the search box of Dynamics 365 Business Central home.
3. Click on “Web Services” from “Go to Pages and Tasks”.
4. It shall load a list of all the Web Services in the Dynamics 365 Business Central.
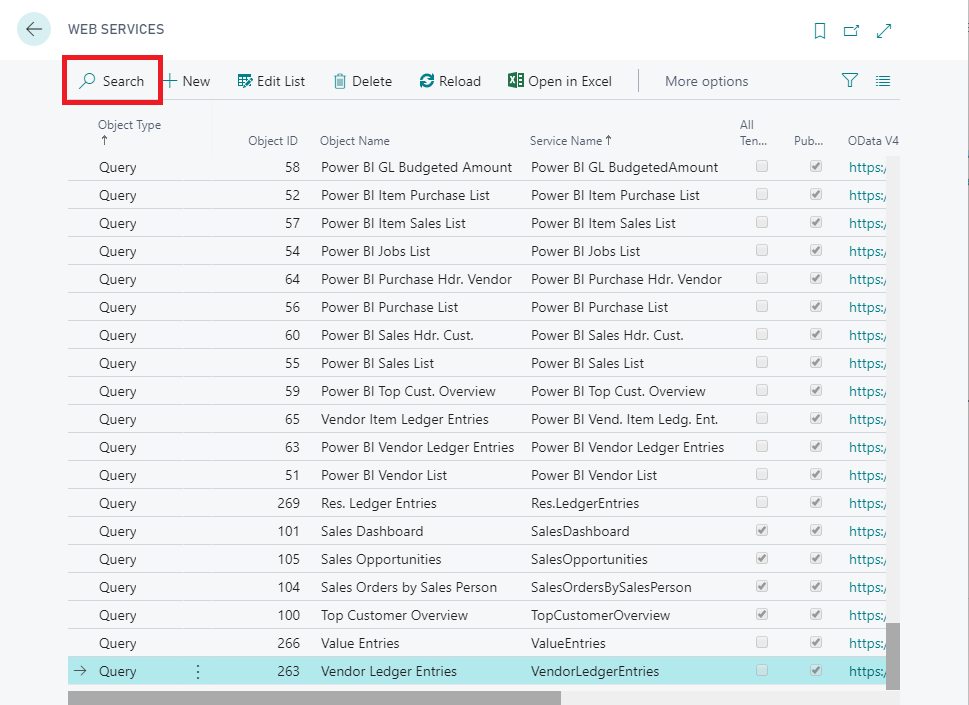
5. Now, enter “*papersave*” in the search box to get the list of all Dynamics 365 Business Central Web Services for PaperSave.
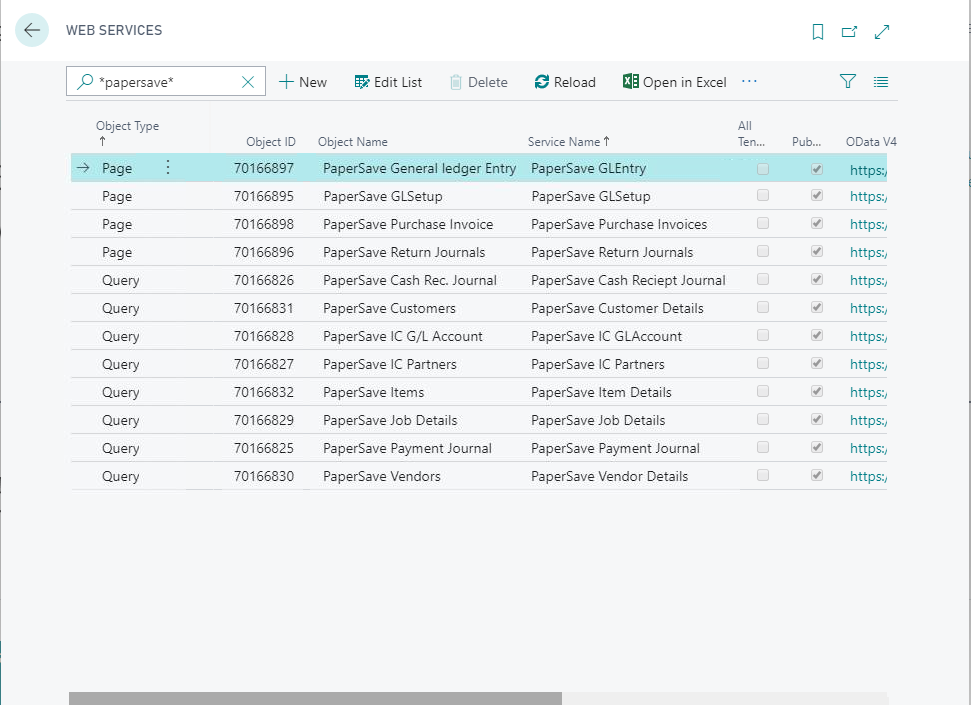
The following is a brief description for a list of all the Dynamics 365 Business Central Web Services for PaperSave:
|
Web Service Name |
Description |
|
PaperSave GLEntry |
It returns the details for posted general ledger entry and includes the columns defined for the posted general ledger entry in PaperSave. |
|
PaperSave GLSetup |
It returns the dimensions set by the user in G/L Setup and includes the columns defined for G/L Setup in PaperSave. |
|
PaperSave Purchase Invoice |
It returns the details of the purchase invoices and posted purchase invoices but excludes the details of the purchase line item. |
|
PaperSave Return Journals |
It returns the details for general journal and includes the columns defined for the general journal in PaperSave. |
|
PaperSave Cash Receipt Journal |
It returns the details for cash receipt journal and includes the columns defined for the cash receipt journal in PaperSave. |
|
PaperSave Customers |
It returns the details for Customer and includes the columns defined for the Customer in PaperSave. |
|
PaperSave IC G/L Account |
It returns the details for an Inter Company G/L account and includes the columns defined for an Inter Company G/L account in PaperSave. |
|
PaperSave IC Partners |
It returns the details for an Inter Company Partners and includes the columns defined for an Inter Company Partners in PaperSave. |
|
PaperSave Items |
It returns the details for an Item and includes the columns defined for the Items in PaperSave. |
|
PaperSave Job Details |
It returns the details for a job and includes the columns defined for a job in PaperSave. |
|
PaperSave Payment Journal |
It returns the details for payment journal and includes the columns defined for Payment journal in PaperSave. |
|
PaperSave Vendors |
It returns the details for vendor and includes the columns defined for vendor in PaperSave. |
|
PaperSave PI Association
|
It returns the documents which are related to the Purchase Invoice. It is used by PaperSave web application to get information for Interrelated documents such as document numbers of Purchase Order, Purchase Quotes, and Vendor. |
|
PaperSave PO Association
|
It returns the documents which are related to the Purchase Order. It is used by PaperSave web application to get information for Interrelated documents such as document numbers of Vendor, Purchase Quotes, Purchase Invoice, and Posted Purchase Invoice. |
|
PaperSave PO Header
|
This web service is used to create the Purchase Header() from PaperSave for Purchase Order. |
|
PaperSave PO Line
|
This web service is used to create the Purchase Line() from PaperSave for Purchase Order. |
|
PaperSave PQ Association
|
It returns the documents which are related to the Purchase Quote. It is used by PaperSave web application to get information for Interrelated documents such as document numbers of Purchase Order, Vendor, Purchase Invoice, and Posted Purchase Invoice. |
|
PaperSave Vendor Association
|
It returns the documents which are related to the Vendor. It is used by PaperSave web application to get information for Interrelated documents such as document numbers of Purchase Order, Purchase Quotes, Purchase Invoice and Posted Purchase Invoice. |
|
PaperSave Purchase Order
|
It returns the details for Purchase Order Header and includes the columns defined for Purchase Order in PaperSave (excluding the details for Purchase Order line). |
|
PaperSave Purchase Quote
|
It returns the details for Purchase Quote Header and includes the columns defined for Purchase Quote in PaperSave (excluding the details for Purchase Quote line). |
|
PaperSave Sales Invoice
|
It returns the details for Sales Invoice Header and includes the columns defined for Sales Invoice in PaperSave (excluding the details for Sales Invoice line). |
|
PaperSave Sales Order
|
It returns the details for Sales Order Header and includes the columns defined for Sales Order in PaperSave (excluding the details for Sales Order line). |
|
PaperSave Sales Quote
|
It returns the details for Sales Quote Header and includes the columns defined for Sales Quote in PaperSave (excluding the details for Sales Quote line). |