|
CustomEvent |
  
|
| Show/Hide Hidden Text |
|
CustomEvent |
|
| Show/Hide Hidden Text |
As the name of the activity itself indicates, CustomEvent allows you to create a custom event as per your requirement. Using this activity, you also have the facility to create a Custom Event by providing "PostScript" and "PreScript" where you can specify the JavaScript which can be used to perform the operation on the Item before and after an action is taken on the Item.
To use the CustomEvent you need to set the following Properties:
| 1. | Drag and drop the CustomEvent as shown below: |
 |
| Click on image to magnify/shrink |
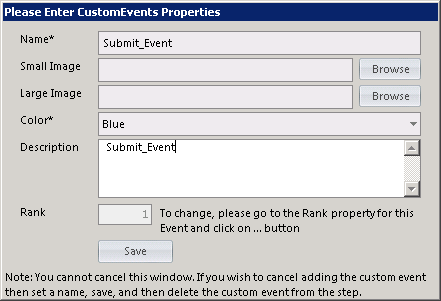
2. As soon as you drag and drop the CustomEvent from the toolbox into a step, a new window named Please Enter CustomEvents Properties window will open. Here you need to enter the details as mentioned below:
| • | Name: Enter the name of the CustomEvent. |
| • | Small Image: Browse the image to be displayed. The small image size for the event must be less or equal to 16 inches in height and width. |
| • | Large Image: Browse the image to be displayed. The large image size for the event must be less or equal to 32 inches in height and width. |
| • | Color: Choose the display color of the event from the drop down list. |
| • | Description: Provide a description of the event in the available textbox. |
| • | Rank: Assign rank to the event. (Incase of multiple Custom Events, the order of the Custom Events will be displayed based on its rank.) |
Note: |
If CustomEvent is dragged and dropped multiple times for the same Step Activity, then system will automatically calculate the rank as per the order of dragging. However you are allowed to change the rank of CustomEvent from the Properties section of StepActivity. Click here to know more about StepActivity. |
| • | Save: Click on Save button to save the event. |
3. As you save the event details, you will be directed to the main screen and there you will be able to view CustomEvent. Now double click on CustomEvent to view the properties panel.
 |
| Click on image to magnify/shrink |
4. You can view the Properties of CustomEvent in the right panel of the screen. Description of all the properties of CustomEvent is mentioned below:
| □ | Activity: |
| • | Name: You can view and modify the name of the Activity. |
| • | Description: You can write the description of the activity in the available textbox. |
| □ | Event Properties: |
| • | CommentRequired: If CommentRequired property is set as True then you will be forced to add the comment while approving, rejecting or executing any custom events from PaperSave Workflow, PaperSave Workflow Entry Viewer, PaperSave Workflow Item Review, PaperSave Web and PaperSave Mobile windows even if the prompt for comment from the respective windows is kept disabled. |
Note: |
CommentRequired Property can also be set at Approve and Reject Event while designing a Workflow. |
| □ | Properties: |
| • | ActivityDescription: You can modify the description as per your requirement. |
| • | DisplayName: Display Name of the event can be viewed and modified as per your requirement. |
| • | EventColor: You can select the color of the event from the drop-down list. |
| • | LargeImageName: You can click on Ellipses icon to modify the Large Image Name. |
| • | Rank: Rank of the event will be assigned as per its order of dragging. You are allowed to change the rank by clicking on the Ellipses icon. |
| • | SmallImageName: You can click on Ellipses icon to select the Small Image Name. |
| □ | Script: |
| • | PostScript: Script written at PostScript Event will be executed after the activity gets completed. |
| • | PreScript: Script written at PreScript Event will be executed before the activity gets started. |
 |
| Click on image to magnify/shrink |