|
CustomEventActivity |
  
|
| Show/Hide Hidden Text |
|
CustomEventActivity |
|
| Show/Hide Hidden Text |
As the name of the activity itself indicates, CustomEventActivity allows you to create a custom event as per your requirement. Using this activity can create a Custom Event by providing "PostScript" and "PreScript" where you can specify the JavaScript which can be used to perform the operation on the Item before and after an action is taken on the Item.
To use the CustomEventActivity you need to set the following Properties:
1. To create a State Activity drag an appropriate activity into the design area, then drag and drop the CustomEventActivity under an event after which you want the CustomEventActivity as shown below:
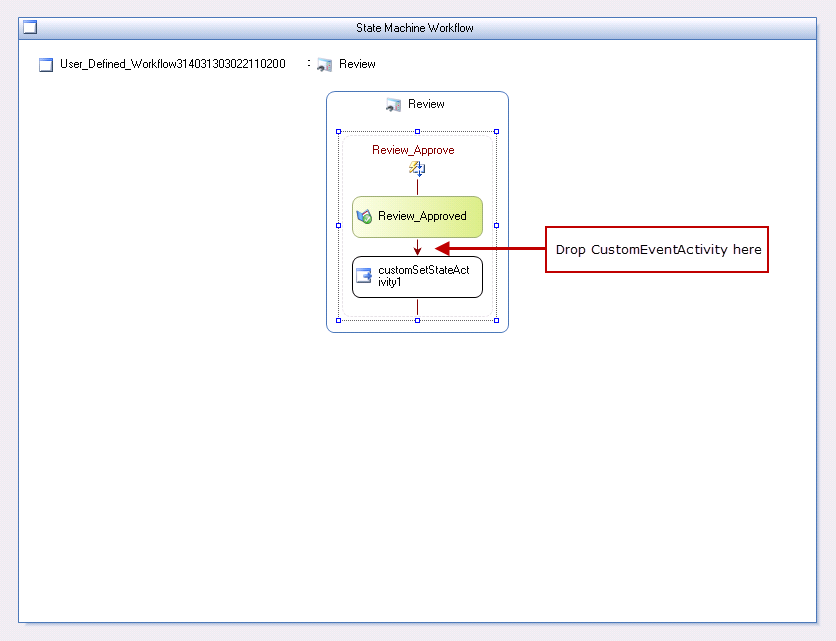
Click on image to view magnify and shrink print screen.
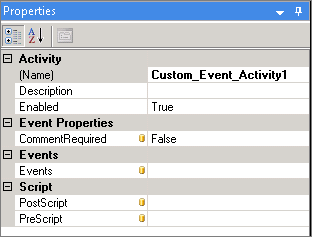
2. Description of the properties of the CustomEventActivity is mentioned below:
| □ | Activity: |
| • | Description: You can enter the description of the activity |
| • | Enabled: To enable this property select True from the drop-down list |
| □ | Event Properties: |
| • | CommentRequired: If CommentRequired property is set as True then you will be forced to add the comment while approving, rejecting or executing any custom events from PaperSave Workflow, PaperSave Workflow Entry Viewer, PaperSave Workflow Item Review, PaperSave Web and PaperSave Mobile windows even if the prompt for comment from the respective windows is kept disabled. |
Note: |
CommentRequired Property can also be set at Approve and Reject Event while designing a Workflow. |
| □ | Events: |
| • | Events: As you click on Ellipses icon, Custom Events window will open. Description of Custom Event property is mentioned in point no.3. |
| □ | Script: |
| • | PostScript: Script written at PostScript Event will be executed after the activity gets completed. |
| • | PreScript: Script written at PreScript Event will be executed before the activity gets started. |
3. Click on Add button and provide the following details:
| • | Name: Type the name of the event. |
| • | Display Name: Type the name to be displayed. |
| • | Small Image: Browse the image to be displayed. The small image size for the event must be less or equal to 16 inches in height and width. |
| • | Large Image: Browse the image to be displayed. The large image size for the event must be less or equal to 32 inches in height and width. |
| • | Color: Choose the display color of the event. |
| • | Description: Provide a description of the event. |
 |
| Click on image to magnify/shrink |
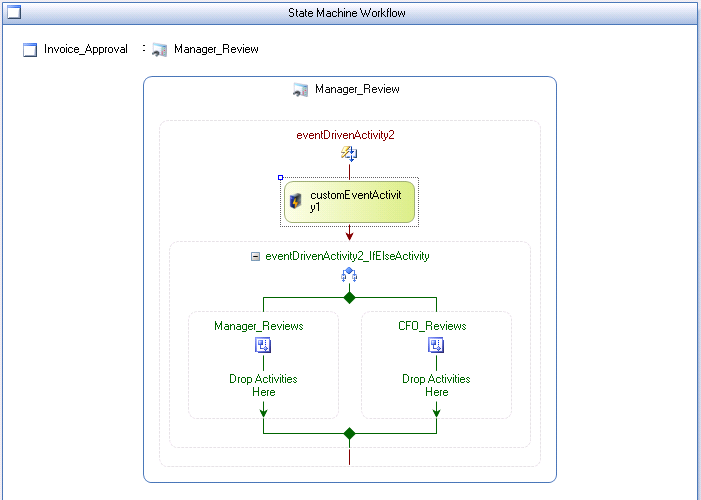
4. Once the required details are provided, click Save on the toolbar and click Close. The "Custom Event" branch will appear as shown below:
5. Similarly, you edit the events that are already created by selecting the appropriate events from the Name pane and clicking Edit on the toolbar. You can make the desired changes and click Update to save the changes made. You can also delete an event by selecting the appropriate event from the Name pane and clicking Delete on the toolbar.
6. After an event is created, an IfElseActivity will be created, this activity is used for adding other events and activities. For more information on the IfElseActivity, click here.
Example:
1. Use profile.CUSTOMEVENT_NAME:
If you want to add a check on the "Manager_Reviews CustomEvent" branch that will cancel the event if the profile field Vendor ID is blank, write the script on PreEvent of CustomEventActivity with Event Manager_Reviews and CFO_Reviews.
if (profile.CUSTOMEVENT_NAME=='Manager_Reviews' && profile.VendorID=='')
{
ScriptResult.CancelScript=true;
}
Note: |
This feature is applicable on the PaperSave Workflow, Workflow Entry Viewer, Workflow AutoEntry, Workflow Item Reviewer, PaperSave Web Workflow and Mobile Application. |
2. Assigning Workflow Parameter Values to Profile Fields.
String Workflow Parameter:
if(Parameters["PaperSave_Invoice_to_DataEntry_StringWorkFlowParameter"] == 'StringParameterValue')
{
profile.ptd_string_textbox = 'Parameter Field String Value Matched';
}
else
{
profile.ptd_string_textbox = 'Parameter Field String Value Not Matched';
}
3. Number Workflow Parameter:
if(Parameters["PaperSave_Invoice_to_DataEntry_NumberWorkFlowParameter"] != 0)
{
profile.ptd_number_textbox = 15;
}
if(Parameters["PaperSave_Invoice_to_DataEntry_DateWorkFlowParameter"] != '01/01/2011')
{
profile.ptd_date_datebox = '12/12/2012';
}
In the above code "PaperSave_Invoice_to_DataEntry_DateWorkFlowParameter" is the name of the workflow and "ptd_date_datebox" is the profile field.