|
For Windows Based Applications |
  
|
| Show/Hide Hidden Text |
|
For Windows Based Applications |
|
| Show/Hide Hidden Text |
The Quick Access Toolbar is a customizable toolbar that contains a set of commands that are independent of the tab that is currently displayed. You can move the Quick Access Toolbar from one of the two possible locations i.e. above the ribbon or below the ribbon, and you can add buttons/groups that represent commands to the Quick Access Toolbar.
Notes: |
||||||||||
|
For PaperSave Windows based Application, Quick Access Toolbar is available in all the applications.
Getting familiar to Quick Access Toolbar:
Add a command/group of commands to Quick Access Toolbar:
You can add a command/group of commands to Quick Access Toolbar by following below given steps:
1. On the Ribbon, click the appropriate tab to display the command that you want to add to the Quick Access Toolbar as shown below:
 |
| Click on image to magnify/shrink |
2. Right click the command/group, and then click Add to Quick Access Toolbar on the shortcut menu as displayed below:
 |
| Click on image to magnify/shrink |
3. You should see the respective command/group of commands gets added to the Quick Access Toolbar as displayed below.
 |
| Click on image to magnify/shrink |
Remove a command/group of commands from the Quick Access Toolbar:
1. Right click the command you want to remove from the Quick Access Toolbar, and then click Remove from Quick Access Toolbar on the shortcut menu as displayed below:
Notes: |
You can only remove one command at a time from the toolbar. Moreover, if you have added whole group to Quick Access Toolbar then you would be able to remove whole group from the toolbar and not the individual commands under it. |
 |
| Click on image to magnify/shrink |
Move the Quick Access Toolbar:
The Quick Access Toolbar can be located in one of two places:
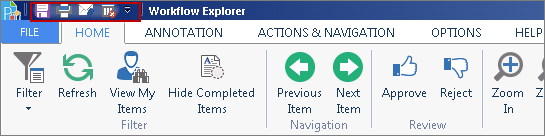
| • | Upper-left corner next to the icon for a PaperSave Application, for example, next to the PaperSave Workflow icon (default location) as displayed below: |
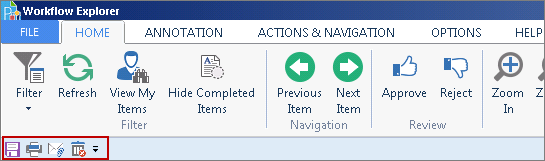
| • | Below the Ribbon, which is part of the PaperSave Fluent user interface as displayed below: |
If you don't want the Quick Access Toolbar to be displayed in its current location, you can move it to the other location. If you find that the default location next to the program icon is too far from your work area to be convenient, you might want to move it closer to your work area. The location below the Ribbon encroaches on the work area. Therefore, if you want to maximize the work area, you might want to keep the Quick Access Toolbar in its default location.
1. Click Customize Quick Access Toolbar icon as displayed below:
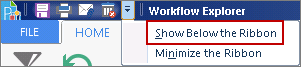
2. In the list, click Show Below the Ribbon or Show Above the Ribbon to set the location of Quick Access Toolbar.