|
Options Tab - Workflow Entry Viewer |
  
|
| Show/Hide Hidden Text |
|
Options Tab - Workflow Entry Viewer |
|
| Show/Hide Hidden Text |
This Options tab provides options to configure various annotation settings, manage views of the display, and many other tasks. All the options available in this tab are discussed below.
 |
| Click on image to magnify/shrink |
View Group:
1. Apply: This option is used to apply a saved view.
2. Save: This option is used to save a view. A view is the grouping you have done by dragging the column header of the grid to display documents in the group. The changes in the grid, like change in the column size, filter, grouping and or sorting will also be saved.
3. Delete: This option is used to delete an already created view.
4. Reset: This option is used to reset if any views are applied to the current grid.
Grid Options Group:
1. Show Groupings: This option will display the grouping bar on the top of the grid. You can group columns by dragging the header of the column to this bar.
Note: |
Show Groupings filter will only work when the selected Page Size is either ALL or if the number of Workflow Items in the grid is less than the currently selected Page Size. |
 |
| Click on image to magnify/shrink |
2. Show Filters: This option will Show/Hide the filters for each column on the top of the document list in the grid.
 |
| Click on image to magnify/shrink |
3. Set Columns: This option is used to Show/Hide the columns to be displayed. You can show the column by selecting the appropriate check box of the column in the Set Columns dialog box. Similarly, to hide the column, uncheck the appropriate check box of the column in the Set Columns dialog box.
| • | For Workflow 1.0: |
You will be able to view below displayed screen if the selected Workflow Type is 1.0.
 |
| Click on image to magnify/shrink |
| • | For Workflow 2.0: |
You will be able to view below displayed screen if the selected Workflow Type is 2.0.
 |
| Click on image to magnify/shrink |
Options Group:
1. Remember Layout: If you have made any changes to the layout of the window i.e. adjusted the position of various panes, then clicking this option will display the same layout when you open the application in the future saving you time with adjusting those panes again.
2. Prompt for Comment: Selecting this option will prompt you to add a comment whenever a document is "Approved" or "Rejected."
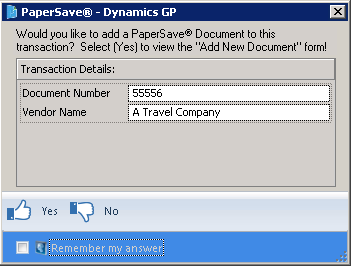
3. Prompt to Add Document: In case this button is enabled, you will be asked to associate and add a document to a host application record when you open and save a record of a Host Application such as shown below:
4. Auto Save: If this button is enabled, you will not be asked to save the changes. If this button is not enabled, you will be asked to save the changes.
5. Workflow User: As you click on Workflow User option, Workflow User window will open. You can view the Workflow User details in the below displayed screen. Click here to know more about Workflow User.
 |
| Click on image to magnify/shrink |
6. Export: This option is used to export the document list displayed in the grid to an Excel file.
7. Show All Comments: This icon represents Show All Comments. This option can be used to view all the comments added for the selected Workflow Item in the grid.
8. Show Hidden Fields: This icon represents Show Hidden Fields. This option can be used to view all the hidden profile fields for the selected Workflow Item in the grid.
Note: |
Show Hidden Fields option will only get enabled for Workflow 2.0. |
9. Audit Trail: This option is used to view Audit Log Details for the selected Workflow Item. Click here to know more about Audit Trail.
10. Save Workflow History: This option is used to save workflow history in an HTML file.
Note: |
||||
|
11. Change Owner: This option will only get enabled if the selected Workflow type is Workflow 2.0. This option is used to change the current owner of the step. Select the document whose owner need to be changed and click on Change Owner button. As you click on Change Owner button, Select Owner window will open as displayed below. You can double click on a particular Workflow User and change the current owner of the step.
Note: |
A Workflow Super User or a Workflow Admin or the Current Owner of the Workflow Item will only be allowed to change the Owner of the selected Workflow Item. |
 |
| Click on image to magnify/shrink |
Template Group:
1. Add Current Profile as Template: This option will add the current profile fields of the Document Type along with its values as a template. You can create myriad templates. There are also two types of templates: Global Template is a template that is visible to all users and the Local Template is the template that is visible for those who create the template.
2. Edit User Templates: This option is used to edit the Global Templates along with the templates created by you using the PaperSave Workflow.
Drag & Drop Group:
Reset Drag & Drop Default Submission: This button allows you to reset the Default Submission Type during drag & drop. You need to deselect Reset Drag & Drop Default Submission button to view Submission Type window while you drag & drop the items in the Workflow.