| Show/Hide Hidden Text |
Introduction
This topic talks about the manual steps you may require to follow to configure PaperSave for BBCRM.
Note: |
Please take a note that the manual steps provided in this topic considers that PaperSave is hosted on premise with PaperSave version 6.0 SP1 build#25. |
Integration Instructions
Please follow the instructions as described below:
Step 1: Click here to download the PaperSaveIntegration.zip file. Extract and unblock the file if blocked by right clicking on it and you should see following binaries:
• Blackbaud.AppFx.WebAPI.dll
• PaperSaveCatalogSP1b24.dll
• CRMDatabaseScript.sql
• PaperSave.HostIntegrations.BBeCRM.Branding.dll
• PaperSave.HostIntegrations.BBeCRM.Client.dll
• PaperSave.HostIntegrations.BBeCRM.WebBatchIntegration.dll
• PaperSaveCustomAction.html
• PaperSaveIntegration.js
• Queries to be run after running CRMDatabaseScript.txt
• PaperSaveBBCRMSQLCLR.dll
• SQLScript.sql
Thereafter, put the binaries in the path as directed below:
Note: |
You need to put the binaries in the Custom folder if BBCRM is hosted on Blackbaud Hosted Environment or if you wish to have all the customizations done on the custom folder and not on the default paths. |
If Custom Folder exists, then put the binaries as follows:
bbappfx\vroot\browser\clientbin\custom\
a) PaperSave.HostIntegrations.BBeCRM.Client.dll
b) Blackbaud.AppFx.WebAPI.dll
bbappfx\vroot\bin\custom
a) PaperSave.HostIntegrations.BBeCRM.Branding.dll
b) PaperSave.HostIntegrations.BBeCRM.WebBatchIntegration.dll
c) PaperSave.HostIntegrations.BBeCRM.Client.dll
bbappfx\vroot\bin\
a) PaperSave.HostIntegrations.BBeCRM.Client.dll
b) PaperSaveCatalogSP1b24.dll
Note: |
Please take a note that you will have to deploy catalog.dll file ONLY if BBCRM is hosted on Blackbaud and follow the relevant steps described below under Step 2. |
bbappfx\vroot\browser\ htmlforms \custom
a) Here, at this path create a folder named PaperSave
b) Then, copy PaperSaveCustomAction.html and PaperSaveIntegration.js within this PaperSave folder.
If Custom Folder does NOT exist, then put the binaries as follows:
bbappfx\vroot\browser\clientbin
a) PaperSave.HostIntegrations.BBeCRM.Client.dll
b) Blackbaud.AppFx.WebAPI.dll
bbappfx\vroot\bin
a) PaperSave.HostIntegrations.BBeCRM.Branding.dll
b) PaperSave.HostIntegrations.BBeCRM.WebBatchIntegration.dll
c) PaperSave.HostIntegrations.BBeCRM.Client.dll
d) PaperSaveCatalogSP1b24.dll
Note: |
Please take a note that you will have to deploy catalog.dll file ONLY if BBCRM is hosted on Blackbaud and follow the relevant steps described below under Step 2. |
bbappfx\vroot\browser\ htmlforms
a) PaperSaveCustomAction.html
b) Create folder PaperSave at this path and then put PaperSaveIntegration.js in it.
Step 2: Open Web BBCRM application>> Administration>> Application>> Catalog Browser
a. Select Table in Type dropdown and PaperSaveCatalogSP1b24.dll in Source dropdown and then click on Apply. List of modules will appear. Load all these modules one by one as mentioned in below screenshot.
b. Select Data List in Type dropdown and PaperSaveCatalogSP1b24.dll in Source dropdown and then click on Apply. List of modules will appear. Load all these modules one by one as mentioned in below screenshot.
Note: |
After loading all the Data List, you will have configure the security roles for each data list as described further under Configuring Security Roles section. |
c. Select Functional Area in Type dropdown and PaperSaveCatalogSP1b24.dll in Source dropdown and then click on Apply. One module will appear. Load this module as mentioned in below screenshot.
d. Select Task in Type dropdown and PaperSaveCatalogSP1b24.dll in source dropdown and then click on Apply. List of modules will appear. Load all the modules one by one as mentioned in below screenshot.
e. Select Package in Type dropdown and PaperSaveCatalogSP1b24.dll in source dropdown and then click on Apply. List of modules will appear. Load only those modules that have PaperSave Web Integration as suffix as mentioned in below screenshot.
f. Select Batch Type Extension in Type dropdown and PaperSaveCatalogSP1b24.dll in source dropdown and then click on Apply. Two modules will appear. Load both the modules one by one as mentioned in below screenshot.
Step 3: Execute CRMDatabaseScript.sql script that exist in PaperSaveIntegration.zip package you downloaded in Step1 against BBCRM Database from the SQL Server Management Studio.
In SQL Script you will find following highlighted values, needs to be replaced with:
- [PSROOTURLREPLACER] – Replace this with PaperSave Application Server URL. Ex (https://ServerName:PortNumber). You can find this from PaperSave Start. aspx page.
- [PSCOMPANYNAMEREPLACER] – Replace this as SQLSERVERNAME\INSTANCE.BBCRMDatabase format, Ex. (HPSDEV45\BBCRM.BBInfinity). If BBCRM server not installed on particular instance then use SQLSERVERNAME\BBCRMDatabase format, Ex. (HPSDEV45.BBInfinity).
- [PSWEBMODULEURLREPLACER] – Replace this with PaperSave Web Module URL. Ex. (https://ServerName:PortNumber/PaperSave.WebModule)
Step 4: Run below queries against BBCRM database hosting the tenant after replacing the placeholder values in following queries with the values as mentioned in Note section followed by the queries.
Update USR_PAPERSAVE_CONFIG set CONFIGVALUE='<PaperSaveAppServerURL>' where CONFIGNAME='PaperSaveRootURL';
Update USR_PAPERSAVE_CONFIG set CONFIGVALUE='<SQLServerInstanceName>.<CompanyDBName>' where CONFIGNAME='PaperSaveCompanyName';
Update USR_PAPERSAVE_CONFIG set CONFIGVALUE='120' where CONFIGNAME='ElapsedTimeOut';
Update USR_PAPERSAVE_CONFIG set CONFIGVALUE='<PaperSaveWebModuleURL>' where CONFIGNAME='PSWebModuleURL';
Note: |
Please make sure that you replace the placeholder values in above the queries as described below: |
• <PaperSaveAppServerURL> denotes the PaperSave Application Server root URL.
For example; https://ServerName:PortNumber
• <SQLServerInstanceName>.<CompanyDBName> where <SQLServerInstanceName> denotes the SQL server instance name (should be a machine name instead of local or localhost or.) and <CompanyDBName> denotes the company’s DB name for BBeCRM.
For example; instancename.BBInfinity
• <PaperSaveWebModuleURL> denotes the PaperSave Web Module base URL.
For example https://ServerName:PortNumber/PaperSave.WebModule
Step 5:
- SQL Script: Locate PaperSaveBBCRMSQLCLR.dll from the folder that you have downloaded and copy the file to local drive. Now, open SQLScript.SQL file in an editable mode and update the path of PaperSaveBBCRMSQLCLR.dll in the SQL file. Replace [PSSQLCLRDLLREPLACER] with Path of file PaperSaveBBCRMSQLCLR.dll. Ex (C:\PaperSaveBBCRMSQLCLR.dll).
- Replace [BLACKBUADCRMDATABASEREPLACER] with BBCRM Database Name.
- Connect to SQL Server Management Studio where BBCRM Database is hosted and execute this .SQL file against this database.
Note: |
As we are registering, assemblies with EXTERNAL_ACCESS, below permissions need to be set for the user who will be executing the above .sql file. You can refer the below article to know more on SQLCLR Permissions. |
https://msdn.microsoft.com/en-us/library/aa833413%28v=vs.100%29.aspx#SQLCLRPermissions
| • | db_DDLAdmin - this permission grants CREATE and ALTER permissions for the assemblies and objects types that you deploy |
| • | database-level VIEW DEFINITION - required in order to deploy |
| • | database-level CONNECT - grants the ability to connect to the database |
In addition, you must also have:
| • | The login that you use to deploy must have the External Access Assembly server permission. |
Step 6: Configure the PaperSave Company manually from the PaperSave Settings and make sure that you place the same company name you gave in the above ‘PaperSaveCompanyName’ configuration value in the Company’s BBCRM database.
a. Browse the PaperSave application server URL
b. Click on PaperSave settings and it will prompt you to install it on your box. Click on Install button. It will prompt you to enter the password to open PaperSave settings. Use papersave as the password.
c. Once PaperSave Settings gets open, go to Company section, and ‘Add’ a company with required details. Click on Test before updating the Company and ensure that the Successful message comes on testing Data Access Service test. See below screenshot for reference:
| • | Company Name – Put the company name same as the name used in Step 4 second query i.e. <SQLServerInstanceName>.<CompanyDBName> |
| • | Server Name – SQL Server name hosting the Blackbaud database |
| • | Authentication – Windows or SQL Authentication (For SQL Authentication Mode, you will have to provide SQL User’s Credentials who has the rights on BBCRM’s Database. |
| • | Database Name – Enter the Blackbaud CRM Database Name. |
Sign off and then Sign in again in BBCRM web application and you should be able to use PaperSave.
Data Lists
Please make sure that BBCRM Users have rights on below mentioned Data List:
Note: |
Please refer Configuring Security Roles section described further to get the steps to assign permissions and tasks to the System Roles. |
Data List Id |
Data List Name |
ABCD7BB7-B68F-4C51-9823-08694D8F06C6 |
PaperSave.BBeCRM.PaperSaveConfigDataList |
041A7E07-6AFB-432A-91F3-58AC2B744529 |
PaperSave.BBeCRM.DeleteCommitedBatchMappings |
2EC1C71D-EB76-4689-8471-2D29F476E9DA |
PaperSave.BBeCRM.PaperSaveGetAllDataLists |
627EE2D6-AAB0-49F7-9D9C-2F72518C5BF8 |
PaperSave.BBeCRM.PaperSaveRevenueBatchDataList |
5c9323c9-f88d-4e2c-a3c4-d61bde54625a |
PaperSave.BBeCRM.Records.Constituent |
b0457c68-8b3c-4c14-ad41-68d40d586961 |
PaperSave.BBeCRM.Records.Event |
005A5EA0-012C-4FB9-923D-58A12CCB802B |
PaperSave.BBeCRM.Records.Membership |
4421158d-1140-4e05-b218-c5822e04a9e3 |
PaperSave.BBeCRM.Records.Prospect |
e58acb7a-13cf-4ba8-9e8b-2900965997be |
PaperSave.BBeCRM.Records.Purpose |
29357b9e-dabb-4c38-8d01-c793b3446c4b |
PaperSave.BBeCRM.Records.Volunteer |
8e8de31d-7488-463b-9387-1a49baaf9eb3 |
PaperSave.BBeCRM.Transactions.Interaction |
a693fe78-a07e-4211-95d7-d87cf89986c7 |
PaperSave.BBeCRM.Transactions.NamingOpportunity |
AE465248-ABDF-4F5A-9DB3-F8AEC5C9F3E2 |
PaperSave.BBeCRM.Transactions.Revenue |
Configuring Security Roles
Please follow the steps described below to assign permissions and tasks to System Roles for non-admin users of Blackbaud CRM:
Note: |
Please take a note that you will have to repeat the steps 1 to 3 for all the data lists. |
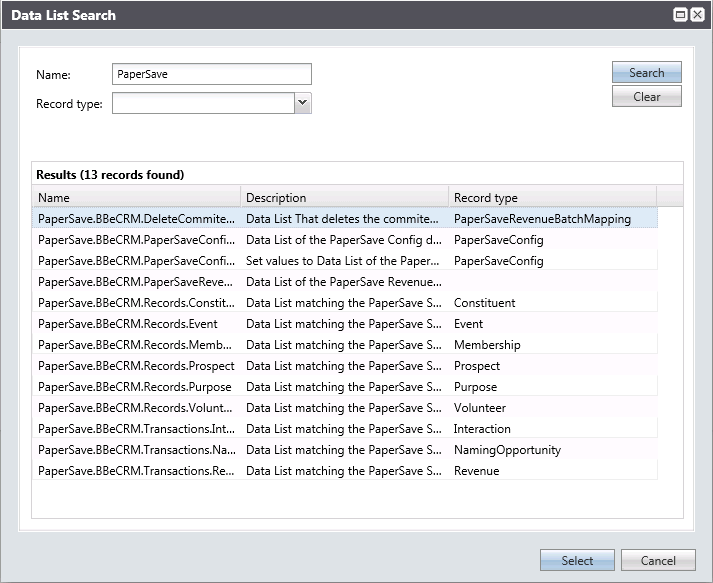
1. Open Blackbaud CRM Application>> Expand Administration Menu>> Click on Application option>> Click on Features option>> Click on Data List Search under Features. Data List Search form will open as displayed. Search for PaperSave Data List. Select any PaperSave Data List and click on Select button.
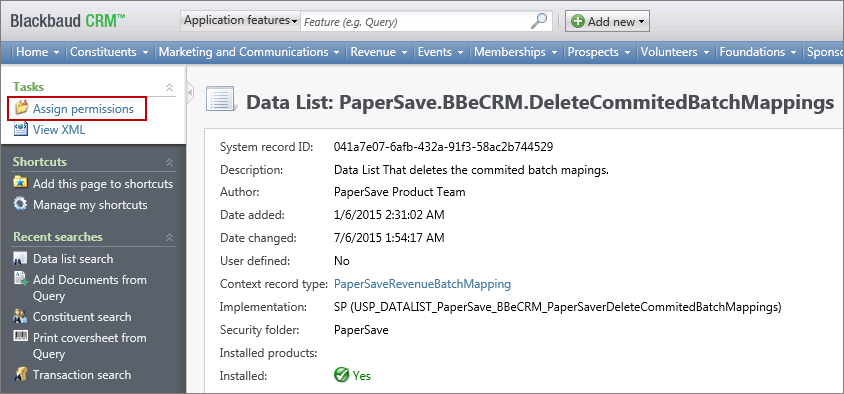
2. You should see following window for the selected Data List. Now, click on Assign Permissions button displayed on the left panel.
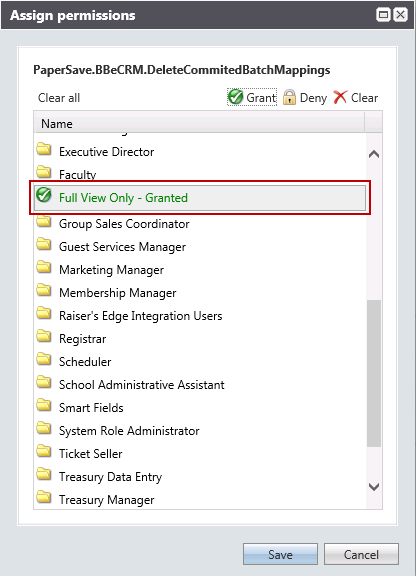
3. Assign Permissions form will open as follows. You should see list of Roles in the grid. Locate Full View Only Role and click on Grant button to grant the permission. Once the permission is granted, color of the Role will change to green as displayed below. Click on “Save” button to save and exit the window.
Note: |
If you are unable to find “Full View Only” role in the grid, then you can add the role from, Administration>> Security>> System Roles>> Click on Add button>> Enter Full View Only in the available text-box and save the role. |
Following steps, talks about the steps required to assign tasks for the selected Role.
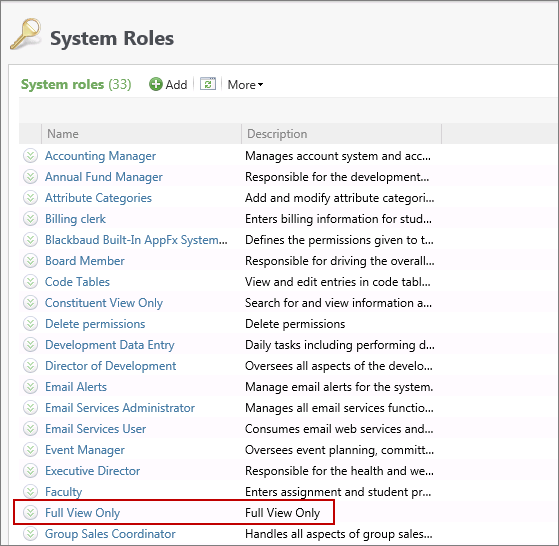
4. Expand Administration drop-down menu>> Select Security Option>> Click on System Roles option. Below displayed window will open. Click on “Full View Only” Role and then, click on Assign tasks button.
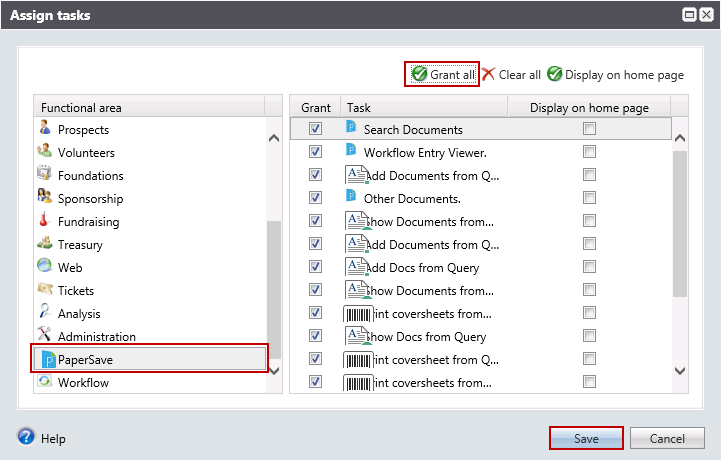
5. Following window will open. Locate PaperSave and click on Grant All button to assign all the tasks for the selected Role and click on “Save” button to save and exit the window.
Configuration for Batch Committing Process
PaperSave gives you an ability to add a PaperSave User who will be responsible for communicating with PaperSave while committing a Batch in BBeCRM. The user added here will be used under Change Parent ID functionality when Revenue batch commit process is done from BBeCRM. This user will be responsible for association of documents when revenue batch gets committed. Please take a note that the user added here must be a PaperSave Workflow User.
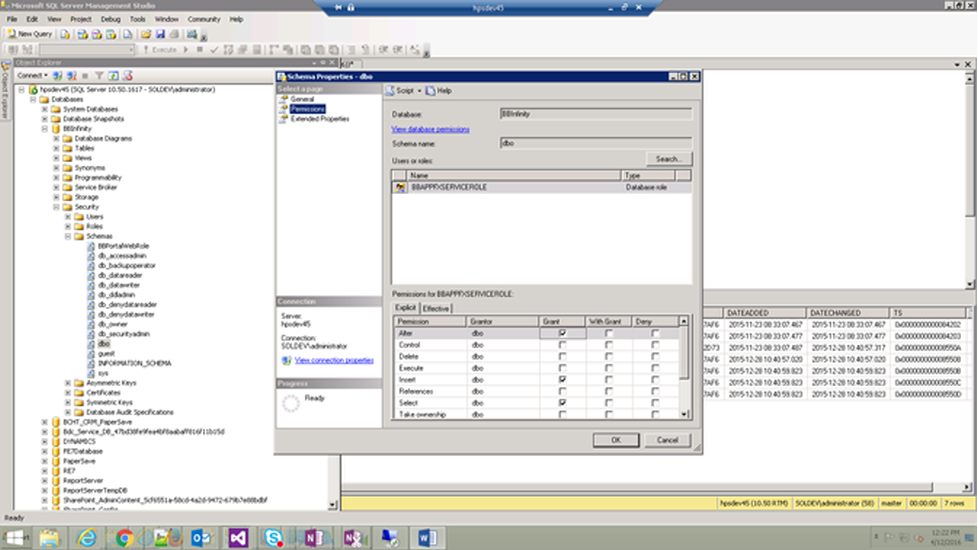
Please take a note that the schema, which is used for execution of SQL under part of SQL Server standards, has Alter, Select and Insert rights. To give rights go to SQL Server Management Studio>> Connect to instance where BBCRM Database is located>> Expand Database Node>> Expand Security Node>> Expand Schemas Node>> Locate the schema which was used to execute SQL commands against BBCRM Database>> Double click on the Schema. Schema Properties window will open. Select Permissions page from the left panel and in the bottom right panel, you should see the table for assigning permissions. Here, you will have to check the check box for Alter, Insert and Select under Grant column. Click on OK button to save the changes and exit the window.
Configuration option is available under PaperSave Menu within Blackbaud CRM Application as displayed below. This option allows you to set the user who will be responsible for association of documents when revenue or membership batch gets committed. Please take a note that the user added here must be a PaperSaveCloudTM User or a PaperSave Workflow User.

Before you click on Configuration you will have to add another 3 rows with following SQL commands in table USR_PAPERSAVE_CONFIG in BBCRM Database:
Note: Users have [Domain\Username] convention in organization.
In following queries we used @ID. You will find values for @ID in USR_PAPERSAVE_CONFIG table under BBCRM database. Execute this query - select * from USR_PAPERSAVE_CONFIG. You can use values either under ADDEDBYID or under CHANGEBYID
- Insert into USR_PAPERSAVE_CONFIG(CONFIGNAME,CONFIGVALUE,ADDEDBYID,CHANGEDBYID,DATEADDED,DATECHANGED) VALUES ('PaperSaveDomainName','[PAPERSAVEDOMAINNAMEREPLACER]',@ID,@ID,GETDATE(),GETDATE()) – Here [PAPERSAVEDOMAINNAMEREPLACER] needs to be replaced with Domain value.
- Insert into USR_PAPERSAVE_CONFIG(CONFIGNAME,CONFIGVALUE,ADDEDBYID,CHANGEDBYID,DATEADDED,DATECHANGED) VALUES ('PaperSaveUserName','[PAPERSAVEUSERNAMEREPLACER]',@ID,@ID,GETDATE(),GETDATE()) – Here [PAPERSAVEUSERNAMEREPLACER] needs to be replaced with Username value.
- Insert into USR_PAPERSAVE_CONFIG(CONFIGNAME,CONFIGVALUE,ADDEDBYID,CHANGEDBYID,DATEADDED,DATECHANGED) VALUES ('PaperSaveUserPassword','[PAPERSAVEUSERPASSWORDREPLACER]',@ID,@ID,GETDATE(),GETDATE()) – In this case you cannot directly replace [PAPERSAVEUSERPASSWORDREPLACER] with Password you want instead you can execute this command - Insert into USR_PAPERSAVE_CONFIG(CONFIGNAME,CONFIGVALUE,ADDEDBYID,CHANGEDBYID,DATEADDED,DATECHANGED) VALUES ('PaperSaveUserPassword','',@ID,@ID,GETDATE(),GETDATE())
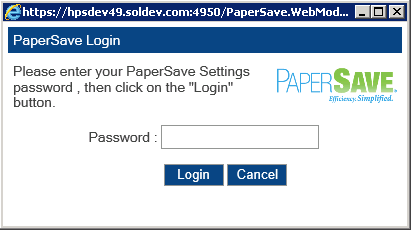
On Selecting Configuration option, following prompt will open asking you to enter PaperSave Settings password. Enter the password and click on Login button.
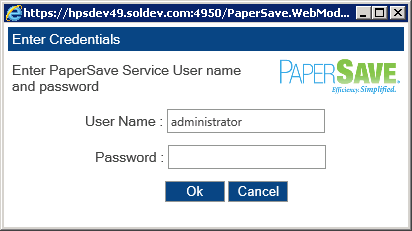
Thereafter, you will be asked to enter PaperSave Service User Name and Password in the respective text-box. Click OK to save the credentials and exit the window.
