|
Document Explorer |
  
|
| Show/Hide Hidden Text |
|
Document Explorer |
|
| Show/Hide Hidden Text |
Document Explorer:
Document Explorer user interface gives you the ability to view all the documents associated with the records.
Open Host Application (here, Student Information System) and select appropriate Transaction Type. Then navigate to the record for which PaperSave Document exists. Click on Show Documents button. Document Explorer window will open as below.
Note: |
If only one document is associated to the selected record, then PaperSave will open the document directly in the Document Display user interface, instead of PaperSave Document Explorer window. |
Following is the description of all the panels in the Document Explorer user interface.
1. Ribbon: You can view various options in the ribbon under different tabs for managing the documents.
2. Document Type Pane: You can view all the Document Types for the current Transaction Type with the total no. of records for each Document Type.
3. Record Grid: You can view the list of all the records available for the selected Document Type.
4. Paging Grid: Paging grid allows you to view the list of records in the Document Grid as per your selection. You can select the Page Size ranging from 50 to 200 or else you can view all records at once by selecting ALL from the drop-down list. You are allowed to navigate to First, Previous, Next and or Last Page based on the available no. of records by clicking on the respective icons. Right side of the Paging Strip shows you the no. of selected record out of total no. of records available in the Record Grid.
Note: |
PaperSave will save the last Page Size (except ALL) set by the logged-in user and reflect the same value when the respective user opens the window next time in future. |
 |
| Click on image to magnify/shrink |
Working with Document Explorer:
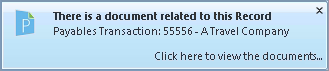
When opening the record, if a document is associated but not directly linked to the transaction you are opening, a notification as displayed below will appear stating that "There is a document related to this Record". Double-clicking on this notification will give you access to the list of associated documents.
Document Explorer window will open as below. The Document Types panel displayed in the left side of the window will give you further information about the records. You have the ability to select particular Document Type and view the list of documents that exists for that particular Document Type.
To open a specific file, simply double-click on the File Name and it will open the file in Document Display window. To view multiple documents in Document Display window, select the documents by checking check-box and click on Open Selected button. Multiple Document Display window will open. You can navigate to previous or next document by using Navigation buttons viz; Previous Document and or Next Document.
 |
| Click on image to magnify/shrink |
Adding Documents using Document Explorer interface:
| □ | One way to add documents from Document Explorer interface is using Add Document button available in the ribbon. Clicking on Add Document button, Add New PaperSave Document window will open. You can choose a method to add new document. Click here to know more. |
| □ | The other way to add document from Document Explorer interface is, using Drag & Drop. Drag and Drop can be done in the following three ways: |
1. Drag & Drop the documents directly from Microsoft Outlook, File Manager or from Desktop into the Document Explorer grid
2. Drag & Drop the documents from one Document Type to another Document Type within the same Document Explorer interface
Note: |
You are allowed to drag multiple documents at a time. However, to select multiple documents, keep the CTRL key (for non-consecutive selection) and or SHIFT key (for consecutive selection) pressed and select the documents. Please make sure that check box should not be checked during the selection. |
3. Drag & Drop the documents from one Document Type to another Document Type within the same Document Explorer interface
Note: |
You are allowed to drag multiple documents at a time. However, to select multiple documents, keep the CTRL key (for non-consecutive selection) and or SHIFT key (for consecutive selection) pressed and select the documents. Please make sure that check box should not be checked during the selection. |
| □ | Following is the procedure to drag & drop documents from one document explorer to another and also from one Document Type to another Document Type within the same Document Explorer window: |
| • | Click on a document to select. |
| • | Drag the document to another Document Explorer or Document Type and drop it. (Check box should not be checked.) |
| • | To select multiple documents, keep the ctrl key (for non-consecutive selection, and press the shift key for consecutive selection) pressed and select the documents. |
| • | The documents will be copied and not cut. |
Note: |
||||||||||
|
Note: |
||
While running Student Information System in an elevated mode (Run as Administrator), if you are unable to Drag & Drop the files in Document Explorer then you need to follow below steps:
|