|
ScanNow |
  
|
| Show/Hide Hidden Text |
|
ScanNow |
|
| Show/Hide Hidden Text |
ScanNow:
ScanNow functionality gives you the ability to scan documents directly to records. Please follow the below steps to add document to PaperSave using ScanNow.
1. Open PaperSave Add Document user interface from any Host Application (here, Student Information System).
2. Click on ScanNow button available in the ribbon.
 |
| Click on image to magnify/shrink |
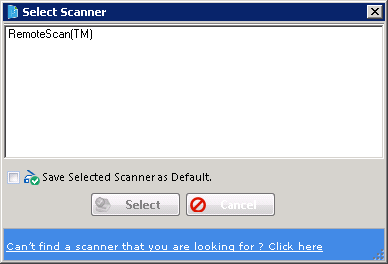
3. Select Scanner dialog box will open. Select the appropriate scanner. To make the selected Scanner as the default one, check 'Save Selected Scanner as Default' check-box. So, next time while performing ScanNow you will not be asked to select the Scanner from the list. However, you can reset the default scanner from ScanNow Settings window.
Note: |
If you are unable to view the desired Scanner in the list, it is recommended to click on the URL (Can't find a scanner that you are looking for? Click here) displayed at the bottom of the screen. Try doing this for three times and if still you do not find the scanner in the list, contact PaperSave Support Team. |
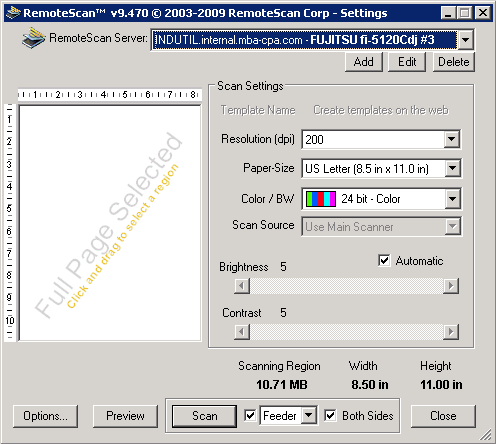
4. Click Select. The TWAIN driver window will open.
Note: |
Twain Driver dialog box will only appear if the Show the TWAIN driver window option is selected from PaperSave Run-Time window. |
5. You can make the necessary changes in the settings for the Resolution, Paper-Size, Color/BW, Scan Source, Brightness, Contrast, and other options.
6. Click Scan to start scanning the documents.
7. The scanned documents will appear in the Document Display area of the window. Click Save and Exit to attach the document to the selected record and exit Add New PaperSave Document window.
 |
| Click on image to magnify/shrink |
8. If you want to add more documents, click Save and New to save the current document and continue adding new document.
Click here to know about Scanner Recommendations.