|
Adding Documents in Web Workflow Entry Viewer Using Drag & Drop |
  
|
| Show/Hide Hidden Text |
|
Adding Documents in Web Workflow Entry Viewer Using Drag & Drop |
|
| Show/Hide Hidden Text |
PaperSave provides you the ability to add documents in Web Workflow Entry Viewer using Drag and Drop functionality. To add documents in Web Workflow Entry Viewer, you need to follow below mentioned steps:
1. Open Host Application, locate PaperSave Menu integrated within Host Application and select Workflow Entry Viewer option.
2. Workflow Entry Viewer window open as displayed below. Now select the Workflow/Workflow Queue as below:
For Workflow 1.0: Expand Workflow Queue drop-down, select the appropriate Transaction Type, Document Type, and Queue for which you want to add the document using drag & drop.
For Workflow 2.0: Expand Workflow drop-down, select the appropriate Transaction Type, Document Type, and Workflow for which you want to add the document using drag & drop.
 |
| Click on image to magnify/shrink |
3. After selecting the appropriate filters, you need to drag and drop the files that you want to add to PaperSave.
Note: |
||||
|
For Workflow 1.0:
| • | If the selected Workflow Type is 1.0, then system will ask you to select Workflow Queue and Workflow State from the respective drop-down list as displayed below. After selecting the appropriate option, click on Add to Workflow button. |

| • | You should see the following successful notification, once the document is successfully added. |

For Workflow 2.0:
There are 2 methods to add Workflow item to Workflow as mentioned below:
Method 1: Adding items directly to Workflow
Method 2: Adding items through a Drop Point
Note: |
Users having Workflow Super User rights or Workflow Admin rights or Workflow Submission rights should ONLY see below window while dragging and dropping the item. And only those users will be allowed to add the items either directly to Workflow or using Drop Point.
|
Description of each method is as follows:
Method 1: Adding items directly to Workflow
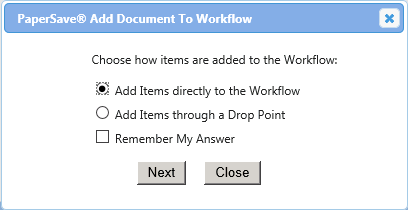
1. Drag & Drop the item in the Workflow grid. Below displayed prompt opens. You should see 2 options for adding the items. Select Add items directly to the Workflow option and click Next. You can check Remember My Answer checkbox if you want the system to remember this answer and you do not want to view this prompt again for the logged-in Workflow User. However, if you wish to view this prompt again and want to change your submission type, you can do it from Options tab of PaperSave Web Workflow Entry Viewer form by de-selecting Reset Drag & Drop Default Submission button.
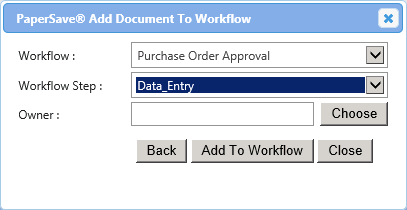
2. Then system will ask you to select Workflow and Workflow Step from the drop-down list. If you select Workflow Step from the drop-down list, then a new field named Owner will be displayed. You need to click Choose button to select the Workflow User.
Note: |
||||
|
3. Clicking on Choose button will open Select Owner page as displayed below. You need to double click on a particular user to select the user.
 |
| Click on image to magnify/shrink |
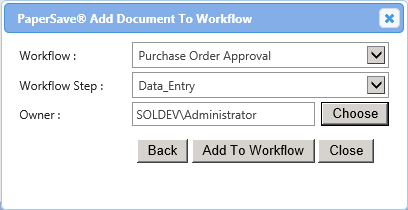
4. Thereafter, click on Add to Workflow button to add the document to the selected Workflow and exit the prompt. To go to previous step click Back. To exit without adding the document, click Close.
Method 2: Adding items through a Drop Point
1. Drag & Drop the item in the Workflow grid. Below displayed prompt opens. You should see 2 options for adding the items. Select Add items through a Drop Point option and click Next. You can check Remember My Answer checkbox if you want the system to remember this answer and you do not want to view this prompt again for the logged-in Workflow User. However, if you wish to view this prompt again and want to change your submission type, you can do it from Options tab of PaperSave Web Workflow Entry Viewer form by de-selecting Reset Drag & Drop Default Submission button.
Note: |
Please take a note of below given scenarios: 1. Users having only Drop Point submission rights should not see below window and system will directly display drop point selection window and add the item using Drop Point. 2. Users not having rights either on Workflow nor on Drop Points will not be allowed to add the items to the Workflow and they should see a message that says 'You are not authorized to add items into the Workflow'. |

2. Select the Drop Point and click on Add to Drop Point button. To go to previous step click Back. To exit without adding the document, click Close.
Note: |
You should NOT see the below prompt if only single Drop Point exists for the Workflow, and system will directly add the item to the Workflow without prompting the below prompt. |

4. Once the documents are successfully added, you should see below successful notification. This is how you can add documents using drag and drop functionality and thereafter you can perform the necessary actions by using different options available under Home, Annotations, Actions & Navigation and Options tab.