|
File Management (External Saving) |
  
|
| Show/Hide Hidden Text |
|
File Management (External Saving) |
|
| Show/Hide Hidden Text |
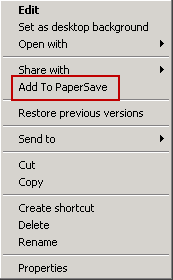
PaperSave gives you the ability to seamlessly add documents to PaperSave with a simple right click on any supported file type. This process of adding the documents is known as External Saving. To add a document using External Saving follow the below given steps:
1. Right-click on the documents supported by the PaperSave application. As you right click on the document, below displayed screen will open. You need to select Add to PaperSave option from the list of options.
2. As you select Add to PaperSave option, Choose the Record to associate to window will open as displayed below. Now you need to select Host Application (here, Dynamics GP) and its related Transaction Type from the left panel of the screen.
To search for a specific record, enter the search criteria under Contains text-box. You are allowed to enter multiple search values separated by semicolon (;) in the Contains text-box, then click on Search button. To reset the search fields, click on Reset button. To view all the records in the grid, click on Show All Records button. Right panel of the window displays the list of records for the selected Transaction Type.
Note: |
Please take a note that the sequence of the columns displayed in the panel is based on the Source Command's column sequence. Incase you may want to change the sequence of the columns, you will have to modify the column sequence from Source Command for the respective Transaction Type from PaperSave Settings. |
Moreover, you can click Show all Results on load for this transaction type button after selecting a transaction type from the tree structure, if you wish to view all the records whenever you next time load the same transaction type.
 |
| Click on image to magnify/shrink |
3. Selecting Workflow: You can add the selected documents to a Workflow by selecting the Document Type, Drop Points/ Workflow Queue (Queue option will only get enable if Workflow 1.0 exists for the selected Document Type) from the respective drop down list and click on Add To Workflow option. Selected document will be added to the selected Workflow and the window will get closed.
OR
The other way to add a document is, select the record and click on Select button. Add A New PaperSave Document window will open as displayed below. You can view the document in the Document Display Area in the middle panel of the window. If the selected document is Searchable PDF, then PaperSave gives you the ability to select and copy the text using ctrl+c and paste it. You can record the Profile Field values under Document Profile pane on the right side of the window. You will be able to view Submit to Workflow group in the toolbar (if Workflow exists for the selected Transaction Type). Select the Drop Point/ Workflow Queue from the drop-down list. Thereafter if you wish to add another document then click Save and New button or else click Save and Exit button to save the current document and exit the window. To know about other options available in the ribbon, click here.
 |
| Click on image to magnify/shrink |