|
Options |
  
|
| Show/Hide Hidden Text |
|
Options |
|
| Show/Hide Hidden Text |
The Options tab provides various options like, creating shortcuts for ScanLater or Workflow, selecting the option prompt for expected number of separators, and much more. You can even configure the scanner settings and choose to display the TWAIN driver window while scanning the documents with the following options.
 |
| Click on image to magnify/shrink |
Shortcuts Group:
Create Shortcut: This option allows you to create shortcuts for ScanLater, Queue and Workflow. Click here to know more.
Scanner Group:
1. Scanner Settings: This option allows you to configure scanner settings. Click here to know more.
2. Show the TWAIN Driver Window: Selecting this option will display the TWAIN driver window while scanning the document. Click here to know more.
Options Group:
1. Save Changes: This option allows you to save the Profile Field details for the selected stack.
2. Number of items processed in Parallel: This option will allow you to select the no. of items ranging from 1-25, that you wish to process in parallel.
3. Thumbnails View: This option gives you the facility to set the view of thumbnail as per your choice. There are 4 options available in the drop down list viz. Tiny, Small, Medium and Large.
4. Remember Layout: If you have made any changes to the layout of the window i.e. adjusted the position of various panes, then clicking this option will display the same layout when you open the application next time in the future and ultimately saving your time with adjusting those panes again.
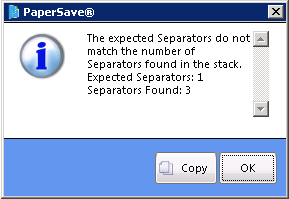
5. Verify Separators: This option is used to verify the number of separators when a document is added. If this option is selected, then whenever you add files it will ask for the expected number of separators and it will compare that with the actual number of separators found in the document. The expected number of separators and the actual number of separators found will be displayed in a dialogue box.
Example:
1. Select the Verify Separators option. After selecting the option will be displayed as  .
.
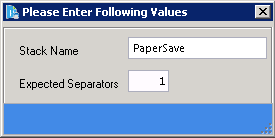
2. Then Click on Add From Scanner or Add From File to add a file.
3. Thereafter enter the expected number of separators in the Expected Separators box and click on OK button. (Here, we have entered "1").
4. If the expected number of separators provided here differs from the actual number of separators in the file, then the following message will be displayed.
6. Auto Save: If Auto Save state button is selected then it will automatically save the changes made to the Profile Fields and there is no need to click Save Changes button to save the Profile Field details.
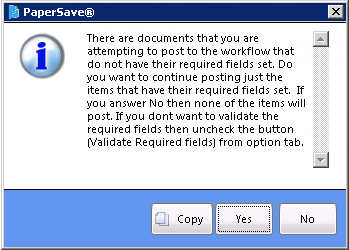
7. Validate Required Fields: If Validate Required Fields state button is selected then while posting the stack, system will validate if values for all the required Profile Fields is entered or not and you should see below message window if values are not entered for the Profile Fields.
Settings Group:
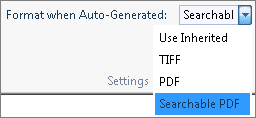
Format when Auto-Generated: This option will allow you to decide whether the tiff document should be converted into PDF or Searchable PDF by selecting appropriate option while posting. Default selection will be Searchable PDF. You can change the settings as per your requirement. Moreover, system will remember the Settings when you open PaperSave Scan for the next time.
Note: |
While adding documents using ScanLater from PaperSave Scan (PaperSave Capture), value selected from Output Setting drop down under Page Separations grid will override the Output Settings value set at Document Type level. |